Literally 4 ingredients and less than 15 minutes from start to finish. Woo!
This delicious meal with salmon, olive oil and hemp seeds gives you an incredibly nutritious meal that is high in protein, packed with heart, brain and skin healthy omega 3 fats, plus fibre and a whole slew of vitamins and minerals.
So if you need a simple week night meal that is quick to get on the table, allergy friendly, nutritious and delicious – this is your meal!
1 salmon fillet per person (we prefer skin on)
1 tsp lemon olive oil per fillet
1 tsp coconut aminos per fillet
1 tbsp hemp seeds per fillet
Lay the salmon on paper towel and pat it dry on both sides.
Mix together the oil and aminos and then place the salmon into the oil mix to coat the flesh surface.
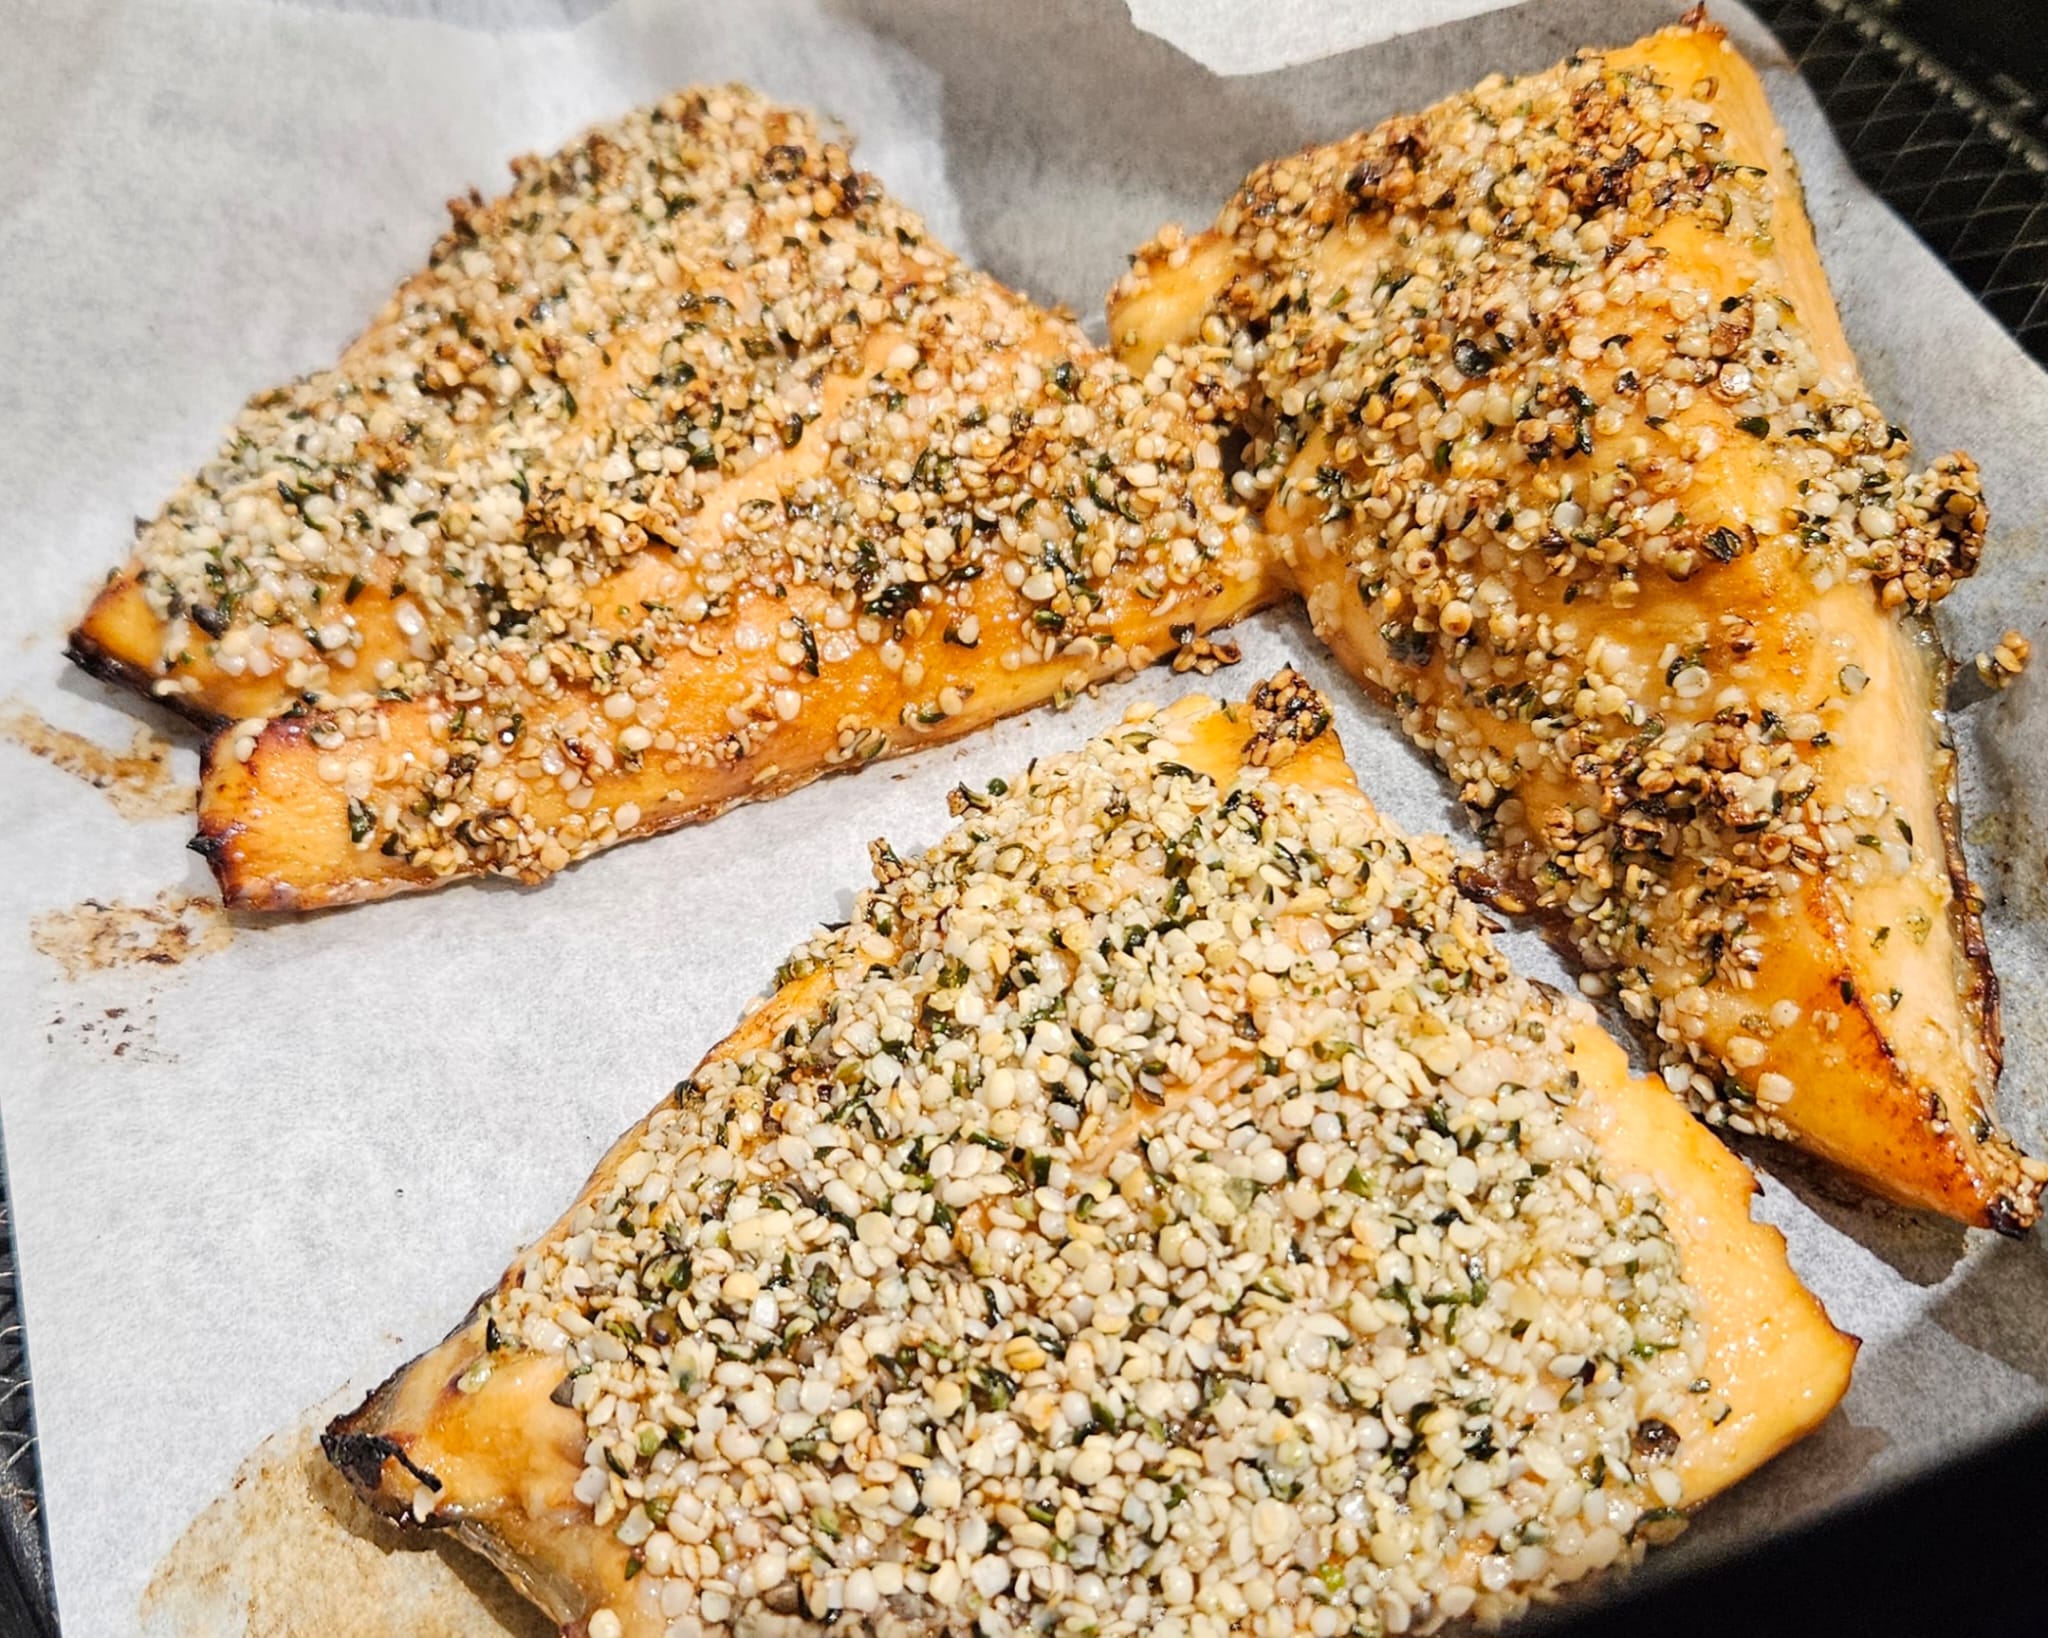
Then dip the salmon into the hemp seeds so that they stick well to the oil.
Place the salmon skin side down (seeds up) onto a hot baking tray and place into a 200C oven, and bake for about 12-14 minutes.
Have an air fryer? Cook in air fryer, skin side down, on 200C for 8 minutes.
Serve immediately with;
*a fresh crunchy salad,
*steamed greens,
*boiled baby potatoes,
*potato wedges,
*grilled corn on the cob, or
*a lentil salad.
Want a little extra zing? Drizzle the finished salmon with some chilli olive oil, or add chilli flakes to the oil mix at the start.
It’s 2024 and I swear that the grocery prices rise very time I go to the shop 💸
One of the ways we try to manage our food budget is by packing lunches not just for the kids at school, but for my husband and myself too.
We both work in busy jobs so the food needs to be quick and uncomplicated, but it also needs to be filling, tasty and cost effective.
So, as we come into winter we move into soups. I LOVE that I can prepare big batches in advance and have meals ready for the week. And I am excited to have 2 new soups to share with you over the coming weeks.
The first is my delicious Poached Chicken French Lentil Soup. I crunched the numbers for you – this DELICIOUS batch, even including the oil and the seasonings, cost me a total of $15 to make. That is 6 lunches, each with 25g of protein and a great serve of gut loving fibre, for $2.50each. Winner!
2 large chicken breasts (about 500g)
80g dried french lentils
70g pearl barley
2 large carrots
5 sticks celery
160g frozen corn kernels
1 medium brown onion
3 cloves garlic (or just measure if with your heart!)
2 tsp chicken stocks powder (we use Massel brand)
2 tsp olive oil
8 cups boiling water
1 tbsp dried Italian herb mix
Heat the olive oil in a large saucepan.
Dice the onion and add to the oil. Cook in medium heat, stirring occasionally until the onion is golden.
Add in the finely chopped garlic. Cook for 2 minutes.
Finely slice the carrot and celery, add to the onion mixture and cook down for 4-5 minutes.
Add in the barley and lentils, then stir in the herbs and mix well.
Now add the boiling water and chicken stock powder as well as the corn. Bring back to a gentle simmer.
Add the chicken breasts into the liquid and return the lid to the pan to allow the breasts to poach.
After about 10 minutes, turn the chicken breasts over and return the lid for another 8-10 minutes.
Check that the chicken is cooked (juices should run clear or be at 75C), and remove the breasts to a bowl. Slice the chicken.
Stir the soup and check that the lentils and barley are cooked – takes about 20 minutes from the start. Allow to simmer for a little longer if they are not yet soft.
Return the chicken to the pot and stir well.
Serve warm or divide in to shallow containers and freeze.
Serves 6
Gluten free? Switch the barley for brown rice.
Need a bigger meal?
-Double the barley and lentils for very little addition cost, but a good serve more of fibre and protein.
-Add a hand full of grated cheese at serving time to the hot soup to boost the fats and protein to help with satiety, or
-Divide the meal into 4. You’ll get almost 38g of protein and it will still cost you less than $4 for lunch.
Packed with veggies and flavour. We love this dinner because we both leave it thick and chunky for the adults, and also put some through a quick spin in the food processor to give a ‘chicken bolognese style sauce’ for the less, ah, amenable kiddos!
It’s a pretty forgiving and flexible dish so the quantities are pretty rough!
5-6 Chicken boneless thighs, skin removed
1 tbsp garlic flavoured olive oil
1 medium brown onion, finely chopped
Fresh thyme, basil and rosemary, finely chopped (or about 2 tsp dried Italian Style herbs)
1/2 tsp dried chill flakes (optional)
1 large eggplant (about 800g), diced
1 tsp salt
12-15 button mushrooms, or 6-8 larger field mushrooms, diced
1 cup passata
1 heaped tbsp tomato paste
2 large handfuls of fresh spinach
ground black pepper to taste
Start with the eggplant – it needs some time to draw out the moisture to stop it going rubbery when you cook it.
Dice the eggplant, and place it in a draining sieve. Sprinkle it with the salt and leave to sit for 30 minutes. You will see lots of moisture on the surface and dripping down into the sink. Pat dry with a paper towel.
Heat the oil in a large frying pan, add in the onion and cook over medium heat until it starts to brown. Add in the diced chicken, sprinkle with herbs and chilli then cook over a medium heat until the chicken starts to brown.
Add in the eggplant and stir well to combine.
Now add in the mushroom and stir them through. Cook over a medium heat, stirring occasionally, for a few minutes until the eggplant and mushrooms cook down.
Now add in the passata and paste, stir well and allow to simmer for about 10 minutes. Then add in the spinach and stir well to combine.
You only need to cook down the spinach for another 2 minutes before you’re ready to serve.
Serve the stew on its own, over pasta or zucchini noodles. Our kids eat this best when we pop in in the food processor and roughly process it so it is less chunky and more of a sauce. They enjoy it with pasta and little bit of grated cheese.
Makes about 6 adult serves. It freezes and defrosts fairly well, but also keeps well in the fridge for a couple of days for left over lunches.
Very simple, inexpensive, easily sourced ingredients. Amazingly good at feeding your super gut bugs. Quick to make, cooks in bulk and freezes well for weekday lunches. Allergy friendly ….. AND YUMMY!!!
400g Broccoli (1 medium size), roughly chopped
600g Cauliflower (1 large), roughly chopped
1 small brown onion (about 120g), diced
1 tbsp olive oil
2 tbsp veggie stock paste
8 cups boiling water
150g cream cheese (*dairy, soy or nut based – you can even use a light silken tofu here)
If you don’t have stock paste you can use 2 cups liquid stock and then only 6 cups water.
Heat the oil in a large saucepan then add in the onion and cook, stirring, until it is soft and golden.
Add in the cauliflower and broccoli plus the stock paste and stir well. Cook down for about 3 minutes then add in the boiling water.
Cover and simmer for about 20 minutes or until the veggies are very soft. *If you need a quicker cooking time you can give them veggies a quick blitz in your food processor first.
Remove from the heat and add in the cream cheese.
Use an immersion blender to blend until the soup is very smooth. If you are using a blender/thermo cooker/bullet machine to blend – BE VERY CAREFUL! Allow it to cool quite a bit first and then do small batches.
Serves 8.
If Macros are important to you, here they are for 1 serve.
I did not grow up in a family that ate lasagne much – but my husband did! It was my lovely mother-in-law’s go to dish!
He has missed it since we were married, so I’ve worked hard at making a dish that we both enjoy AND fits all of our dietary needs. This one is also a winner with the kids – and the left overs taste even better the next day!
Heads up – this is in no way a traditional lasagne, I’m not event pretending it is … in fact I have had friends tell me that I am not allowed to call it lasagne if it doesn’t have either pasta or cheese … sorry … I’m going do it anyway!!
**Check out below the main recipe to see how I make this one completely plant based**
This is a meal that takes a little more time and fiddling in the kitchen than I normally like, but the end result is worth it and it does make 10 large and very filling servings, so I’ll allow it!
1 tbsp garlic olive oil
1 small brown onion, diced (about 125g)
OPTIONAL: 1/2 tsp dried chilli flakes
1kg beef mince
400g tin brown lentils, drained and rinsed
1 medium zucchini (about 1.5 cups chopped)
150g fresh spinach
200g button mushrooms
400g tin red kidney beans, drained and rinsed
70g tomato paste,
1 tsp dried oregano
salt to taste
Large egg plant (about 1kg)
spray olive oil
125g grated cheese (dairy or vegan)
For the Sauce:
1 large cauliflower (approx 900g-1kg), roughly cut up
1 tbsp olive oil
1 tsp dried onion flakes
1/2 tsp dried garlic flakes
1 cup high protein almond milk (or soy or dairy milk if they suit you)
1 cup hot veggie stock
4 heaped tbsp nutritional yeast
Salt to taste
Heat the olive oil in a large saucepan. Add in the onion and garlic flakes. (Steam Temp, speed 1, set for 15 minutes)
Then add in the cauliflower and stir well to coat in the oil. (Turn up to speed 2)
Add in the milk and stock and cover, allowing to come to a gently simmer. (Leave in Steam temp, speed 2 with the m/c off)
Simmer for 10-15 minutes or until the cauliflower is soft and you can easily pierce it with a fork.
Add in the nutritional yeast and then use an immersion blender to mix until smooth – you can transfer to a blender if you need to but be VERY careful! (Start by turning off the temperature function and gradually build to speed 8 until very smooth).
Taste the sauce and add a little salt to taste (dairy cheese is quite salty and when you remove it you need to add in a little salt to help with flavour). Set the sauce aside.
Onto the meat mix:
Start by creating the veggie mix you’ll stir in to the meat.
In your food processor or thermo cooker, add in the zucchini, spinach, mushrooms, kidney beans and tomato paste, then blitz until quite fine. (Speed 6, 8 seconds, scrape down and repeat until you get your desired consistency). Set aside.
In a large frying pan heat the olive oil then add in the diced onion and cook, stirring until translucent.
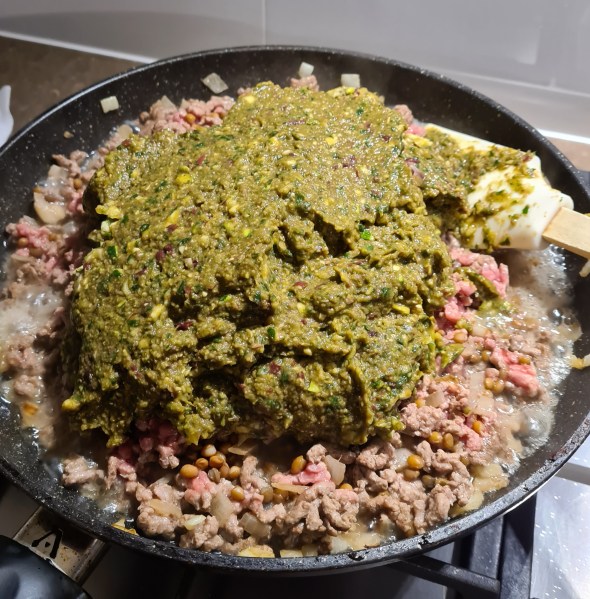
Add in the beef mince and herbs/spices. Break it up well and when it has roughly browned, add in the lentils and mix well.
Now add in the whole processed veggie mix to the meat mix and stir very well.
Bring to a gentle simmer for about 15 minutes.
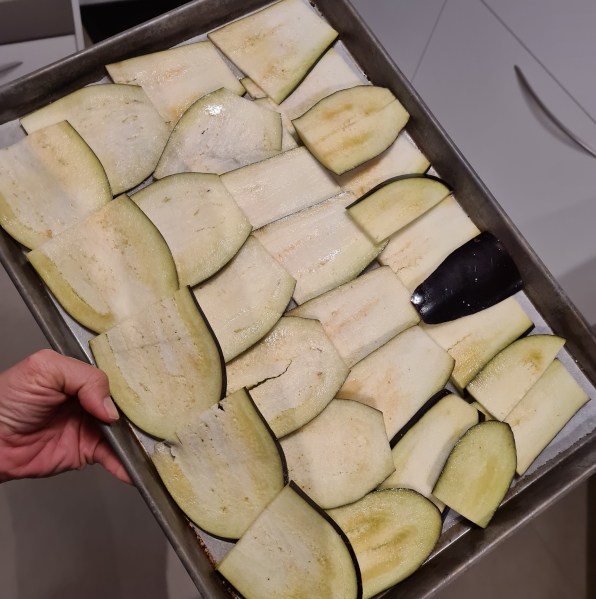
Now the egg plant while the meat is simmering:
Slice finely. Lay on a baking tray, spray with a little olive oil, sprinkle with a little salt and place under the grill in your oven.
Once the top side is golden brown (it only takes a few minutes), turn over and cook the other side.
The remove from the oven and set aside.
Now build the layers:
Lightly grease a large baking dish (I actually use 2 – awesome for freezing one too!)
Layer half of the meat mix into the bottom, then lay down half of the egg plant, then half of the cheese sauce and then repeat.
Then sprinkle either dairy or vegan grated cheese over the top.
Pop into the preheated 180C oven (fair warning …. you’re best to place it on a baking tray to catch any drips or bubbling sauce!) for about 30 minutes or until golden and bubbling – a quick minute under a grill at the end really helps to give you golden cheese, especially if you are using a plant based cheese.
Slice and serve…. and Enjoy!
**If you want to make this meal completely plant based: I use my lentil bolognese recipe but I omit the pasata (other wise there is too much liquid)**
*Of course, if you just want dairy free but you still love your pasta, then go ahead and use whichever lovely, fresh sheets suit you.
*And if you are not an eggplant fan but you still need a Gluten Free option, then I have used both of these Orgran and San Remo Lasagne sheets in the past.
If Macros are important to you here are the details for 1 serve – that is 1/10th of the meat based meal (I have kept the cauliflower ‘cheese’ sauce separate as I know people like to use it in other dishes!). You will just need to additionally factor in whichever cheese you use on top.
This is a soup-er simple meal, really inexpensive and delicious. A pretty mild soup, so it is very kid friendly too.
400g Cauliflower (1 medium size), roughly chopped
1.2kg Butternut pumpkin roughly chopped
1/2 small brown onion (about 60g), diced
1/2 tsp ground nutmeg
1 tbsp garlic infused olive oil
2 tbsp veggie stock paste
10 cups boiling water
225g cream cheese (*dairy, soy or nut based – you can even use a light silken tofu here)
If you don’t have stock paste you can use 3 cups liquid stock and then only 7 cups water.
Heat the oil in a large saucepan then add in the onion and cook, stirring, until it is soft and golden.
Add in the cauliflower and pumpkin plus the stock paste and stir well. Cook down for about 3 minutes then add in the boiling water.
Cover and simmer for about 20 minutes or until the veggies are very soft. *If you need a quicker cooking time you can give the veggies a quick blitz in your food processor first.
Remove from the heat and add in the cream cheese. Use an immersion blender to blend until the soup is very smooth. If you are using a blender/thermo cooker/bullet machine to blend – BE VERY CAREFUL! Allow it to cool quite a bit first and then do small batches.
I love to serve mine topped with roasted pumpkin seeds and pine nuts (switch hemp seeds for nut free) …. Just pop the seeds in a hot, dry frying pan and cook, stirring, for a couple of minutes until they are golden brown. Sprinkle on the soup and if you want a little extra kick … sprinkle on a little pinch of chilli flakes!
Serves 12.
If Macros are important to you, here they are for 1 serve (roughly 2 ladles of soup) , worked out for the dairy based cream cheese – not including the seed topping.
This will last several days in the fridge, or it freezes and defrosts well.
Well, these are easy, have only a few ingredients, freeze well, pack in a heap of good stuff to stretch the meat further aaaaand… they’re delicious!
Plus I kind of feel like they’re a complete meal in one. Protein, veg and grain … All right there! Which means that if I’m in a hurry and grab a couple of these from the freezer, I’ve got everything I need for a balanced meal. Winning 👌
4 medium chicken thighs (about 485g), skinless and boneless
200g broccoli
1/2 cup tricoloured quinoa (110g)
1 tbsp coconut aminos
1/4 cup (15g) Nutritional yeast
1 birdseye chilli or 1/2 tsp chilli flakes (you can skip the chilli if you’re not a fan!)
Start by bringing a small saucepan of water to the boil and cooking the quinoa. Rinse it well first, then it should take about 15 mins. Drain it, rinse it again and set aside.
Wash the broccoli well and shake dry (too much water and your patties will be soggy). Break into chunks and add to your food processor. Process until fine (Speed 4, 8 seconds, scrape down then Speed 5 for 5 seconds).
Whilst still processing (speed 4), add the nutritional yeast and chicken through the top chute and process until it is finely chopped and well combined. (Up to Speed 5 for 8 seconds once it is all added)
Continue processing (Speed 4) and add in the chilli and coconut aminos.
Add add in the (very well drained) quinoa and process until it is evenly combined.
Scrape mixture into a bowl, cover and place in the fridge for 2 hours, or up to over night. I usually make the mix in the morning before work and then form the patties in the afternoon.
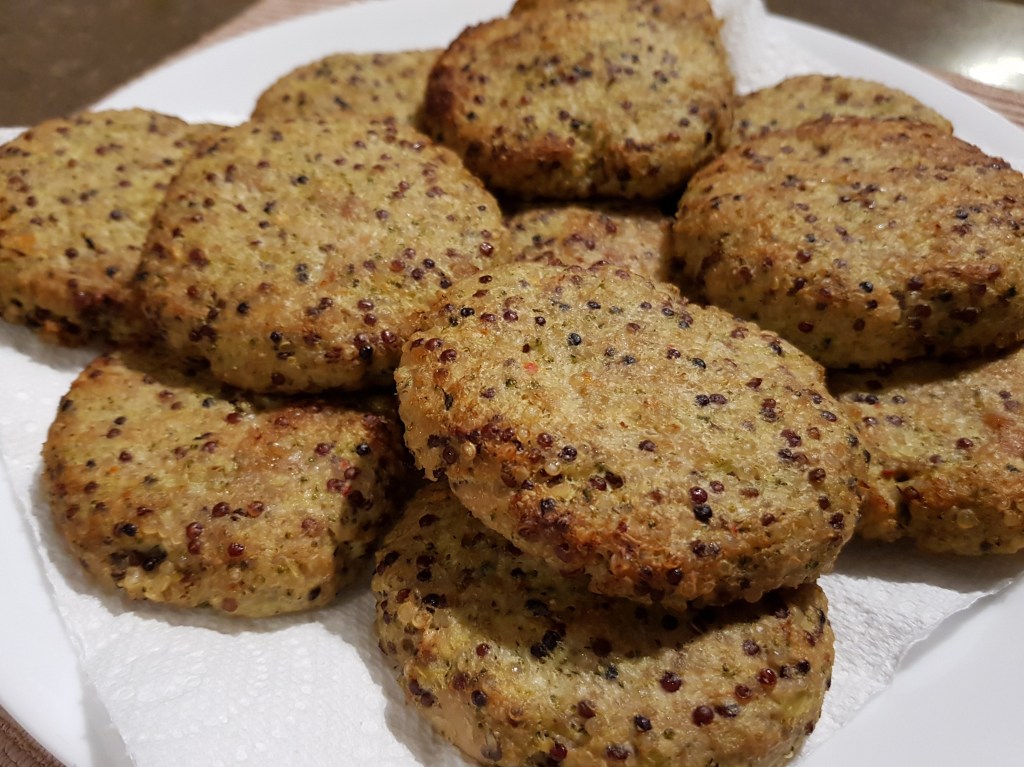
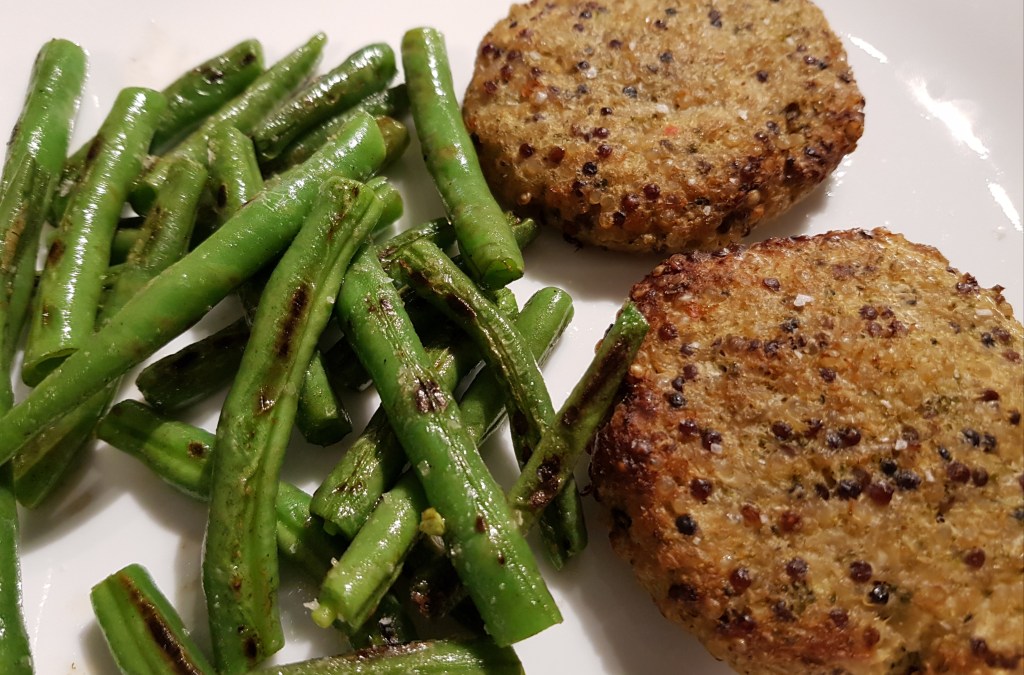
Use tablespoons of mixture to form patties with slightly oiled hands and place them on a lined baking tray.
So pretty!
Spray with a little olive oil, then place into a 200C oven for about 20 minutes, then flip and cook for another 5-10 minutes, or until cooked through (you can use a thermometer to check that the centre has reached 75C) and golden.
Makes 12. These freeze and defrost well – use a little kitchen paper to absorb excess moisture when defrosting and reheating.
Serve warm with extra veggies, and an extra drizzle of coconut amino sauce – or use them the next time your build your own burgers!
Enjoy
If macros are important to you – here are the details per patty (1 /12th of the recipe):
We don’t heat a huge amount of red meat, but a few months back, my biggest boy was reading and the characters in the book described the Lamb Koftas they were eating.
Will had never heard of them before so he asked me about them and then asked me to make them.
They were very simple to make and a winner of a meal with 6 empty plates, so they have been added to the menu and we hope you like them as much as we do!
500g lamb mince
120g chick peas, drained and rinsed
1 small brown onion
2-3 clove cloves garlic
1 tsp tahini
1 tbsp hemp seeds
1 medium carrot
1 large handful spinach
1/2 tsp ground turmeric
1 tsp dried paprika
1 tsp ground coriander
1 tsp ground cumin
1/2-1 tsp dried chilli flakes (depending on the amount of bite you like)
2 tsp finely grated lemon zest
good pinch salt
Optional: Dressing of Minted yoghurt (see below the recipe) and crunch of toasted pine nuts or pumpkin seeds
Into your food processor/thermo cooker, place the onion, garlic, chick peas, lemon, seeds, tahini, carrot, spinach and all of the herbs and spices.
Process until they are finely chopped (Speed 4, 8 seconds, scrape down and repeat)
While the machine is still processing, add in the lamb in through the top opening and process until the mixture is very well combined and quite smooth.
Place the mixture into a bowl, cover and place in the fridge for at least an hour (over night is fine). This will help the mixture to hold together without egg as a binder.
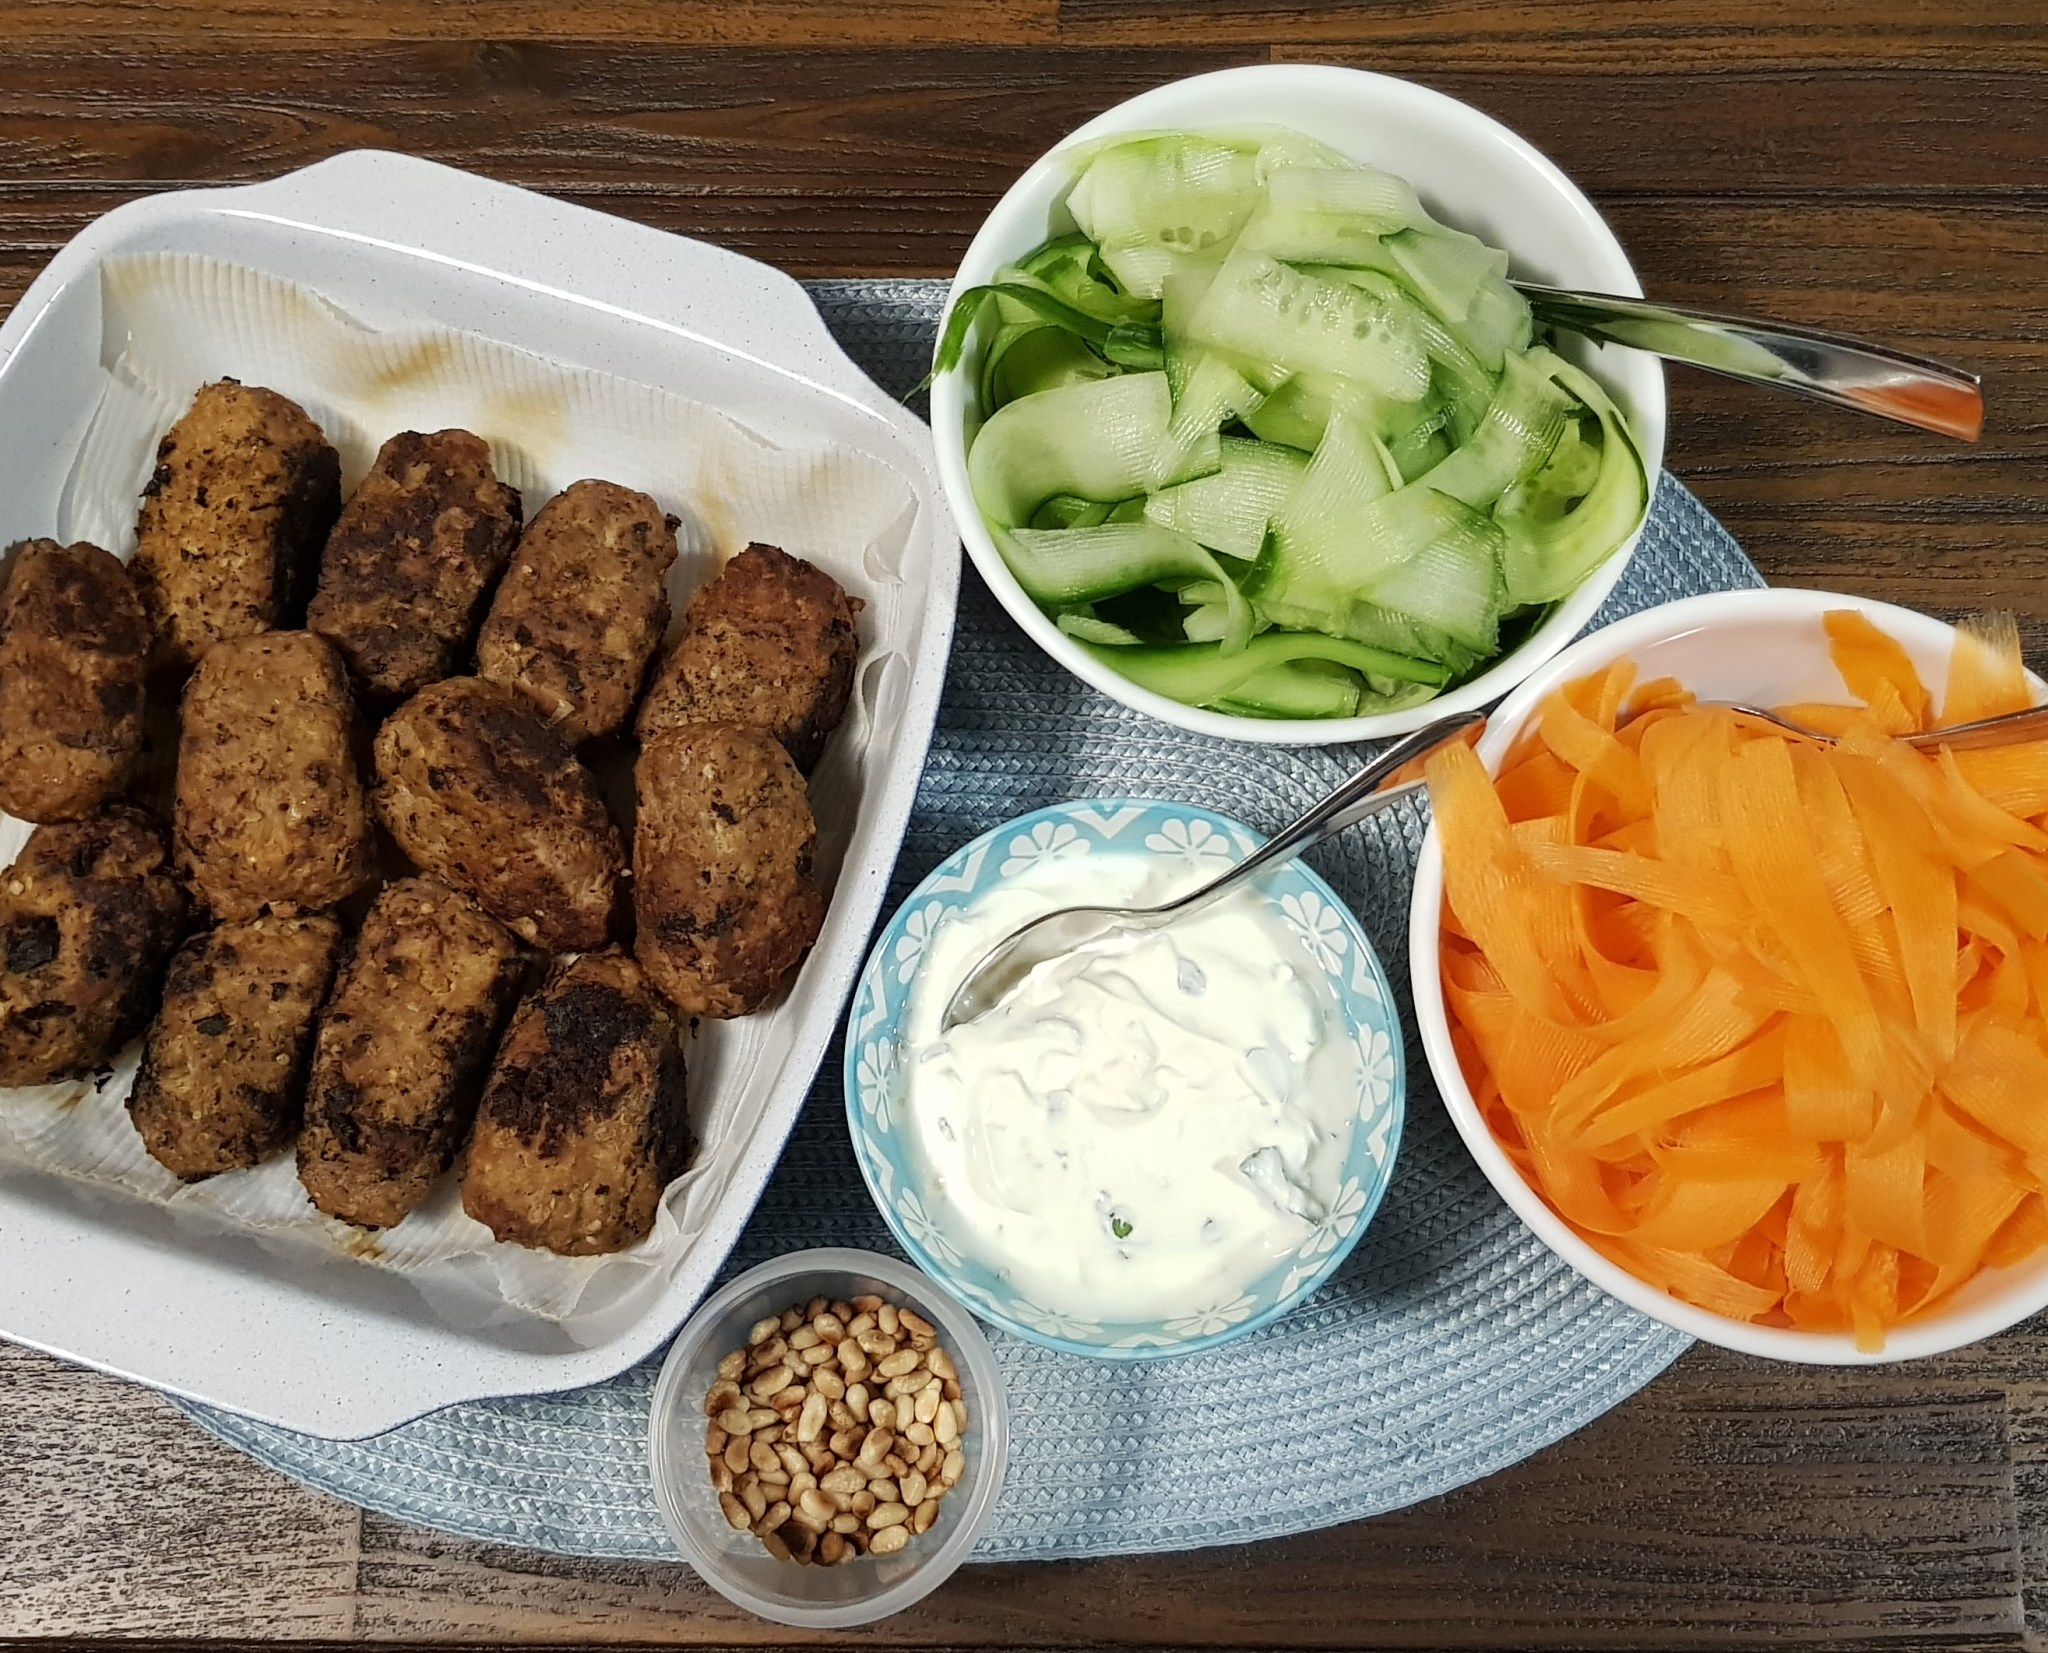
Divide the mixture into 12 and form in to small fat sausage shapes.
Place on a lined baking tray, spray or brush with a little olive oil and bake at 180C for about 40 minutes, turning them over after 30 minutes.
We like to serve ours with ribbons of carrot and cucumber.
We also used minted yoghurt as a dressing (you can used which ever kind of unflavoured yoghurt fits your dietary needs). About 4 tbsp mixed with 2 tsp of finely torn fresh mint.
Top with toasted pine nuts (or pumpkin seeds).
If Macros are important to you here are the details. Each serve is 1 kofta (that is 1/12 of the mix)
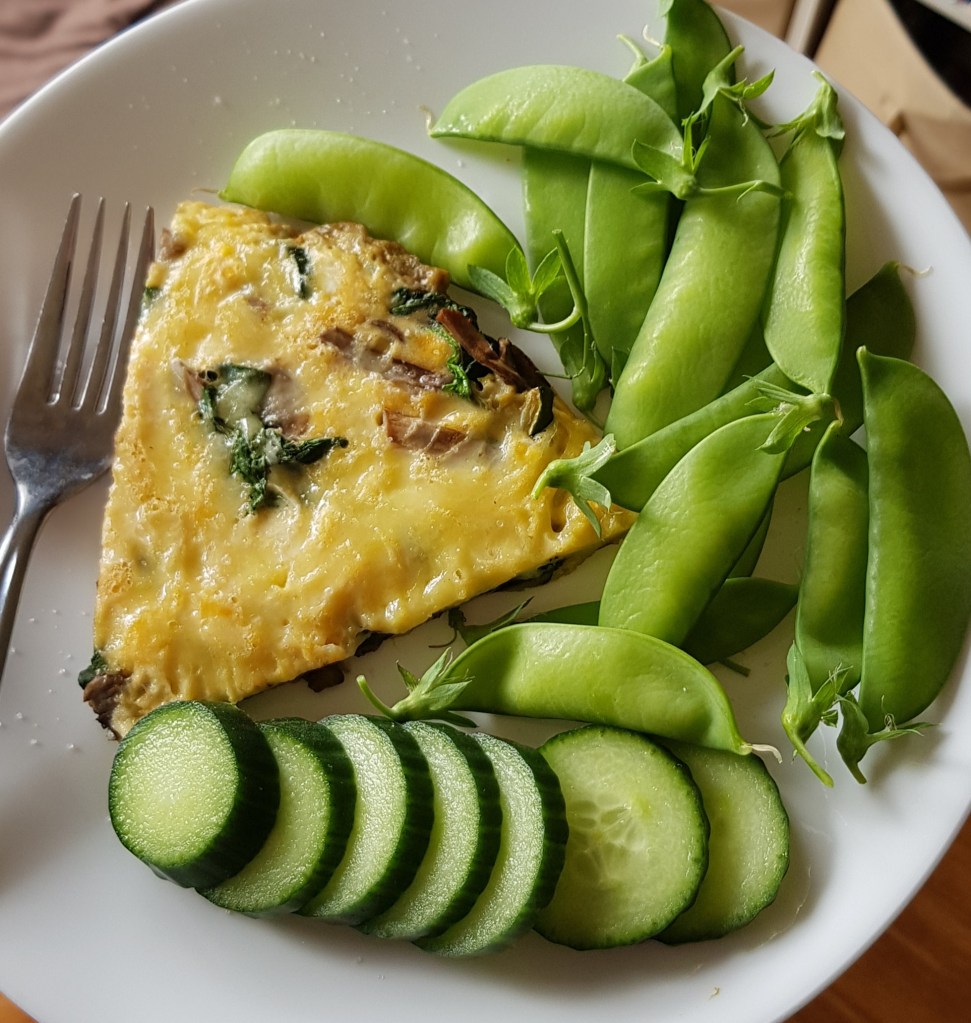
A little while ago I posted my Salmon Tart and I have had a few requests for a vegetarian version.
So, here is a my baked veggie omelette – you’ll need a frying pan that can transfer from the stove top into an oven.
I tend to make tarts like these so I have them on hand work work lunches – delicious cold or warm . Or if you’re in a rush, grab a couple of slices out of the fridge and steam some extra greens – speedy and filling dinner!
8 medium eggs
1 large zucchini
12 swiss brown mushrooms, finely sliced
250g spinach
1 tsp olive oil
1 tbsp nutritional yeast
salt and pepper to taste
Optional: 50g grated tasty cheese
Heat the oil in the frying pan, then slice the zucchini into rounds and place into the frying pan.
Fry for 1 minutes until the first side is golden, then flip over the zucchini before adding in the mushrooms to the pan. Cook, stirring for another minute until the mushrooms start to soften. Then add the spinach to the pan.
it’s a LOT of spinach!
Add in the salt, pepper and nutritional yeast and stir through to make sure the veggies are evenly coated.
Whisk together the eggs and then pour evenly over the veggies.
Turn the frying pan to a gentle heat and allow to cook until the side of the omelette just start to pull away from the sides of the pan – the top of the omelette will still be very wet at this point.
Sprinkle the top with cheese if you wish before popping it in a pre-heated 180C oven for about 10 minutes or until the top just stops wobbling … Remember that the eggs will keep cooking while it is warm so if you leave it in the oven for too long you’ll get a rubbery omelette.
Let it cool and then slice into 6.
Store it in the fridge for about 3 days.
If macros are important to you here are the details (which includes the cheese) for 1 slice, which is 1/6th of the omelette:
So simple to make and I love the way that you can bulk them up with whatever you had on hand – so they’re budget friendly too!
I tend to make tarts like these so I have them on hand work work lunches – delicious cold (so I don’t stink out my office colleagues!) or warm (for those days I work at home). Or if you’re in a rush, grab a couple of slices out of the freezer and steam some extra greens – speedy and filling dinner!
7 medium eggs
130g (approx) salmon fillet*
150g broccoli
3 large celery sticks
20g olive oil
25g milk of choice (I mostly use unsweetened high protein almond milk)
1 tsp freshly chopped dill
salt and pepper to taste
*If you don’t have a salmon fillet, just used plain tinned salmon, and skip the cooking part.
Start by pan cooking the salmon, so it is almost cooked – it will finish in the oven. Then break it in to small pieces.
Steam your broccoli – I did a couple of minutes in the microwave. And then use a knife to diced it evenly.
Finely dice your celery.
Place the broccoli, celery and salmon into a bowl.
In a separate bowl (I prefer a decent sized measuring jug because it pours well), break all of your eggs. Then add in the dill, salt and pepper, milk and oil and then whisk really well.
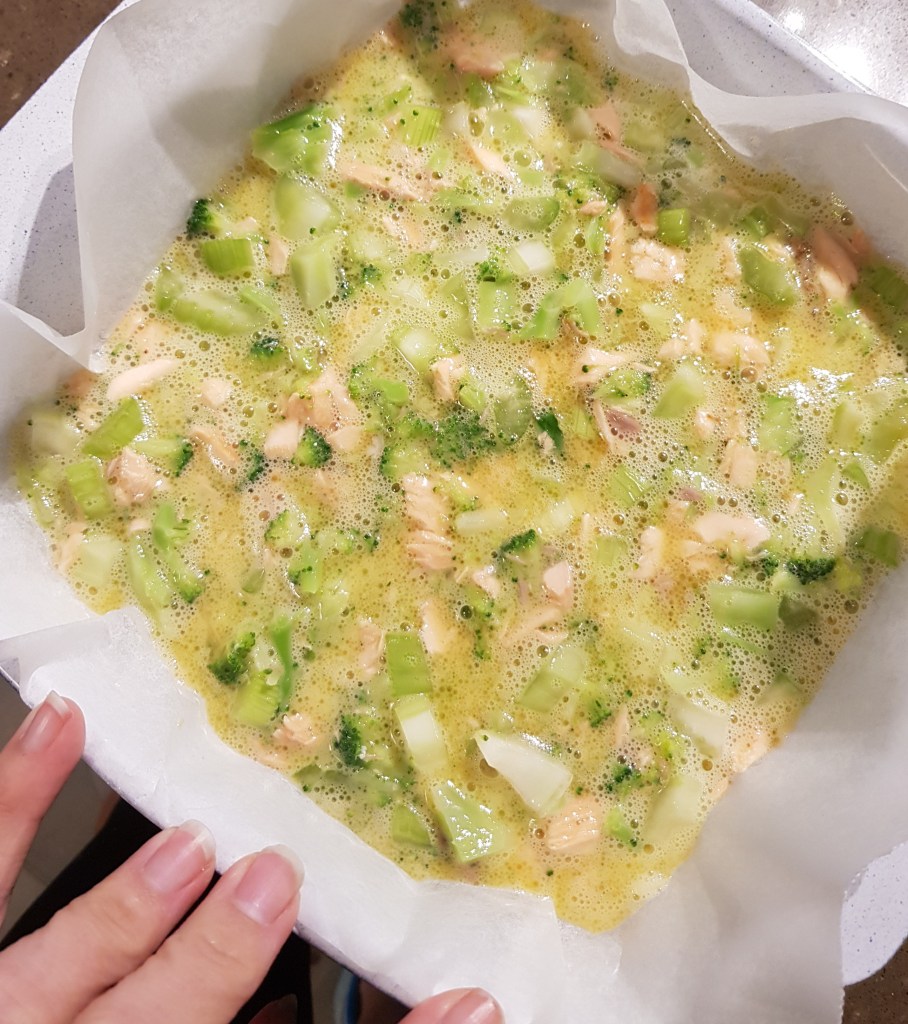
Pour the egg mix into the salmon and veg mix and then fold together until even.
Pour into a lined baking dish (21cm x 21cm) and place into a preheated 180C oven.
Bake for about 25 minutes or until it is golden and the egg is mostly set …. as the egg is still hot it will continue to cook as it cools when you remove it from the oven.
Allow to cool a little before slicing into 9 squares.
You can gently reheat this one in a microwave from the fridge. Or if you are going to freeze it, lay it between 2 sheets of kitchen paper before you do, as this will help to absorb the ice crystals as it defrosts.
If macros are important to you, here are the details for 1 slice (that is 1/9 of the total dish)
If you want an easy switch to make this a vegetarian option, omit the salmon and replace with a few handfuls of sliced mushrooms – I like the swiss brown variety!