Hummus

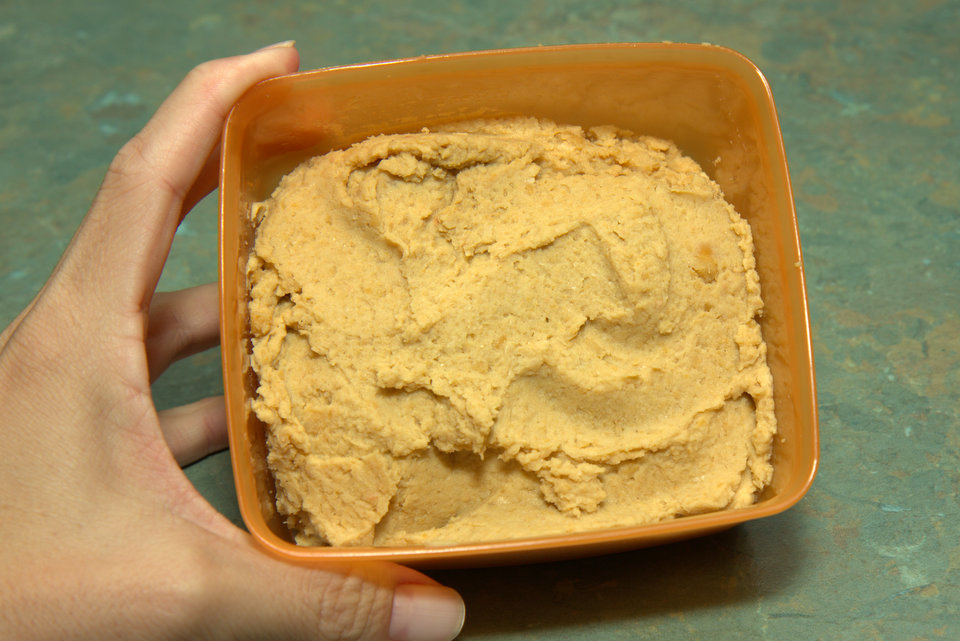
I loooove chickpeas – they’re low GI and high in fibre and protein and they are cheap 🙂 I love their nutty flavour and the crunch they have when they are roasted. I add them to casseroles and stews and eat them several times a week in my morning tea, so there’s no way I can look past hummus as my favourite dip! My little miss happily eats half her body weight in it for morning tea!

FB_IMG_1580304964032

See below the recipe for a few variations on the original too.

  • 400g tin drained and rinsed chick peas 1-February 2013 2428
  • 1 tbsp tahini*
  • 1/4 cup extra virgin olive oil
  • 1 good pinch flaked pink salt, and
  • juice from a medium lemon (use 1/2 first and taste test before adding the rest)

*If you need to be sesame free then replace tahini with equal quantities of seed butter.

Add all ingredients, except the olive oil, to the food processor and blitz until well combined. The while the processor is running, drizzle the olive oil through the top chute until well combined and creamy (In a Thermal cooker – Speed 4 for 10 seconds, the scrape down sides and use speed 5 for 15 second intervals, scraping down sides in between until you reach desired consistency).

If it is too thick for your liking, add in a few teaspoons of water.

The citric acid in the lemon will help to preserve the mix so it will store in an air tight container in the fridge for several days – but my best tip is to make a double batch and pop one in the freezer – it defrosts perfectly!!

This makes about 8 serves (a heaped dessert spoon full).

We have it with crunchy raw veggies or wholegrain rice crackers.

Enjoy!


My yummy morning tea!

For a variation on plain hummus:

  • Add in about 100g of cooked (steamed or roasted) beetroot – even the tinned variety works, plus a tsp of fresh chopped rosemary and 1/2 tsp of mince garlic. Blend to desired consistency.
  • Add in about 100g of roasted pumpkin and a handful of pumpkin seeds. Blend to desired consistency.
FB_IMG_1580304933023
The beetroot version – hooray for pink hummus!!

Chocolate Freezer fudge

ok – this is hands down the best dessert I have made to date!  If you are after a very simple but decadent, chocolatey dessert that is allergy friendly and quite healthy – then this one is for you!

  • 1/2 Cup Sunflower seed Butter1-February 2013 692
  • 1/2 Cup tasteless Coconut Oil (Room Temperature)
  • 1/2 Cup Cocoa
  • 1/2 Cup Pumpkin Puree
  • 1/3 Cup honey/maple syrup

Place all ingredients into your processor (helps if the pumpkin is still warm) and process until the mix is smooth, stopping to scrape down the sides. In a Thermal Cooker, start on Speed 5 for 20 seconds, scrape down the sides and then process again, working up to speed 7 until mixture is very smooth).

Pour in a greased 8×8 tin, cover in glad wrap and freeze for about 4 hours.

Cuts into about 16-20 pieces and needs to be stored in the freezer.

This was  a MASSIVE hit in my house and I have to confess that it didn’t last very long! They are already requesting another batch

3-February 2013 699

Hope you enjoy it as much as we did 🙂


Slow Cooked Chicken (plus Stock and Gravy)


We all really enjoy chicken in our family, so I am always on the look out for new recipes that are cheap, easy and healthy.

I know that they are significantly cheaper than pieces, but I haven’t really cooked whole chickens much, partly perhaps because my Mum didn’t, but honestly, it is mostly because I didn’t want to make a mess in my oven!!! So when I heard people talking about how they cooked chickens in their slow cooker I was keen to experiment and we have now been cooking this way for years.

This is a super easy way to cook a chicken, the flavour is lovely and gentle and the meat is delightfully soft and just falls off the bone – which means my kids ate it really well. And I can make both stock and gravy from the left overs – such a win for the budget!! See below the main recipe for these recipes.

  • 2 cloves minced garlic
  • 1 lemon or lime
  • whole chicken
  • Optional – a few sprigs of thyme

Grate the zest off the fruit and set aside.

Wash the chicken inside and out and pat dry.

Cut the ends off the fruit and place inside the cavity, then place breast side up in the slow cooker.

20160608_063155

Sprinkle the zest and garlic (and thyme) over the chicken, then place the lid on and cook on low for 6 hours.

You don’t need to add a rack or any liquid as the chicken will cook in its own juices. It won’t have the browned crispy skin of oven roasted chicken but it is amazingly tender.

20160608_125356

Allow to rest for half an hour before carving (or pulling apart with a fork like I did! 😉 )

To get the crispy skin of a traditional roast chook,  transfer to a baking dish and place it into a preheated 240C oven for about 12-15 minutes.

20160608_131113.jpg

Serve with salad or veggies.

Enjoy!

If you are keen to use your chicken to the max, here’s an easy recipe for stock, using the carcass.

Remove the fruit from the cavity (or leave it in if you want to add a lemony flavour!), place the carcass in a large saucepan, add a pinch of black pepper and a couple of salt, a bundle of favourite herbs (I do rosemary and thyme from my garden), then  add a roughly chopped brown onion, 2 carrots and 3 or 4 sticks of celery. Add enough water to cover the chicken (just over 2L for my saucepan), bring to the boil and then reduce the heat and simmer slowly for 1.5-2 hours. Strain the stock (just over 3 cups) and store for use in soup, risotto etc. Keeps well in the freezer for a month or two.

To make a delicious gravy for your chicken and make that dollar stretch even further….

Make a simple roux (1 tbsp of nuttelex and 1 tbsp GF flour), then gradually whisk in the juices from the bottom of the slow cooker. Yum!! The best part is that the flavours of your gravy will reflect and enhance the flavours of your chook!

20160608_130851


Enjoy 🙂

Lazy Bolognese-y

Hello!

Hope that you have had a lovely Christmas and school holiday break. We had a wonderful time – 5 weeks with our families, split between a remote caravan park, a beach house and my family home in Perth.

While it was delightful being away, the kids ate more refined and packaged foods and sweets than they would normally have, so I have been finding it difficult to get them back into their regular eating routine – especially with Harry and vegetables.

So when I made spag bol the other night, instead of just grating in the veggies like I normally do, I then blitzed them in the food processor before adding them to the meat which made a really nice thick sauce … without obvious pieces of ‘pooey vegetables’ (my lovely 2 year old!). Harry was so excited to see how much ‘meat’ he had on his spaghetti that he practically inhaled the bowlful – win for Mummy!!

See below the recipe for a link to our meat free bolognese.

  • 500g beef mince
  • 1 brown onion, finely chopped
  • 2 tbsp garlic olive oil
  • 1-2 tsp minced chillies (or 1/2 tsp dried, ground chilli)
  • 1 large carrot
  • 1 large zucchini
  • 1 tin (420g) beans, drained and rinsed (kidney beans, black beans or a 3 bean mix)
  • 1 tin (420g) lentils, drained and rinsed
  • 10-12  button mushrooms
  • Fist sized piece of sweet potato or pumpkin
  • 1 large jar of tomato passata (approx 700g)
  • 3 tbsp tomato paste
  • 1/4 cup coconut aminos (or you could use red wine)
  • 1 tsp beef stock powder (we use the Massel brand)
  • spaghetti or fettuccine (we use the gluten free versions)

Heat the oil in a large frying pan, then add the onion and cook, stirring, until soft and golden

Add the mince and break it into small pieces as it browns, add the passata, paste, aminos/wine and stock. Mix well and turn down to low heat. Add in the lentils.

Meanwhile, in the food processor blitz or grate the vegetables, beans and mushrooms. Process more or less depending on how smooth you want your sauce.

Add the veggie mix to the meat mix in the saucepan and stir well. Bring to a very gentle simmer for about half an hour, stirring regularly. I leave the saucepan lid on but cracked open.

Serve on the cooked pasta or a bed of steamed green beans – add grated cheese of choice to top if you like.

This makes a large batch. The Bolognese freezes and thaws well.

20170209_153036

Enjoy 🙂

If you are a fan of bolognese, but you’d like a meat free option, check out our yummy mushroom and lentil bolognese.

Optional – Add in a few tablespoons of my tomato confit for an extra flavour boost.

20170209_150614-1

UPDATE : This recipe remains a firm favourite in our home (12 years after I originally posted this recipe!). But these days there are 6 mouths to feed and 2 of those mouths belong to very big teenage boys and another pre-teen who is entering his eating era! So I only ever make this in a double batch – thank goodness for a 12L saucepan!! Because the meal is filling, high protein, high fibre, an excellent way to contribute to veg consumption and allergy friendly, it is very common for this to also go to school in a lunchbox thermos – so a double batch never goes to waste!

Chicken and Lentil Curry

I have to admit that this was another meal originally concocted on the spot to avoid having to make a trip to the shops, well after my menu plan was over.

I know that it doesn’t look pretty, but man it tastes good! I think it’s my personal favourite of the moment – Peter agrees, Ellie squeals when you stop shovelling it in and even the boys both ate and enjoyed it  😀  Happy Mummy!

*When I have a really busy day and this curry is on the menu, I switch to my slow cooker version  – see below the main recipe for the details!

  • 8 chicken thighs, diced (approx 1kg)
  • 1 brown onion, finely diced
  • 2 cloves garlic, crushed
  • 1 medium red chilli, finely diced
  • 800g tin crushed tomatoes
  • Optional: 600g pumpkin, diced
  • 140g coconut cream
  • 2 x 400g tin brown lentils, drained and rinsed
  • 1 400g tin of black beans
  • 1 tsp Massel chicken style stock powder
  • 2 tbsp ground coriander
  • 2 tbsp ground cumin
  • 2 tsp ground turmeric
  • 2 tsp ground ginger
  • 2 tbsp olive oil
  • water

Heat the oil in a large frying pan. Fry the onion for a minute or two before adding the garlic and chilli. Cook, stirring for about a minute before adding the chicken.

Sprinkle the chicken with stock powder, plus other hers and spices and stir well. Allow it to brown.

If you’re using  in the pupmkin add here and stir well to combine. Cook for 5 minutes, stirring occasionally.

Add the lentils, beans and tomatoes plus about 1/4 a tin of hot water.

Reduce heat to low and allow to simmer for about 15 minutes.

Stir in the coconut cream and simmer for another 15 minutes (or longer if you’d like a thicker sauce).

Serve with brown or wild rice. Or try a bed of spinach if you need a lower carb option.

20171231_192958.jpg


20200210_181823
Slow cooked version on spinach

This makes enough for 10-12 adult dinner serves and it freezes and thaws really well.

Enjoy!!

*SLOW COOKER VARIATION*

  • 8 chicken thighs (approx 1kg)
  • 1 tsp onion flakes
  • 1/2 tsp garlic flakes
  • 1/2 tsp red chilli flakes
  • 2 x 400g tin brown lentils, drained and rinsed
  • 1 400g tin of black beans
  • 1 tsp Massel chicken style stock powder
  • 2 tbsp ground coriander
  • 2 tbsp ground cumin
  • 2 tsp ground turmeric
  • 2 tsp ground ginger
  • 800g tin crushed tomatoes
  • Optional: 600g pumpkin, diced
  • 140g coconut cream

Place chicken in the bottom of the slow cooker.

Mix together all of the herbs and spices and sprinkle over the chicken.

Top with the pumpkin (if you’re using it) and all of the beans and lentil.

Add in the tinned tomatoes, plus 1/4 cup water and give it a gentle mix so that some of the liquid makes it to the bottom of the slow cooker.

Place on the lid and cook on low for 7 hours.

Remove the lid and use 2 forks to shred the chicken, then stir in the coconut cream and allow to keep cooking, lid off, for another hour.

20200210_181533

Serve as ususal.

Slow cooker Silverside

I have always loved silverside – in fact, when I was younger it was often my request for my birthday dinner … my mum makes a mean cauliflower cheese to go with it 🙂

I enjoy this meal because it is so easy to make, tasty, the meat is very tender so my little people wolf it down, I can cook it in bulk and the leftovers freeze well. Wins all around!

  • approx 2kg silverside piece1-December 2012 825
  • 2tbsp honey
  • 8 cloves
  • splash white vinegar

Remove the meat from the plastic and rinse it off. Place in the slow cooker, fat side up.

Drizzle the honey over the top, then press the cloves in to the meat.

Fill with enough water to cover and add a good splash of vinegar to the top.

Place lid on and cook on low heat for about 4 hours.

Turn off slow cooker, but allow meat to sit in the cooker for a further hour. After this, remove the meat, place on a board and cover in foil, allowing to rest for another hour before slicing. The longer you leave it to cool, the thinner you can slice the meat.

Serve with salad or veggies.

2-December 2012 859

This makes enough meat for about 3 meals for all 5 of us. I slice the whole piece, then divide and freeze in air tight containers.

Enjoy 🙂

Merry Christmas (and Royal Icing Recipe)

I love gingerbread and when put in house form with royal icing, it’s even better. Since making one a year at church Christmas events a number of years ago, I’ve tried to make one each year for our family. This year I happened to be in Ikea and checked their ingredients on their gingerbread house kits – no egg and no dairy! So I grabbed it – not having to make a house myself this year was very enticing!

[Please note that the tags for this post are to do with the royal icing not the house.]

IMG_9454
Ingredients list (apologies for the depth of field blur!)

The next issue was the royal icing – I love its lemon tang but it’s traditionally made with egg whites so I needed a replacement. I could have used No Egg but I wasn’t sure how it would go so I had a search online and found that someone else had done the experimenting for me. She decided that the glycerine worked better in the hardening factor – rather essential for a gingerbread house (less so for just decorating cookies) and since I had some in the cupboard, that’s what we went for. I did also look up whether or not it was safe to be eating something I’ve always just used in making homemade bubble mix or on dry skin but I guess if you can use it on your lips, it’s ok to ingest too!

Here’s the recipe:

IMG_9444
Mine ended up slightly more runny than I wanted it but it still worked well, even for attaching decorations

The BBC’s egg free royal icing

500g / 1lb 2 oz icing sugar (You can use icing mixture too)
2 lemons
3 – 4 teaspoons glycerine

Sift the sugar into a the bowl of a mixer.
Juice and strain the lemons.
Beating continously, gradually add the juice and glyercine to the sugar

Sourced at:
http://hoppobumpo.blogspot.com.au/p/bbcs-egg-free-royal-icing.html
Originally sourced at:
www.bbc.co.uk/food/recipes/database/eggfreeroyalicing_77309.shtml (link now defunct)

I halved this recipe and had enough for my house and decorating with a little left over.

My main tips for construction are to build the walls and wait a while for them to set before putting the roof on. Ensure you’ve reinforced the inside corners with extra icing. Hold the roof pieces for a few minutes until you are sure they won’t slide.

IMG_9455
Construction complete. Next time I will put the chimney together and then attach it to the roof instead of trying to do both at once.

Our decorations are dairy, egg, and nut free (and quite a few are wheat free too) – skittles, musk sticks, mint leaves, jelly babies, licorice (black and strawberry), marshmallows and edible glitter.

IMG_9466
Decorating with edible glitter!

IMG_9470
The final product and my cheeky monkey sneaking into view 🙂

Wishing you a Merry Christmas as we celebrate the birth of our Saviour. I’ll have a blogging break until late January.

Banana Bread

Banana bread sounds good in theory right? It’s fruit – it must be healthy.

Nope, sorry. Most banana breads that you find in cafes are pretty well just glorified cake …. don’t get me wrong – they are super delicious, but just the healthy choice people think they’re making!

This recipe is a lot lower in sugar and has lot of extra goodies added to it. Still super delicious, but I am really happy to pop this one in lunch-boxes or enjoy at brunch or with an afternoon cuppa.

See below the recipe for a coeliac friendly option.

  • 2 cups flour (Plain flour is fine but I have used mixes of spelt, barley and rye and they all work well too)
  • 1/3 cup sugar (optional, but add it in if you’re a sweet tooth!)
  • 2 rounded tsp GF baking powder
  • 1/2 tsp salt
  • 1 tsp cinnamon/mixed spice
  • 1/2 cup milk of choice (oat, almond and rice work well)
  • 1 tsp apple cider vinegar
  • 2 medium, very ripe, bananas, mashed
  • 75g vegan butter/tasteless coconut oil
  • 50g maple syrup or honey*
  • 1 tsp vanilla bean paste
  • 3 tbsp seeds (use whichever are your favourite – process these first if you’d like less obvious bits). A small handful of chopped walnuts also works well here.
  • 3 tbsp aquafaba (liquid drained from a can of chick peas) OR 1 whole egg
  • rolled oats to top (or more sliced banana)

Into a large bowl add all of the dry ingredients. I don’t do sifting (ever if at all possible!), so I use a whisk to gently mix this dry mixture until it’s even.

In a large measuring jug, mix the milk and the vinegar and whisk vigorously for a minute. It should become slightly thicker and have lots of frothy bubbles on top. Then set aside for a few (3-4) minutes. Or blitz in your blender/nutribullet for a few seconds.

To the milk mix, add the mashed banana, oil, syrup, aquafaba/egg and vanilla and whisk until well combined. (or another few seconds in the blender/nutribullet)

*If you’d like an alternative to the honey or syrup, you can blend in 6 medjool dates to the wet mix

20190720_093930

Add the wet ingredients to the dry, folding them in until just combined – don’t over mix.

Pour into a large greased loaf pan, sprinkle oats on top and bake at 180C for about an hour, or until a skewer, inserted in the middle comes out clean.

20170430_120053

Allow to cool in the tin for 10 minutes before transferring to a wire rack for another 10-15 minutes.

20190720_132446

I also make these into muffins when I don’t have as much baking time – makes 18-20.

20151106_153616

This is yummy as is, or with a bit of butter, or even toasted. It freezes and defrosts well, just slice and wrap individually before freezing.

Enjoy … as I currently am, with a cuppa 🙂

To make these coeliac friendly, use 1 2/3 cups of GF flour mix (I like Bobs Red Mill All purpose baking flour) plus 2 flat tsp of psyllium and make sure you use a gluten free milk then top with rolled quinoa or use the extra banana option.

20190720_105755.jpg

To make these in a thermal cooker:

Whisk the milk and vinegar and set aside (Speed 4, 10 seconds).

Place the bananas, oil, vanilla, aquafaba/egg and syrup in the bowl and process on speed 5 for 8 seconds.

Add in milk mixture and process on speed 4 for 8 seconds. Then set aside the wet mix.

Add all of the dry ingredients to the machine and process on speed 4 for 8 seconds.

Add the wet mix back into the dry and process on speed 4 for 6 seconds, the scrape down and repeat.

Bake as per regular method.

Gingerbread Cookies

IMG_0812

I love cooking gingerbread at Christmas time. I am looking forward to making a gingerbread house with my kids soon too! I’ve adapted an already adapted recipe based on Sheriden Rogers ‘Entertaining at Home’ (1994 p143 – I think!) that my friend gave me. After the results of my recipe, I can only imagine how yummy the ‘normal’ version is. The kids loved helping with the cookie cutters.

This gingerbread is crunchy on the outside and soft on the inside. It’s hard to even tell it doesn’t have ‘normal’ ingredients in it. This is a big amount of dough so I usually divide it in half and get about 50 small cookies (I use the Tupperware cookie cutters as pictured).

250g dairy free spread
185g brown sugar
2 eggs worth of egg replacer
300g honey
750g plain g.f. flour
pinch salt
3 tsp ground ginger
2 tsp ground cinnamon
1/2 tsp ground allspice
3 tsp bicarbonate of soda dissolved in
125ml boiling water

Preheat oven to 170 degrees Celcius (325F)
Cream dairy free spread and sugar until light and fluffy (use a large bowl and a mixmaster/kitchenaid is best)
Beat in egg replacer
Add honey and mix
Sift together dry ingredients and then add to mixture in parts alternating with dissolved bicarb soda
If dough feels too soft, add a bit more flour
Refrigerate for 2 hours – overnight
Roll dough out and cut out with cookie cutters
Place on trays with baking paper lining
Cook until lightly browned (about 20min)
Remove from oven but leave on tray for 5 mins before transferring to a wire rack.

Tips – I found the dough got easier to work with after it had been out of the fridge for a couple of minutes.
– If you are using normal flour you might need a bit more to make it into a dough. When I made it this week, I had to add quite a bit. I would add more of the spices next time too.

Overnight Oats – breakfast heaven!!

It is getting hot in the desert, which means that porridge for breakfast isn’t so appealing any more.

I am keen to stick with oats as they are a great, filling and easy, low GI breakfast, but I just don’t love muesli without cows milk.

So it is overnight oats to the rescue – they’re soaked to soften them instead of cooking.

This will be breakfast (and possibly lunch!) all summer at my place – hope you delight in it as much as we do 🙂

  • 150ml almond milk (soy/oat/rice milks work too, if nuts are out)
  • 50g oats
  • 1/2 tsp ground cinnamon
  • 1 tbps honey (agave/maple for a vegan version)
  • 1 tsp vanilla bean paste
  • 1 tbsp chia seeds, and
  • diced fruit to top (I’ve been using blueberries, strawberries and mango)

Mix the oats and milk in a glass container, then add in honey, cinnamon and vanilla and stir well.

Leave overnight in the fridge.

Just before serving in the morning mix through the chia seeds and top with fruit.

Serves 2.

I have also made this for lunch (on more than one occasion!). Just mix up in the morning and allow at least 4 hours in the fridge.