So now we’ve added this version to our repertoire. So very delicious!
50g Rice vermicelli noodles
1 ripe avocado
2 cheeks of ripe mango
1/3 tsp red thai curry paste (I like the Aayam brand)
1 tbsp coconut cream – use the thickest part off the top
8 Rice paper roll sheets
4-6 mint leaves, finely chopped
Either: Firm tofu or 12 cooked prawns
Either drain, press dry and chop your tofu OR peel and chop your prawns.
Place into a glass dish.
Chop the avocado and add it and the mint to the tofu/prawns.
In a blender/bullet/thermal cooker, place the mango, thai paste and coconut cream and process until smooth (Speed 5, 8 seconds, scrape down and repeat).
Add the creamy mango sauce to the other ingredients, cover and set aside in the fridge for at least half an hour.
Cook/soak your rice noodles according to packet instructions, then drain and rinse in cold water.
Soak your rice paper rolls according to packet instructions, then lay onto a damp towel.
Place noodles on the rice paper rolls, add a tbsp of mango mixture to the top and wrap up into rolls.
Serve immediately.
These are best fresh, but keep in an airtight container in the fridge they’ll last 24 hours.
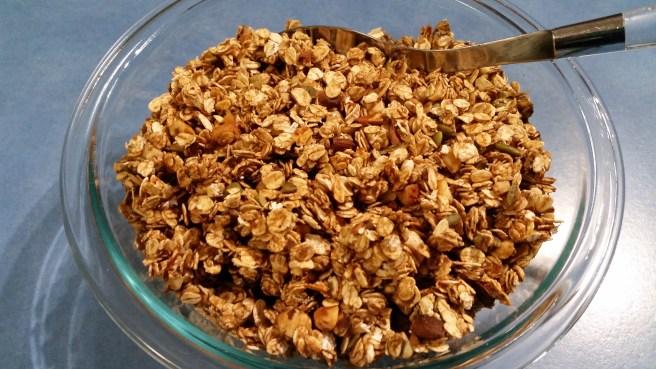
It always seems like such a cafe style, luxurious breakfast item to me. I am not really keen on the store bought variety though because as well as being expensive, they also tend to be loaded with oils and sweeteners (and coconut … why?!).
Well – here’s a way to enjoy your granola that’s kinder to your pocket and to your body!
2 1/2 cups rolled oats (use puffed rice or quinoa flakes for the GF option)
1 cup chopped nut or seeds of choice (today I did almond, hazelnut and pepita)
In a small saucepan mix together the date paste/syrup, oil, seed butter, salt, spices and vanilla.
Stir over low heat until just melted and well combined (Speed 2, 90C, approx 2 mins).
In a large bowl mix together the oats and nut/seeds until evenly combined (Speed 4, 8 seconds).
Add the wet mix into the dry and mix until evenly coated (Speed 3, 20 seconds).
Pour onto a lined baking tray and spread out into a thin, even layer.
Place into a preheated low oven (approx 140C) and bake for 30 mins.
Allow to cool. If you prefer not to have clumps in your granola, stir it around as it cools to avoid any sticking together.
Store in air tight container and use as you would any cereal … add milk to it, or as a topping for your yoghurt. Or, I use this as the filling in my baked pears/apples.
Why not add in some toasted coconut, if that’s your thing, or a handful of dried fruits if you’d like a sweeter version?
I feel like I’m giving away family secrets here …. Sorry Mum!
When my brother and I were little, if Mum and Dad were going out and we were having a babysitter come over (which wasn’t often I should add!) we’d always have an ‘easy meal’ … read; Fish fingers or Cheesey tomato pasta.
Cheesey Tomato pasta was my favourite …. a bowl of spaghetti with a tin of condensed tomato soup stirred through it and a handful of cheese sprinkled over the top so that it would melt as you stirred it …. kid heaven!
Well, these days, our family diet doesn’t look much like that but there are (many!) still times when an ‘easy meal’ is required …. “cheesey ‘mato pasta” as it has become known in our house, is a hands down winner. Inhaled every time. Full tummies and a happy, easy dinner time – there’s a lot to be said for that!!
Check out the end of the recipe for a modification to also use this as a great pizza sauce!
1 small butternut pumpkin (roughly 800g before peeling and seeding)
1 400g tin kidney beans or butter beans, drained
100ml coconut cream (we use the Aayam brand)
1 cup tomato passata
2 tbsp tomato paste
4 heaped tbsp nutritional yeast
1/2 tsp salt
Optional: 1 small zucchini
Pasta of choice
*You could swap out the coconut cream for creamed cheese or even regular dairy cream if your diet allows
Set a big pot of lightly salted water to boil for your pasta of choice (we use a GF variety). A legume based or a high protein pasta is a great addition here if you’re serving this as a meal on its own.
Peel and dice the pumpkin, then steam until soft – usually a few minutes in the microwave when this kind of dinner is required. If you have extra time (or some left over!), roasting the pumpkin adds a delicious depth of flavour too.
If you are adding a zucchini, dice and steam the it in the last couple of minutes with the pumpkin (you can peel it first if your little people are detectives for any green ‘bits’!)
Place the steamed veg and beans, with the tomato passata, into your blender/processor/bullet/thermal cooker together and blend until quite smooth (Start on speed 4 and work up to speed 6, for 10 seconds, then scrape down and repeat). Be very careful to follow safety instructions for blending hot ingredients. Add in the tomato paste, coconut cream, salt and nutritional yeast and blend again (speed 6, 10-15 seconds and repeat if necessary).
**If you are new to adding veg into your sauces, you could start out using less pumpkin and use more of your regular pasata or pasta sauce.
Cook and drain your pasta, then return to the saucepan and pour over the sauce.
Top with a little addition cheese of choice if you like.
Topped with Bio Cheese
Top with some crispy bacon if you wish – or fried mushrooms to keep it vegan.
This makes enough sauce for about 3 dinners, just freeze the leftovers.
You can use this for the sauce in pasta bakes or even double it for shared suppers (and Sunday School dinners in our case!). Add in extra veggies if you like, or throw in some left over bbq chook or sausages.
Enjoy 🙂
P.S. For a terrific and nutritious pizza sauce simply omit the coconut cream and passata (and don’t add the zucchini).
It marks the anniversary of the landing at Gallipoli of the Australian and New Zealand troops during WW1. It is a time when Australians give thanks for the sacrifices that our service men and women (including both of my beloved Granddads) have made for our country. We remember with the Dawn Service, the March and ANZAC biscuits.
The biscuits were originally sent in care packages to troops far off because they were cheap to make, didn’t contain any eggs and they kept well for a long time – after the end of the war they were sold as a fundraiser and today they are the only commercial good allowed to carry the name of ‘ANZAC’. They are delicious and thankfully, very easy to make into an allergy friendly version – plus, you can be very flexible with them based on what you have in your pantry.
See below the recipe for a *coeliac friendly version.
1 cups rolled oats
1 cup plain flour (GF flour, spelt, wheat – all work)
1/4 cup desiccated coconut
1/4 cup of almond meal (or seed meal)**
5 tbsp coconut sugar (or other sugar)
125g melted butter or oil (coconut oil, olive oil and melted vegan butter all work well, as does a nut oil if it suits you)
50g golden syrup/honey/maple syrup
1 tsp bicarb soda
2 tbsp boiling water.
*For a Coeliac friendly version: you can replace the oats with a mix of rolled quinoa and puffed rice.
**to omit the almond/seed meal, replace it with an extra 1/4 cup coconut.
Mix together the dry ingredients, except the bicarb soda, in a large bowl. (Speed 4, 10 seconds). Then set aside.
In a medium sized saucepan (or microwave), melt together the oi/butter and syrup. (Speed 2, 100C for approx 2 mins)
In a separate bowl, mix together the bicarb and boiling water and then add to the butter/syrup mix. It will froth up to about double the volume.
Add the wet mix to the dry mix and combine well (Speed 4, 8 seconds, scrape down and repeat).
On a greased baking tray place heaped teaspoon-fulls of the mixture and flatten down slightly. They need to have quite a bit of space in between.
Cook in a preheated oven at 170C for about 15-20 mins or until golden brown.
When you remove them from the oven they will be quite soft. They will harden as they cool. Leave them on the tray for 10 minutes before transferring to a wire rack to finish cooling.
These have extra oats replacing the coconut and almond meal – based on what was in my pantry!
These ones have puffed rice replacing the coconut.
Makes about 18 biscuits and they keep well in an air tight container for a couple of weeks … but they never last that long in my house!
A double batch of these bikkies is a great solution for Church suppers or bulking up for lunchboxes.
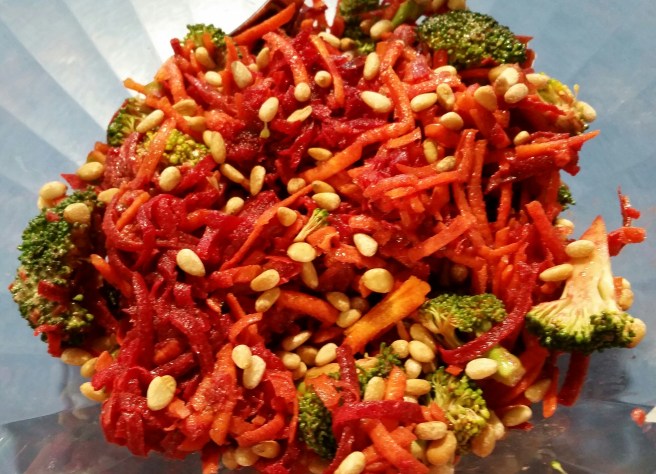
As well as the common allergies we have in our home, we also have a few more unusual ones. Raw cabbage is one of those.
Last time my biggest boy came across raw cabbage it took 4 days for the swelling in his lips and face to go down. So …. add in the usual dressings and that’s coleslaw out for us then!!
This is our delicious alternative – loaded with veggies, has all the lovely fresh crunch of standard coleslaw and an awesome creamy, yet healthy dressing!
OPTIONAL: a good handful of toasted pine nuts/walnuts
Peel the beetroot and then grate it and the carrots – food processor is easiest. Or you can do them julienne style with a mandolin.
Chop the broccoli into bite sized pieces.
Place all of the veg into a large bowl, add in the avocado dressing and toss through until well coated.
Top with a sprinkling of pine nuts or walnuts if you are able (toast them on a baking tray under the grill for just a few minutes – watch them carefully and toss part way through to get even browning).
Serve as a side salad at a bbq, with the protein at your main meal, or even top it with a tin of salmon as a delicious lunch.
My little miss loves her oat milk. We have found a great brand that is unsweetened and free from weird additives …. my only problem is the price. $3/L or more …. eek!!!!! Works out to over $430 a year!
Not helpful for this tight budget. So, for this month we are leaving those 12L on the shelf and making them ourselves.
So easy and so cheap!! You do need a good high powered processor and a nut milk bag or a cheese cloth for straining.
Place oats in a bowl and pour over the boiling water. Allow to sit for about 15 mins before draining and rinsing gently. ** You can skip this step if you are in a hurry, but you might find that your milk is a little slimy in texture.
Place soaked and drained oats and all remaining ingredients into your blender/processor and blend on high speed until very smooth. (Start on speed 5, working up to speed 7 for about 20 seconds).
Strain the mix through the milk bag into your milk bottle/container and use your hands to squeeze out any excess.
You can discard the remaining pulp, or to get the very most of your money and your food, spread it out on an oven tray and dry it out on a low heat in the oven then use it in baking (works like almond meal).
Just like the life of the store bought milk, this will store in the fridge for 3-4 days – shake well before use.
lIt is creamier and thicker than the store bought variety so you may want to thin it out by adding a little extra water if that suits your taste preference.
Well, breakfast, or any time you need a filling snack to fuel you well!
These are a twist on my Banana Oat Biscuits. Super easy to make from stuff I always have in my pantry and quick enough that you can have a batch knocked up for breakfast in 5 minutes!
The fibre, great fats and protein help to boost your energy levels and keep you full for a while and the cinnamon in the mixed spice is useful for stabilising blood sugar levels … what’s not to love?!
See below the recipe for a Coeliac version and a few extras.
3 tbsp milk of choice (unsweetened almond is great here)
3 tbsp aquafaba OR 1 whole egg
Pinch salt flakes
In your blender/processor/bullet/thermal cooker add the bananas, milk, aquafaba, honey and seed butter until smooth. (Speed 3 working up to speed 5 for 15 seconds).
In a large bowl use a whisk to mix together the remaining dry ingredients.
Pour the wet mix into the dry and fold together until well combined.
If using your blender or thermal cooker or processor to combine the two mixes use a low speed, so that you don’t shred the oats.
Place into a lined baking dish (mine is 25cm x 18cm), smooth and press down firmly.
Place into a preheated moderate oven for 20 minutes.
Allow to cool before slicing. Makes about 12 bars.
Store in an airtight container in the fridge or even in the freezer.
Extra Options:
To make these coeliac friendly use 2 cups puffed rice and 1 cup rolled quinoa in place of the oats.
For nut free use a seed meal OR replace with 2 tbsp of wholemeal flour
For a sweeter option you could mix through some chopped dried fruit (dates or sultanas are my favourite but cranberries or apple work too)
This little dude takes aaaages to get going in the morning so breakfast is often ‘on the go’ for him – these are perfect!
They’ve had a bit of a nutritional boost but they still passed the taste test from my very perceptive and discerning Harry 😉
No-one messes with his favourite bikkies and gets away with it …. or do they?! He has happily eaten many of these and literally jumped up and down in the kitchen when he has seen that there were more stashed away in the pantry!!
See below the recipe for a Coeliac friendly version and a ginger snap option too.
These are super delicious and quick to make – and everyone loves home made bikkies!
30g plant based Butter
30g Sunflower seed butter (or other nut butter that suits)
140g honey/maple syrup/golden syrup
1 tsp vanilla bean paste
220g plain flour of choice (I use spelt and do half wholemeal)
50g almond meal OR 60g hemp seeds
3/4 tsp bicarb soda
1/4 tsp cinnamon
In a saucepan, over a medium heat, melt together the butter, honey and vanilla (100C, speed 2 for 2 11/2 mins or until completely melted). Remove from stove.
Use a whisk to mix the bicarb, almond meal, cinnamon and flour together and then add to the wet mix (Speed 4 for 8 seconds with the bicarb, then add flour and speed 5 for 15 seconds). If your mix feels too wet, add in 1 tsp more of flour at a time and pulse to combine).
Mix gently until combined.
Tip out on to a silicone mat and allow to cool for 5 minutes.
Roll out the dough into a large rectangle about 2-3mm thick (much thicker and you get a softer biscuit rather than a crunchy one).
Use a shaped cutter to cut our your desired shapes (today we went with farm animals) and lay on a lined baking tray.
Place in a preheated moderate oven for about 8-9 minutes, or until golden brown. They will be soft when you remove them from the oven.
Leave on tray to harden and cool. Store in an airtight container for about a week.
Makes about 40-50, depending on the sized cutter you use … and how much dough your 3 year old helper eats in the process 😉
*Some tips
If this dough cools too much it can become a little stiff and crumbly, a couple of seconds in the microwave will soften it and make it more workable.
If you don’t have time to cut out the whole batch (it happens!), you can save half of this dough, tightly wrapped in the fridge for several days, before bringing it back to room temperature and gently warming it.
Enjoy!
For a Coeliac friendly option: switch to a gluten free flour mix, and use only 190g and add 1 tsp of psyllium husk.
To make a ginger snap version of these bikkies: Replace the honey with equal weight of maple syrup and replace the vanilla with 1.5 tsp ground ginger and an 1/2 tsp ground cinnamon. These are a much quicker to make than traditional gingerbread but very similar in taste.
Cheese replacements are tricky for us. The 3 boys eat dairy cheese now, but I don’t eat much dairy and Ellie can’t tolerate any.
All of the delicious creamy nut based cheeses are out for us and we try not to eat much soy. Hm.
Little miss has adapted beautifully to eat Bio-Cheese …. but …. for those of us who have actually eaten cheese in the past, it is really not that palatable an option. So if we are all eating the same dinner, we don’t use bio-cheese, instead, often making a cheesey tasting sauce with nutritional yeast flakes.
Then I was on a recipe sharing FB page and I saw one of the ladies mention that she made a dairy free Parmesan with Cashews and nutritional yeast and salt. I was so intrigued and started tinkering with a version that was safe for us.
And here it is! Such a cheesey flavour and aroma, and SO simple!
1/4 cup pepitas
1/4 cup roasted almonds OR roasted sunflower seeds
2tbsp, heaped, nutritional yeast flakes
1tsp pink salt flakes
Few grinds black pepper
1/2 tsp Italian herbs
Place all ingredients into your processor/bullet/thermal cooker and pulse until you get a nice crumbly consistency.
Store in an airtight glass jar. Leave it in the fridge if you’ll use it up within a week or so. We don’t so I pop it in the freezer to avoid the oils from seeds or nuts going off.
Sprinkle it on to your Lasagne or your Bolognese. I found that its cheesey flavour together with the creaminess of my avocado dressing was a real winner on our pizza too!
I’ll be using it as a topping for some savoury crackers next!
Salad dressings are bit of a challenge when you are dealing with food allergies, or if you want healthier options! The store bought variety are mostly loaded with sugars plus stabilisers and emulsifiers that we tend to avoid when possible.
As such, we have just mostly avoided dressings – when I do use them, a vinaigrette of some description is my normal ‘go-to’, but occasionally the mood strikes for something a bit different and creamy!
This super simple dressing is amazing! Creamy and rich, it holds beautifully to salads that you toss through it and it’s delightful drizzled on salmon or chicken … maybe even lamb or beef, but I haven’t tried that yet!
the flesh of one avocado, very ripe
2 tbsp extra virgin olive oil
4 tbsp lemon juice
1/2 tsp minced garlic
2 tsp fresh chopped dill
a good pinch pink salt flakes
a few grinds of black pepper
Optional: If you want a more liquid version of the dressing, add in 1 tbsp of Aquafaba (liquid drained from a can of chick peas)
Place all ingredients into your blender/processor/bullet/thermal cooker and process until smooth. (Speed 5, 8 seconds, scrape down and repeat).
Oops – I forgot to take a photo of the whole batch!
Tonight we tossed a good tablespoon of the dressing through a raw broccoli and beetroot salad and then topped our baked salmon with some more! Divine!
This quantity of dressing is probably enough for 5-6 people, and lasts a couple of days in an airtight container in the fridge.