Lemon Lamb with Winter veg mash

Slow cooked, tender and fragrant Lamb – serious comfort food!

The slow cooker makes it super easy – to cook and clean up! I mostly do our accompanying veg separate so that we get them crispy. Some days though, there is just not enough time for evening meal prep past the 10 minutes first thing in the morning to get the slow cooker on …. and on those days we do our veg in the slow cooker and turn them into a veg mash instead – easy and delicious!

  • Boneless lab joint (2-2.25kg). Pick one that fits your slow cooker!
  • approx 1.2kg veg (I use a mix of butternut pumpkin, sweet potato and cauliflower)
  • 400g tin butter beans, drained and rinsed
  • 3/4 cup warm vegetable stock
  • 1/4 cup red wine
  • 1 tbsp fresh rosemary leaves
  • 1 tsp pink flaked salt
  • 1 tsp pepper corns
  • 4 cloves garlic
  • 1 tsbp olive oil
  • 1 tbsp coconut aminos
  • zest of 1 lemon (slice it off finely so you don’t get in too much of the white pith)

To make the paste for flavouring the lamb you’ll need either a bullet type blender, a small blender or a mortar and pestle. If you use a mortar and pestle, grind the dry/hard ingredients and then mix in the aminos and oil at the end.

Blitz together the rosemary, salt, pepper, garlic, lemon zest, aminos and oil until you get a chunky paste.

Chop the veg and place them in the bottom of the slow cooker – make them roughly even pieces. Add in the butter beans.

The pour the wine and stock over the top of them.

Place the joint of lamb on top of the vegetables and rub the paste into it.

20170504_062131

Place the lid on the slow cooker and set to low for 5 hours.

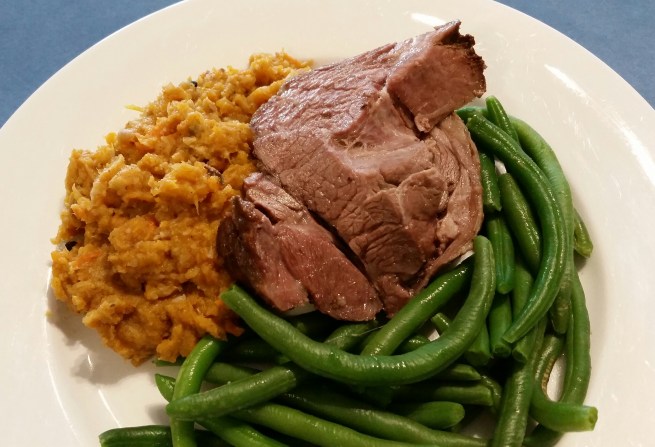
Remove the lamb and pull apart with a fork (or carve if you are so inclined!)

20170504_140455

Drain off (but reserve) the liquid from the slow cooker and set aside, then use a potato masher or a fork to roughly crush the veg into a chunky mash.

20170504_135138-1

If you’d like a gravy to drizzle over the meat, use the liquid that you have strained and reserved and follow my gravy method.

20170504_135234

Serve with steamed greens – I love broccoli or green beans.

20170504_140948-1

Enjoy 🙂

P.S. This amount of meat is enough for about 3 dinners for our family. So I freeze the extras in 2 meal size portions, together with the gravy and it defrosts beautifully later on for a very quick meal with some steamed veg.

Creamy Mango and Avocado Rice Paper rolls

Our Thai Beef rice paper rolls were such a hit that Peter requests then regularly.

So now we’ve added this version to our repertoire. So very delicious!

  • 50g Rice vermicelli noodles
  • 1 ripe avocado
  • 2 cheeks of ripe mango
  • 1/3 tsp red thai curry paste (I like the Aayam brand)
  • 1 tbsp coconut cream – use the thickest part off the top
  • 8 Rice paper roll sheets
  • 4-6 mint leaves, finely chopped
  • Either: Firm tofu or 12 cooked prawns

Either drain, press dry and chop your tofu OR peel and chop your prawns.

Place into a glass dish.

Chop the avocado and add it and the mint to the tofu/prawns.

In a blender/bullet/thermal cooker, place the mango, thai paste and coconut cream and process until smooth (Speed 5, 8 seconds, scrape down and repeat).

Add the creamy mango sauce to the other ingredients, cover and set aside in the fridge for at least half an hour.

20170503_135211

Cook/soak your rice noodles according to packet instructions, then drain and rinse in cold water.

Soak your rice paper rolls according to packet instructions, then lay onto a damp towel.

Place noodles on the rice paper rolls, add a tbsp of mango mixture to the top and wrap up into rolls.

20170503_153046

Serve immediately.

20170503_154323

These are best fresh, but keep in an airtight container in the fridge they’ll last 24 hours.

Enjoy 🙂

Mighty pasta sauce (aka Cheesey ‘mato pasta)

I feel like I’m giving away family secrets here …. Sorry Mum!

When my brother and I were little, if Mum and Dad were going out and we were having a babysitter come over (which wasn’t often I should add!) we’d always have an ‘easy meal’ … read; Fish fingers or Cheesey tomato pasta.

Cheesey Tomato pasta was my favourite …. a bowl of spaghetti with a tin of condensed tomato soup stirred through it and a handful of cheese sprinkled over the top so that it would melt as you stirred it …. kid heaven!

Well, these days, our family diet doesn’t look much like that but there are (many!) still times when an ‘easy meal’ is required …. “cheesey ‘mato pasta” as it has become known in our house, is a hands down winner. Inhaled every time. Full tummies and a happy, easy dinner time – there’s a lot to be said for that!!

Check out the end of the recipe for a modification to also use this as a great pizza sauce!

  • 1 small butternut pumpkin (roughly 800g before peeling and seeding)
  • 1 400g tin kidney beans or butter beans, drained
  • 100ml coconut cream (we use the Aayam brand)
  • 1 cup tomato passata
  • 2 tbsp tomato paste
  • 4  heaped tbsp nutritional yeast
  • 1/2 tsp salt
  • Optional: 1 small zucchini
  • Pasta of choice

*You could swap out the coconut cream for creamed cheese or even regular dairy cream if your diet allows

Set a big pot of lightly salted water to boil for your pasta of choice (we use a GF variety). A legume based or a high protein pasta is a great addition here if you’re serving this as a meal on its own.

Peel and dice the pumpkin, then steam until soft – usually a few minutes in the microwave when this kind of dinner is required. If you have extra time (or some left over!), roasting the pumpkin adds a delicious depth of flavour too.

If you are adding a zucchini, dice and steam the it in the last couple of minutes with the pumpkin (you can peel it first if your little people are detectives for any green ‘bits’!)

Place the steamed veg and beans, with the tomato passata, into your blender/processor/bullet/thermal cooker together and blend until quite smooth (Start on speed 4 and work up to speed 6, for 10 seconds, then scrape down and repeat). Be very careful to follow safety instructions for blending hot ingredients. Add in the tomato paste, coconut cream, salt and nutritional yeast and blend again (speed 6, 10-15 seconds and repeat if necessary).

**If you are new to adding veg into your sauces, you could start out using less pumpkin and use more of your regular pasata or pasta sauce.

20170425_180247

Cook and drain your pasta, then return to the saucepan and pour over the sauce.

20170425_180904

Top with a little addition cheese of choice if you like.

Sneaky Pasta
Topped with Bio Cheese

Top with some crispy bacon if you wish – or fried mushrooms to keep it vegan.

20170425_181340

This makes enough sauce for about 3 dinners, just freeze the leftovers.

20171224_090043

You can use this for the sauce in pasta bakes or even double it for shared suppers (and Sunday School dinners in our case!). Add in extra veggies if you like, or throw in some left over bbq chook or sausages.

Enjoy 🙂

P.S. For a terrific and nutritious pizza sauce simply omit the coconut cream and passata (and don’t add the zucchini).

‘Coleslaw’

As well as the common allergies we have in our home, we also have a few more unusual ones. Raw cabbage is one of those.

Last time my biggest boy came across raw cabbage it took 4 days for the swelling in his lips and face to go down. So …. add in the usual dressings and that’s coleslaw out for us then!!

This is our delicious alternative – loaded with veggies, has all the lovely fresh crunch of standard coleslaw and an awesome creamy, yet healthy dressing!

Hope you enjoy!

  • 1 raw beetroot
  • 2 medium carrots
  • 1/2 head broccoli
  • 4 tbsp creamy avocado dressing
  • OPTIONAL: a good handful of toasted pine nuts/walnuts

Peel the beetroot and then grate it and the carrots – food processor is easiest. Or you can do them julienne style with a mandolin.

Chop the broccoli into bite sized pieces.

20170412_094048

Place all of the veg into a large bowl, add in the avocado dressing and toss through until well coated.

Top with a sprinkling of pine nuts or walnuts if you are able (toast them on a baking tray under the grill for just a few minutes – watch them carefully and toss part way through to get even browning).

20170412_124542-1.jpg

Serve as a side salad at a bbq, with the protein at your main meal, or even top it with a tin of salmon as a delicious lunch.

Enjoy!

Cheesey Sprinkles (vegan Parmesan cheese substitute)

Cheese replacements are tricky for us. The 3 boys eat dairy cheese now, but I don’t eat much dairy and Ellie can’t tolerate any.

All of the delicious creamy nut based cheeses are out for us and we try not to eat much soy. Hm.

Little miss has adapted beautifully to eat Bio-Cheese …. but …. for those of us who have actually eaten cheese in the past, it is really not that palatable an option. So if we are all eating the same dinner, we don’t use bio-cheese, instead, often making a cheesey tasting sauce with nutritional yeast flakes.

Then I was on a recipe sharing FB page and I saw one of the ladies mention that she made a dairy free Parmesan with Cashews and nutritional yeast and salt. I was so intrigued and started tinkering with a version that was safe for us.

And here it is! Such a cheesey flavour and aroma, and SO simple!

  • 1/4 cup pepitas
  • 1/4 cup roasted almonds OR roasted sunflower seeds
  • 2tbsp, heaped, nutritional yeast flakes
  • 1tsp pink salt flakes
  • Few grinds black pepper
  • 1/2 tsp Italian herbs

20170401_180333

Place all ingredients into your processor/bullet/thermal cooker and pulse until you get a nice crumbly consistency.

Store in an airtight glass jar. Leave it in the fridge if you’ll use it up within a week or so. We don’t so I pop it in the freezer to avoid the oils from seeds or nuts going off.

Sprinkle it on to your Lasagne or your Bolognese. I found that its cheesey flavour together with the creaminess of my avocado dressing was a real winner on our pizza too!

I’ll be using it as a topping for some savoury crackers next!

20170401_181841

Enjoy 🙂

Creamy Avocado dressing

Salad dressings are bit of a challenge when you are dealing with food allergies, or if you want healthier options! The store bought variety are mostly loaded with sugars plus stabilisers and emulsifiers that we tend to avoid when possible.

As such, we  have just mostly avoided dressings – when I do use them, a vinaigrette of some description is my normal ‘go-to’, but occasionally the mood strikes for something a bit different and creamy!

This super simple dressing is amazing! Creamy and rich, it holds beautifully to salads that you toss through it and it’s delightful  drizzled on salmon or chicken … maybe even lamb or beef, but I haven’t tried that yet!

  • the flesh of one avocado, very ripe
  • 2 tbsp extra virgin olive oil
  • 4 tbsp lemon juice
  • 1/2 tsp minced garlic
  • 2 tsp fresh chopped dill
  • a good pinch pink salt flakes
  • a few grinds of black pepper

Optional: If you want a more liquid version of the dressing, add in 1 tbsp of Aquafaba (liquid drained from a can of chick peas)

Place all ingredients into your blender/processor/bullet/thermal cooker and process until smooth. (Speed 5, 8 seconds, scrape down and repeat).

20170331_190456-1
Oops – I forgot to take a photo of the whole batch!

Tonight we tossed a good tablespoon of the dressing through a raw broccoli and beetroot salad and then topped our baked salmon with some more! Divine!

20170331_190517-1

This quantity of dressing is probably enough for 5-6 people, and lasts a couple of days in an airtight container in the fridge.

Enjoy 🙂

Roasted pumpkin pastry rolls

Years ago, many years ago(!), when I was a poor uni student, there were a few things that sucked me right in at the campus cafes – $1 student guild coffee, $2 Coke zero and the vegetarian sausage rolls.

The Coke Zero addiction is well and truly beaten, the coffee … well …. let’s not go there! And as for the vegetarian sausage rolls – I’ve never seen another one like it after Graduation. I have seen vegetarian ones around but they are usually loaded with dairy and nuts and, since pastry doesn’t feature very often in our diets, I just haven’t considered them.

Recently, with my desire to add variety to our diets, but decrease our meat consumption, I’ve been playing around with a vegan and nut free version and I think we have a winner!

Obviously you need to use a puff pastry that suits your dietary needs, but if you need a mutli-allergy suitable pastry and live in WA you really, REALLY have to check out Busy Bees Gluten Free pastry (I buy from Weigh n Pay in Woodvale)! It is amazing! It comes in a long roll and it handles just like wheat based pastry. It is soft and easy to work with and even non GF people have been happy to eat it!

  •  3 sheets puff pastry of choice (GF if required)
  • 1 medium butternut pumpkin, peeled and seeds removed
  • 400g tin chick peas, drained and rinsed
  • 1 tbsp garlic olive oil
  • 3 sprigs fresh rosemary
  • 1/2 tsp pink salt flakes
  • 1/2 cup cooked brown rice
  • Optional – 1 large handful chopped spinach (frozen is fine)
  • Optional – add in a fist sized piece of diced sweet potato too

Dice the pumpkin and toss it in the olive oil. Place it in a lined baking tray and sprinkle with the rosemary and salt.

20170322_061005

Place in a preheated 200C oven for about 45 minutes.

Add the chick peas to the pumpkin and mix in well to coat in oil. Return to oven for further 15 minutes.

20170322_071759

Place pumpkin mix into a bowl, add in the rice and spinach (if using) and use a fork or potato masher to crush all the ingredients together. If you want a smoother mix, use your processor or thermal cooker to combine all of the ingredients (Speed 5, in 6 seconds bursts).

20170322_124327

Cut the pastry sheets in half and divide the mixture up between the sheets.

I find it is best to place it in a line down the middle of the pastry.

Roll the pastry over the top of the mix to form long cylinders.

20170322_125548

Lay on a greased baking tray with the join side facing down (helps the join to hold together as it puffs).

20170322_133854

Cook in a preheated 200C oven until pastry is puffed and golden brown. (You can use a short burst under the top grill to get them extra golden and flaky). Takes about 30-35 mins in my oven.

20170322_134043-1

They freeze well – just reheat in an oven, not a microwave otherwise you get soggy pastry.

20170322_134054-1

Enjoy 🙂

Veggie loaded sausage rolls

Sausage rolls are a massive favourite with my kids … and husband!

They are easy to make and they are perfect for hiding lots of veggies, so it is nice to know that they are a slightly healthier option for my family 🙂  I have changed and modified my mix over time and this is the mix that I have found gives the best flavour and binds the best without egg.

I use Chevup sausages in my mix. They are a skinless, gluten free, Aussie beef sausage with about half the saturated fat of normal sausages – I feel much happier about using them than the sausage mince that is commercially available. You can find more details about them here.

The sausages I use also have a lovely flavour, so if you are using regular beef mince, there is a note below the main ingredients for a couple of extra things for you to add.

Gluten, egg, dairy, nut and soy free pastry is the next issue. There are many GF pastries out there but they are often really disappointing. Obviously use the one that suits your diet and that you enjoy.

I have used this pastry from the Gluten Free Bakery:
7-20130806_133713

And it does a pretty good job. But ….

if you live in WA you really, REALLY have to check out Busy Bees Gluten Free pastry (I buy from Weigh n Pay in Woodvale)! It is amazing! It comes in a long roll and it handles just like wheat based pastry. It is soft and easy to work with and even non GF people have been happy to eat it!

  • 8 Chevup sausages
  • 250g beef mince
  • 1/2 tsp onion flakes
  • 1 medium zucchini
  • 8-10 button mushrooms
  • Handful spinach
  • Fist sized piece pumpkin
  • 200g tinned chick peas (drained)
  • 1/2-1 cup GF bread crumbs (you can blitz rolled oats or quinoa to use here instead)
  • 4 sheets of puff pastry (1 used 3 regular and 1 ‘everything free’)

If you are not using the Chevup sausages, use

  • 700g beef mince, plus
  • 1/4 tsp mild paprika
  • 1/4 tsp garlic flakes
  • 2 tbsp GF bbq sauce

Finely grate the zucchini and pumpkin. (Speed 6 for 8 seconds, scrape down and repeat). Then add in the mushrooms, spinach and chick peas and process until the mix is fine (Speed 6, 10 seconds, scrape and repeat).

Add the additional flavourings, if using and process again (Speed 5, 8 seconds)

Add the sausages and mince, to the processor and process until it is quite smooth (Speed 6, 15 seconds at a time, scrape down in between).

Add the breadcrumbs. Start with 1/4 a cup and gradually add more if the mix is too wet. (Speed 6 for 10 seconds at a time) I used about 2/3 cup last time. The mixture should stick together quite well.

20170316_102509

Cut the pastry sheets in half and divide the mixture up between the sheets.

I find it is best to place it in a thin line down the middle of the pasty.

20170316_104105

Roll the pastry over the top of the mix to form long cylinders.

Lay on a greased baking tray with the join side facing down (helps the join to hold together as it puffs).

Cook in a preheated 210C oven until meat is cooked and pastry is puffed and golden brown. (use a short burst under the grill to get them extra golden and flaky). Takes about 35-40 mins in my oven.

20170316_142519

20170316_162347

Makes quite a lot of sausages rolls (about 45 party sized ones) … so I did have to convince my kids that they couldn’t just keep eating them because they were there.

They freeze well – just reheat in an oven, not a microwave otherwise you get soggy pastry.

Enjoy 🙂

P.S. If you wish you could enjoy sausage rolls but are after a vegan version – have a go of my Roasted Pumpkin Pastry rolls

Thai beef rice paper rolls

I’m always encouraging my kids to try new things or test again for the things they think they don’t like …. so I thought it was time I took my own advice!

I have never thought I liked cold rice paper rolls – but if I’m honest, I can’t actually remember the last time I tried them. So, since my kids like any thing wrapped and choosing their own food, this seemed like a perfect dinner option. So I tried – and I really loved them …. and so did everyone else! 2 of the 4 kids asked for them in their lunchboxes and I had a particularly happy husband!

The trick is to get everything ready before you soak and fill the wraps, then it just works as a little production line. These are best fresh, but keep in an airtight container in the fridge they’ll last 24 hours.

20170313_165825

For the Thai beef part you’ll need;

  • 800g gravy beef/casserole beef
  • 125ml coconut cream
  • 1 heaped tbsp red thai curry paste (I like the Aayam bran)
  • 1/2 cup beef stock (I like Massel for a store bought brand)

Place the beef into the bottom of the slow cooker.

Mix together the cream, paste and stock and pour over the beef. Place on the lid and cook on low for 6 hours.

Use a fork to shred the meat and then allow to cool before placing in fridge (or use it hot in the wraps if you’d prefer). This quantity of beef did 12 rolls for us.

You need a packet of rice paper wraps – they are usually in the ‘international food’ aisle of the supermarket. They are hard and brittle, but you dunk them in warm water to soften them (follow the instructions of the back of the pack).

We filled them with cooked brown rice, avocado, the Thai beef and your choice of crunchy salad or veggie fillings. The kids added cheese to theirs as well.

20170313_183941

20170313_184418

Fill, roll and enjoy – A great transportable food for picnics and lunchboxes too!

20170313_184231-1

Roasted Tomato Confit

We have had such a lovely abundance of cherry tomatoes this year. But then we have had some crazily inconsistent weather – and tomatoes don’t like inconsistent watering …. so we picked a load that had split. Gr. What to do?

I remember my host family in France (from a loooong time ago) had all kids of amazing confit jars (confit is French for preserved) in their cool basement. Lots of meats and veggies to get them through a snowy, regional winter. Since I couldn’t bear to waste these little gems, I decided to have a go at my own confit with my little red gems.

You’ll need:

  • cherry tomatoes
  • fresh herbs (I use basil, rosemary and thyme)
  • garlic olive oil*
  • salt and pepper

*If you don’t have have garlic infused oil, use olive oil and scatter through a handful of crushed garlic cloves.

Wash and pat dry your tomatoes. Remove little stems.

Place in a lined baking dish.

20190121_072349

Tear herbs and scatter around the tomatoes. Drizzle very generously with oil, and season in salt and pepper to taste.

20170209_134405

20190209_124602

Place in a preheated 200C oven for about 40 minutes.

20190121_085830

Allow to cool for a few minutes in the tray and then scoop into a sterile glass jar, including all the juices. Top with a little extra oil before sealing.

Store in the fridge for up to a month.

20190121_085811

20190209_170707

Roasting the tomato really intensifies the flavour so this confit is a great addition to many things – Serve on crunchy toast as a bruschetta, spread it on a pizza base, or add a few good scoops into your tomato bases sauces for pasta, bolognese or lasagne.

FB_IMG_1549756779863
We gave some away as a gift – and this is how my gorgeous SIL used hers! Yum!

Enjoy 🙂