Date Oat and Ginger Biscuits

My mum loves her cuppa. If we’re out at a cafe she mostly she resists sweet treats (serious will power!) but she does have a soft spot for a date and oat biscuit, so these ones are for her for Mother’s day. Hope you enjoy them mum πŸ™‚

  • 1 cup wholemeal spelt or light rye flour or plain GF flour mix
  • 3/4 tsp GF baking powder
  • 1/2 cup vegan butter or coconut oil
  • 1/2 cup coconut sugar
  • 2 tablespoons flaxseeds
  • 4 tbsp aquafaba (the liquid drained from a can of chic peas) – or 1 whole egg plus 1 tbsp water
  • 1 tsp vanilla bean paste
  • 1 teaspoon ground ginger
  • 1/2 Himilayan salt
  • 2 cups rolled oats (or rolled quinoa for the GF version)
  • 6 medjool dates, pitted

Using a food processor cream together the butter and sugar (Speed 4, 10 seconds)

Add in the aquafaba, vanilla, ginger salt and flax then mix again to combine (Speed 4, 8 seconds)

Drop the pitted dates one at a time onto spinning blades through the chute at the top, then process until dates are finely chopped (speed 4 whilst adding dates, then up to speed 7 for about 10-15 seconds)

In a separate bowl whisk together the flour, oats and baking powder then add half of this dry mix at a time to the processor and process to combine (Speed 4, 12 seconds, scrape down and repeat for next half).

Use about 3/4 of a tbsp of mix and roll into a tight ball (not quite as big as a golf ball), place onto a lined baking tray, then press down with the palm on your hand to a thick disc shape.

20160507_193206

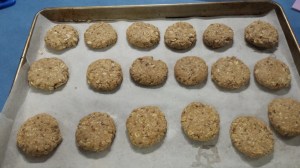
Bake in a preheated moderate oven for about 25 minutes or until golden brown.

20160507_200643

The cookies will still be soft when you remove them. They will harden as they cool. Allow to cool on the tray for 10 minutes before transferring then to a wire rack to finish cooling.

Makes 18. They keep for about a week in an airtight container or you can freeze them.

Enjoy!

Salt and Pepper Calamari

A little victory at our place tonight.

Little miss looked at new food and voluntarily said ‘I’ll try it’

… and she did AND she enjoyed it!!!

In fact, she enjoyed it so much, she ate her brother’s left overs!!!! Unheard of!!! Doing a little dance of joy πŸ™‚

Will loves calamari, so when we saw it on sale at the markets a while ago we bought it but I hadn’t got around to cooking it yet because I hadn’t got my head around a non dairy option for soaking the uncooked squid … then today I had a brainwave ….

The reason that people normally soak calamari in milk is for the lactic acid in the milk to soften the collagen fibres in the squid. So I decided to try the buttermilk that I make to use in scones and banana bread etc. Success!

‘Buttermilk’:

  • 1 cup oat/rice/soy milk
  • 2 tsp apple cider vinegar

Whisk together very quickly until frothy (Speed 4, 12 seconds).

Place calamari into the buttermilk, cover and place in the fridge for 4 hours – overnight.

20160429_071459

  • calamari, enough for your family, cut into rings
  • 8 tbsp aquafaba (liquid drained from a can of chick peas)
  • 1 cup GF flour mix (I used White Wings)
  • 1 tsp garlic salt
  • 1 tsp ground pepper
  • 1 cup rice bran oil, or similar, to cook.
  • extra salt to season after cooking

Heat the oil in a heavy based frying pan to a very hot heat.

Drain and rinse the calamari (drain well as excess moisture will make the breading soggy).

20160429_163945

Combine the flour, garlic salt and pepper and set aside.

Whisk the aquafaba until frothy (Speed 4, 15 seconds with the butterfly attachment).

20160429_163924

Drop the rings into the aquafaba mix, allow to mostly drain then place into the flour mix and coat well.

Drop a few rings at a time into the hot oil, do not overcrowd the pan, an allow to cook for about 1 minute, and until lightly golden.

20160429_175850

Use a slotted spoon or a meal spider to remove the rings and place on a draining rack or paper towel to remove excess oil.

Sprinkle with extra salt and serve immediately.

20160429_180602

…. we were supposed to eat ours with oven baked sweet potato fries, but I dislocated the middle knuckle on my right hand and wasn’t up to the cutting …. so our local fish and chip shop chips came in handy πŸ˜‰

Enjoy πŸ™‚


Spanish Rice

Even though it was the inspiration for this dish, I daren’t call it ‘paella’ because I know that this one is not authentic and there are a lot of paella purists who would be very unimpressed!

So this is my take on a Spanish flavour for a 1 pot rice dish.

  • 1.5 cups short grain rice
  • 2 cups hot chicken stock (I use Massel)
  • 1/2 brown onion, finely diced
  • 2 cloves garlic, finely chopped
  • 1 tbsp tomato paste
  • 1 tsp smoked paprika
  • 400g tin crushed tomatoes
  • 1/4 cup white wine
  • 3 large handfulls chopped green beans
  • 3 large handfulls sliced button mushrooms
  • salt and pepper to taste
  • Optional – 125g sliced spicy chorizo (make sure it is GF and DF)

If you are going to keep this as a vegan dish, and not use the chorizo, you will need to add; 2 tbsp oil, an extra tsp of the paprika plus 1 tsp of minced chilli. It also benefits from a 400g tin of drained and rinsed chick peas!

In a large, heavy based fry pan, place the chorizo and render down the fat, whilst browning the meat.

20160411_171916

Remove the meat from the pan, but leave the oil in the pan. (Add your oil to a dry pan at this point if making the vegan dish). Add the garlic and onion and cook until translucent (chilli too if you’re using it).

Add in the paprika and tomato paste and mix well.

20160411_172504

Add in the wine and use a spatula to deglaze the pan (getting all the tasty, stuck bits off the bottom of the pan so you don’t lose their flavour).

Add the rice to the pan and stir well to coat. Allow to cook for 2-3 minutes.

20160411_172834

Pour over the tomatoes and stock, stir well and bring to a gentle simmer.

Allow to simmer gently for 12 minutes, mixing occasionally.

Taste and season with salt and pepper.

Add in the mushrooms, stir well and simmer for a further 3 minutes.

Stir in the beans, remove from heat. Place lid on the pan and allow to sit, covered, for 10 minutes.

20160411_174513

Return chorizo to pan and stir through, then serve immediately.

20160411_175523

Serves about 6 adults.

Enjoy!


Pear Gingerbread Cake

This delicious, moist cake is perfect for afternoon tea (…. or any time cake is required really!).

See the option within the recipe for the coeliac friendly version.

  • 2 very ripe pears, peeling, cored and diced
  • 125g vegan butter
  • 3 tbsp aquafaba (liquid drained from a can of chick peas) OR 1 whole egg
  • 150g maple syrup
  • 1 tbsp ground ginger
  • 1 tsp ground cinnamon
  • 1 tsp bi carb soda
  • 1.5 tsp GF Baking powder
  • 1 3/4 cups flour (OR 1 1/4 cup GF flour mix and 1/2 cup almond or seed meal)
  • 300ml milk of choice

Whisk together the milk and aquafaba until light and frothy (Speed 4, 15 seconds). Then set aside.

20160406_130349

Melt together the Nuttelex and syrup (Speed 2, 100C, approx 2-3 mins or until all melted).

Whisk together all dry ingredients in a separate bowl.

Add the milk mix to the butter mix, then add the pears and mix gently (Speed 2, 12 seconds). If you are using an egg instead of the aquafaba, add it in at this point.

Add the dry mix gradually to the wet mix and fold together until just combined (Speed 3, 10 seconds at a time, scraping down in between).

Pour mixture (which is quite runny), into a lined/greased tin and place into a preheated moderate oven for about 1 hour or until a skewer comes out clean.

20160406_131114

20160406_141028-1.jpg

Enjoy warm, dusted with icing sugar, or served with a little cream/icecream if your diet allows.

20160406_151204-1.jpg

Happy afternoon tea!

Preserving Chilli

There’s not much nicer in the kitchen than being able to cook with the food that you have grown only metres away!

Our chilli plants have been very productive this summer and these are a couple of the ways I have used them.

Chopped/Minced Chilli – use 1 flat tsp in place of 1 fresh chopped chilli in any recipe.

  • 150g chilli
  • 2 tbsp white vinegar.

Place whole chillis and vinegar in your processor and process until well chopped. (Speed 6, 10 seconds).

20160331_125509

Of course, if you don’t have a processor you can just finely chop by hand and then stir through the vinegar.

Store in small, sterilised glass jars.

Chilli Infused Olive Oil –Β use in place of regular olive oil in cooking to add a bit of extra bite, or as a dip for some delicious crunchy bread.

  • 400ml extra virgin olive oil
  • 6 small chillis (mine were the size of my index finger)

Slice chillis lengthways and place in a saucepan with the oil.

20160331_130248

20160331_130507

Bring to a gentle simmer Β (100C, Speed 1, about 4-5 minutes) and then remove from the heat and allow to stand for 10 minutes.

Pour into sterilised glass bottles, through a sieve to remove the seeds. Then add the remaining chilli flesh into the bottles and seal.

20160331_131417

20160331_132312-1

Enjoy all year ’round πŸ™‚

Gravy

You have probably read about my Mum being a fabulous cook many times on this blog. I’m always hopeful that I can come close to approximating her meals with our dietary limitations.

However, as a kid, I only remember gravy being made in instant form from powder in a packet (Sorry Mum!)… most probably because it was much quick and less fatty. So as an adult learning how to make gravy has been a bit of a challenge for me…. and it seems I’m not alone! It was always a little hit and miss until I recently saw a very old episode of ‘Good Eats’, hosted by Alton Brown. His method for making gravy was to thicken with a roux (fat and flour), so that the flour has already cooked out before it combines with the meat juices. And now we get great gravy every time.

I tend to cook in bulk, and gravy is no exception. This recipe makes about 3 cups of gravy. I pour into reusable squeezey containers and freeze. It means when I cook a leg of lamb that does us for 3 meals – I have the gravy ready to go for each of the following meals too.

  • 3 cups Meat juices (I get about this from a large leg of lamb that I have slow cooked)
  • 2 tbsp fat (either from the meat or Nuttelex)
  • 2 tbsp flour (I use either spelt or a GF flour mix)

A general ratio of 1 tbsp fat, 1 tbsp flour to each 1.5 cups of liquid.

After I have removed the meat, I strain the meat juices and reserve the liquid.

20160326_223649

Sit the liquid in the fridge for a couple of hours so that the fat separates and solidifies on the top. Then I scoop off the fat.

20160327_104823

In a medium saucepan warm the juices back up – they will be quite jelly-like after cooling.

In a large saucepan, over a medium heat, melt your fat of choice, either the fat scooped off the top of the top of the cooled meat juice or use Nuttelex.

Then add in your flour. Whisk it to combine well. This is your roux and it needs to cook for about 4-5 minutes, whisking regularly, to allow the raw taste of the flour to cook out.

20160329_152609

Then add 1/2 a cup of the warmed meat juices at a time into the roux, whisking whilst you add, and waiting till all combined before you add the next 1/2 cup.

Cooking, whisking regularly over a very gentle heat until you see the mixture come to a very slight simmer. Remove from the heat and serve with your meal.

20160329_153056
Silky smooth!

20160329_154031-1

Mixtures thickened with flour will continue to thicken on cooling, so try to serve as soon as possible. You can add a little boiling water if you wish to have runnier gravy.

Of course, you can use this method for all meats and add extra flavours to intensify those already in the juices.

Enjoy!


Chicken and Gravy Pot Pie

I don’t like waste … in any form! Time, money, food and energy are all precious to me so I try to use them all to the best of my capability. This pie kind of exemplifies that! It uses scraps of left over meat, pantry staples and veggies that might be looking a little sad in the fridge, and it makes 2 meals at once. Love it.

A couple of weeks back I bought 2 bbq chickens to take to a picnic. After I’d pulled all of the firm, white meat off, there was a heap left that was brown meat, or a bit soft and fiddly to eat at a picnic, so I pulled every last shred off and froze it to use later – I got 350g off 2 chickens – easily an extra meal!

*If you’re not eating any meat, check below the recipe for a simple tweak to make this a vegan pie.

20160304_134119

Then I make a simple chicken style gravy (not actually any chicken in it!). You need:

  • 2 cups very hot chicken stock (I used Massel brand)
  • 1 tbsp Nuttelex/vegan butter
  • 1 tbsp spelt or pure corn flour
  • 1/3 cup white wine
  • 1 tsp fresh chopped thyme
  • ground black pepper to taste

Melt the Nuttelex in a saucepan then add in the flour, whisking immediately to avoid lumps (Speed 2, 100C for 2 mins or until melted, then add flour and continue speed 2, 90C for 4 mins). Cook, over medium heat, for about 4-5 minutes, stirring regularly. Then add in 1/3 Β of a cup of chicken stock at a time, whist whisking (Speed 2, 90C, and add stock through hold in lid). Once all the stock is combined, add in the wine, thyme and pepper and allow to simmer very gently for 2-3 minutes (Speed 2, 80C for 3 minutes). Set aside.

To make the filling of the pieΒ you will need:

  • 2 tbsp garlic oil
  • 1 brown onion, finely chopped
  • 10-12 large button mushrooms, sliced
  • 2 cups roughly chopped green beans
  • 400g tin chic peas, drained and rinsed (save the brine when you drain it to use as an egg replacer!)

Heat the oil in a large pan (fabulous if this pan/dish can go from stove top to oven!), add the onions and good until translucent. Add in the mushrooms and cook, stirring until softening, about 4-5 minutes. Add in green beans and chic peas.

20160304_134107-1

Pour gravy over the top of the veggie mix, then add the chopped cooked chicken, mix well and then bring to a gentle simmer for a few minutes.

20160304_134549

To make the topping of the pieΒ (which is a type of savoury scone dough!)Β you will need:

  • 45g vegan butter
  • 1.5 -1.75 cups spelt flour (or 1.25-1.5 cups GF flour plus 1 tsp psyllium)
  • 2 tsp GF baking powder
  • 1 heaped tbsp Nutritional yeast
  • 1 tsp Himilayan salt
  • 5-6 grinds back pepper
  • 1 tsp fresh chopped thyme.
  • 1/2 cup milk of choice – or water works well too.

In your food processor pulse together the Nuttelex with 1.5 cups of flour and baking powder.

Once it resembles bread crumbs stop the processor and add nutritional yeast, salt, black pepper, thyme. Process to combine (Speed 4, 5 seconds)

Then whilst the mixer working (used speed 3), gradually add in 1/2 cup milk or water.

Process to bring together (adding 1 tsp of flour extra at a time if your dough is too wet) then tip on to a floured surface and knead gently.

Roll to shape of you pie dish and top. Cut little vent holes.

Place in preheated 200C oven and bake for about 20-25 mins or until risen and golden brown minutes. It’s like having dumplings with a thick chicken casserole!


20160419_174317

20160419_174905

This quantity of filling is actually too much for one meal for our family, so I froze half for an easy meal down the track!

It is super simple to make a vegan version of this pie – simply leave out the chicken and double the quantity of chic peas and mushrooms.

Enjoy πŸ™‚


Vanilla Almond Cake

You might have already noticed, but chocolate flavoured anything is a fairly firm favourite in our house, for all 6 of us! Just occasionally, it’s nice to change it up a bit though πŸ™‚

In the coming week, my 2 youngest boys and my husband have birthdays. We are having a joint birthday party (along with my Nanna!) and each has requested a cake. I couldn’t imagine taking along 3 chocolate cakes, so decided to have a go at a vanilla flavoured base for George’s “Daddy Raa” (Lion King) cake. It is based on my regular Chocolate Cake (which you should try too!). This is was the result – and it is yummy … thumbs up from everyone!!

See below the recipe for a coeliac friendly version.

  • 1 1/4 cup spelt (I do half wholemeal)
  • 1/2 cup almond meal (use extra flour or seed meal for a nut free option, see note below)
  • 2 tsp GF baking powder
  • 1/2 Β cupΒ coconutΒ sugar (use white sugar if you want a lighter coloured batter)
  • 100g Nuttelex/vegan butter/tasteless coconut oil
  • 1 cup milk of choice (I use oat/rice/vanilla almond)
  • 2 tsp vanilla bean paste
  • 3 tbsp aquafaba (liquid drained from a can of chic peas) 1 egg of egg replacement powder OR 1 egg

Mix together the oil, milk and vanilla and heat until melted and well combined.

In the large bowl of your mixer sift together the flour, sugar and baking powder.

Mix the wet mix into the flour mix and beat well so the mixture is light. While the mix is beating, add in the aquafaba.

Pour into a lined cake tin or about 14 regular muffin holes.

20160303_130030

Bake in a preheated moderate oven for approx 50 minutes (for the cake) or 25 minutes for the muffins, or until a skewer comes out clean.

20160303_135807

Allow to cool for 10 minutes in the tin before transferring to a wire rack. Ice as desired.

(I make a simple icing from 1 tbsp melted Nuttelex, 1 tsp vanilla bean paste, a splash of milk and pure icing sugar).

20160303_152253.jpg

To adapt for a Thermal cooker:

Place the oil, vanilla and milk in the jug and cook on speed 2 at 100C for 2 1/2 mins, or until the oil is melted.

Add in the sugar, baking powder and mix on speed 4 for 15 seconds.

Add the flours and mix on speed 4 for 30 seconds. Whilst mixing, add the aquafaba through the opening in the top if the lid.

Enjoy πŸ™‚

To make this into a coeliac friendly versionΒ make sure you use rice or almond milk and replace the spelt flour with 1 cup of a plain GF flour mix and increase the almond or seed meal to 1 cup.

I make the seed meal by milling 3 tbsp each of flax, sunflower and pumpkin seeds.

20160206_110539-1
Seed Meal

This makes a great double batch cake to take to church for supper, or to slice and freeze for lunchboxes too.

20160303_152547.jpg

Cheeky Monkey Bread – Banana Yoghurt loaf

This yummy quick bread is a major hit with all 4 of my little guys at the moment.

It is super simple to make, freezes beautifully and is a great, not too sweet, treat for lunchboxes.

  • 125g soy/coconut/dairy yoghurt
  • 75ml milk of choice
  • 2 tbsp honey/maple syrup
  • 1 large overripe banana
  • 1 tsp ground cinnamon
  • 100g Nuttelex/vegan butter/light tasting oil, melted
  • 1.5 tsp GF baking powder
  • 1.5 cup spelt flour, about 1/2 wholemeal (OR 1.25 cups GF flour mix plus 1/4 cup seed/almond meal mix)
  • 1 tsp apple cider vinegar

Optional extras:

  • 1/3 cup mixed milled seeds (remove 1/3 cup of flour if you use this option)
  • 4 squares dark chocolate

Place all dry items, except the chocolate, together in your food processor (or just a bowl with a whisk) and process until well combined. (Speed 4, 8 seconds).

If using, grate or finely chop the chocolate into the mix and process again until combined (Speed 4, 5 seconds).

Set aside the dry mix.

In your processor/blender/nutribullet/thermal cooker, place the melted butter/oil, aquafaba, honey, vinegar and banana and process until well combined and smooth (Speed 5, 10 seconds).

Pour wet mix into the dry mix and fold through until combined (Use speed 4, 8 seconds, scrape down and repeat)

Pour into lined loaf tin and bake in a preheated moderate oven for about 40 minutes or until golden brown and an inserted skewer comes out clean.

20160227_113213.jpg

Leave to cool in tin for 10 minutes, before transferring to a wire rack. Allow to cool completely before slicing.

20160515_175137

20180116_154858-1
Watch out for hungry superheroes!

Freezes and defrosts well.

20180116_154954-1

Enjoy πŸ™‚

Choc Chip Chick Pea cookies

These yummy cookies are a cross between my regular Choc Chip Cookies and my Date, Chick Pea and Sunflower seed butter cookies.

I love that they look like a regular choc chip cookie but have some hidden extra goodness.

  • 40g Nuttelex or other vegan butter
  • 80g Sunflower Seed butterΒ (or nut butter if your diet allows)
  • 120g chic peas (drained and rinsed)
  • 1/2 cup coconut sugar OR Maple Syrup
  • 1 3/4 cups spelt flour (OR 1 1/2 cups GF flour plus 1/4 cup almond meal)
  • 2.5 tsp baking powder
  • 1 tsp vanilla bean paste
  • 3 tbsp aquafaba (the liquid drained from a can of chick peas)
  • 1/3 cup choc chip/chopped chocolate of choice

Place the Nuttelex, seed butter, chic peas, sugar and vanilla into your processor and process until smooth (Speed 4, 15 seconds, scrape down and repeat).

Add in the aquafaba and baking powder and pulse a few times to combine.

Add in the flour and process until it forms a stiff dough (Speed 4 in 10 second intervals).

Add in choc chips and mix until combined.

20160130_155741

Roll teaspoons of mix into balls and place on a lines tray. Press down with the back of a fork. Try to stop your little helper eating all of the raw dough πŸ˜‰

20160130_160221-1

Place in to a preheated moderate oven and bake for about 12 minutes.

Allow to cool on the tray.

Makes about 20 – store in an airtight container for a week.

20160130_170341.jpg

Enjoy πŸ™‚