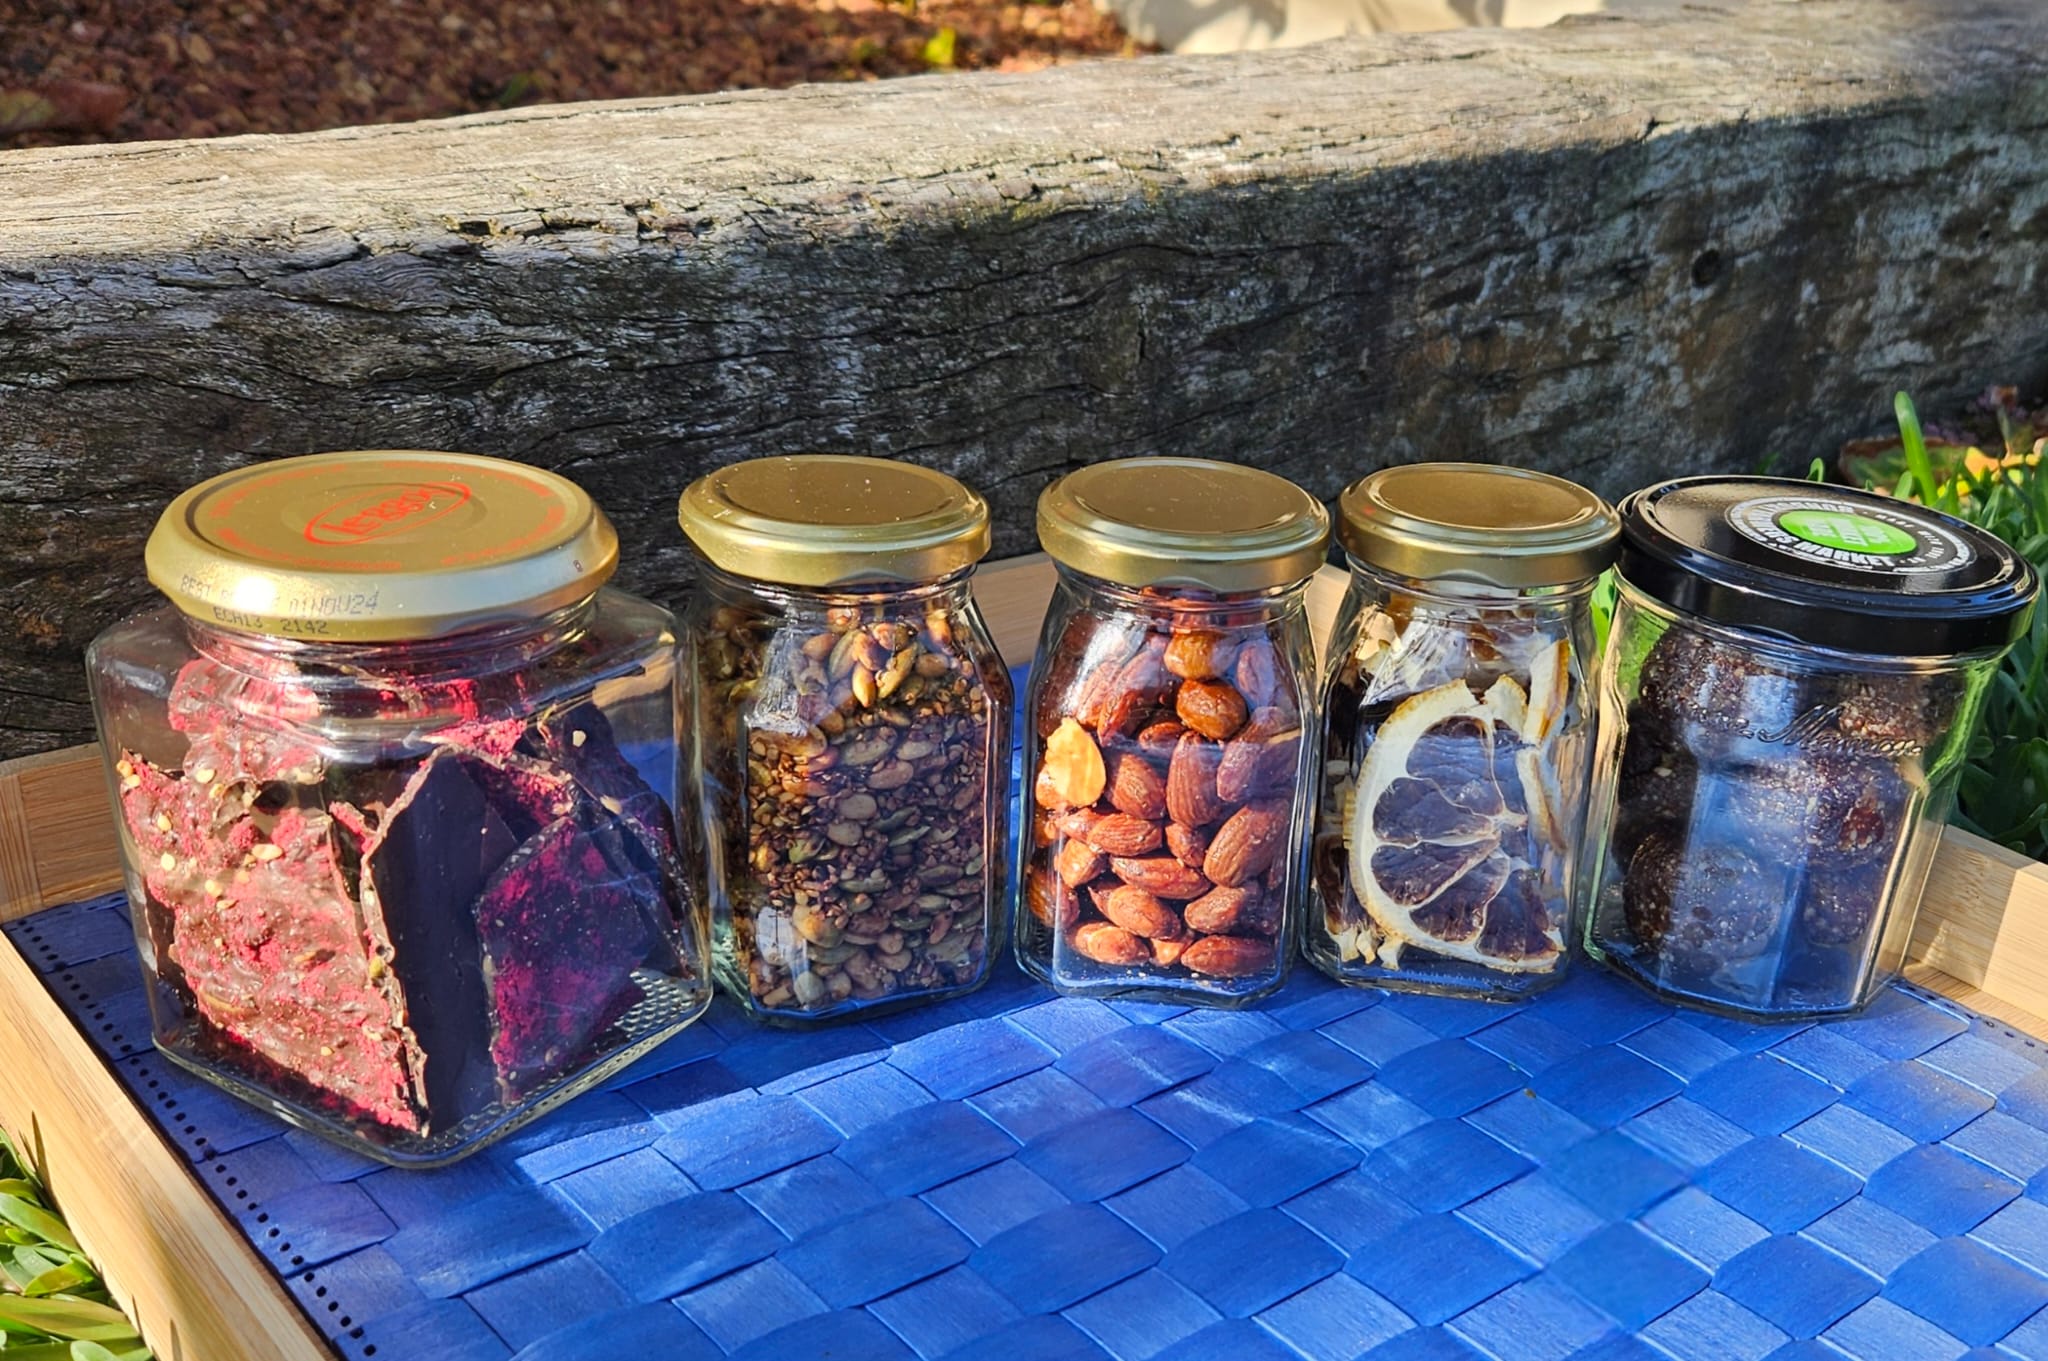
Her birthday was last week and I wanted to make her something special for when we got together to celebrate.
She’s vegetarian, allergic to peanuts … and she doesn’t like cake. But I know that she LOVES raspberry!
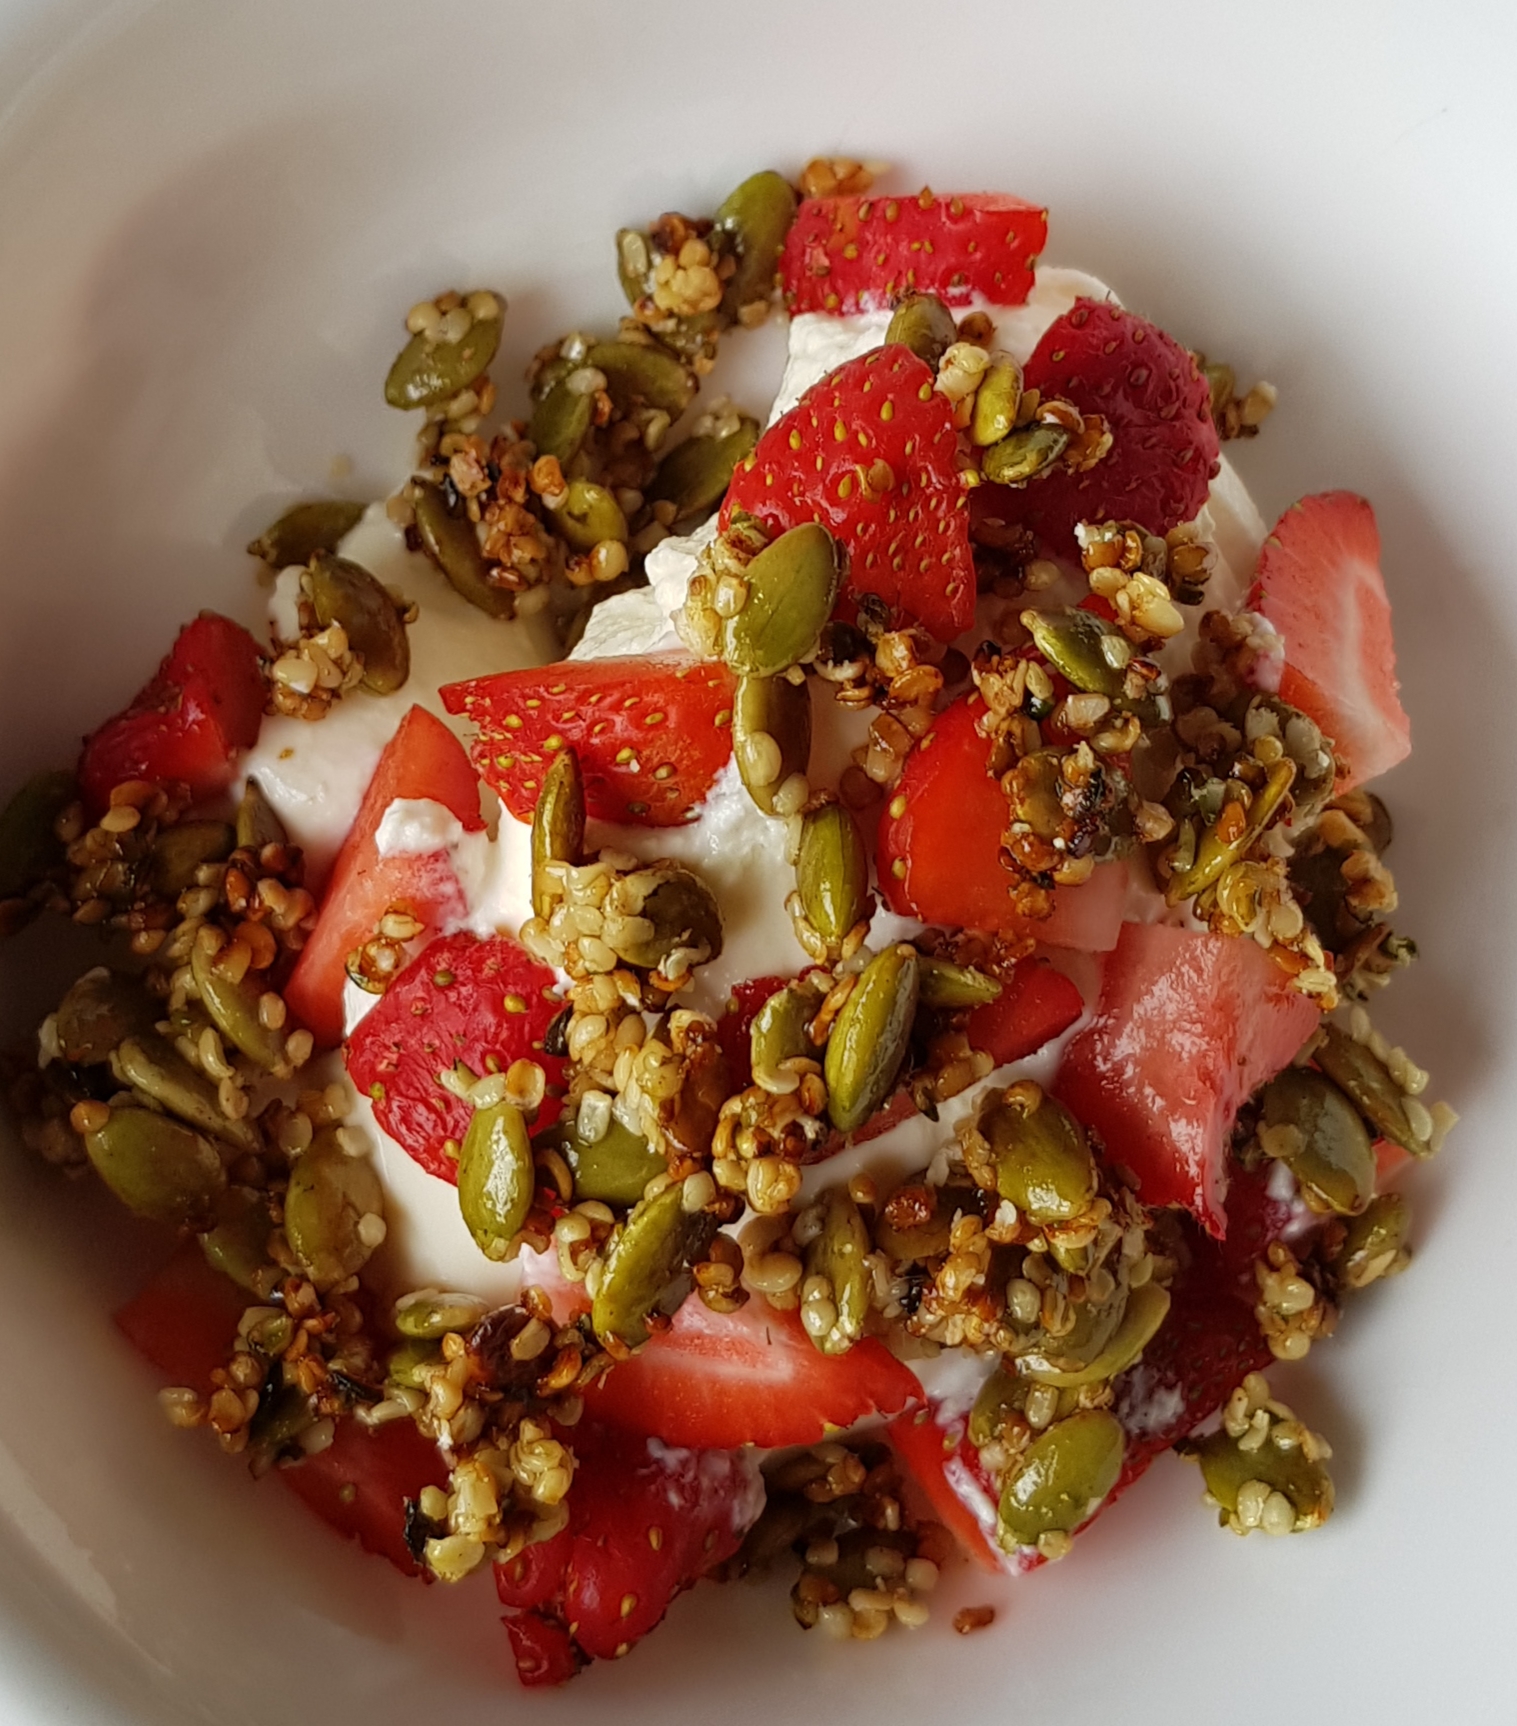
So I decided to create a special chocolate named for her … Happy Birthday A … hope you enjoyed your goodie bag 🧡
It’s pretty simple and fast to make, but it has amazing crunch and a beautiful tang to go with the sweetness of the chocolate.
If you’re headed out to a special function during the lead up to Christmas, it’d make a great dessert too.
275g Dark Chocolate melts (which ever suits your dietary needs)
Pumpkin seeds 1/4 cup
Hemp seeds 1/4 cup
1 tsp dehydrated raspberry powder
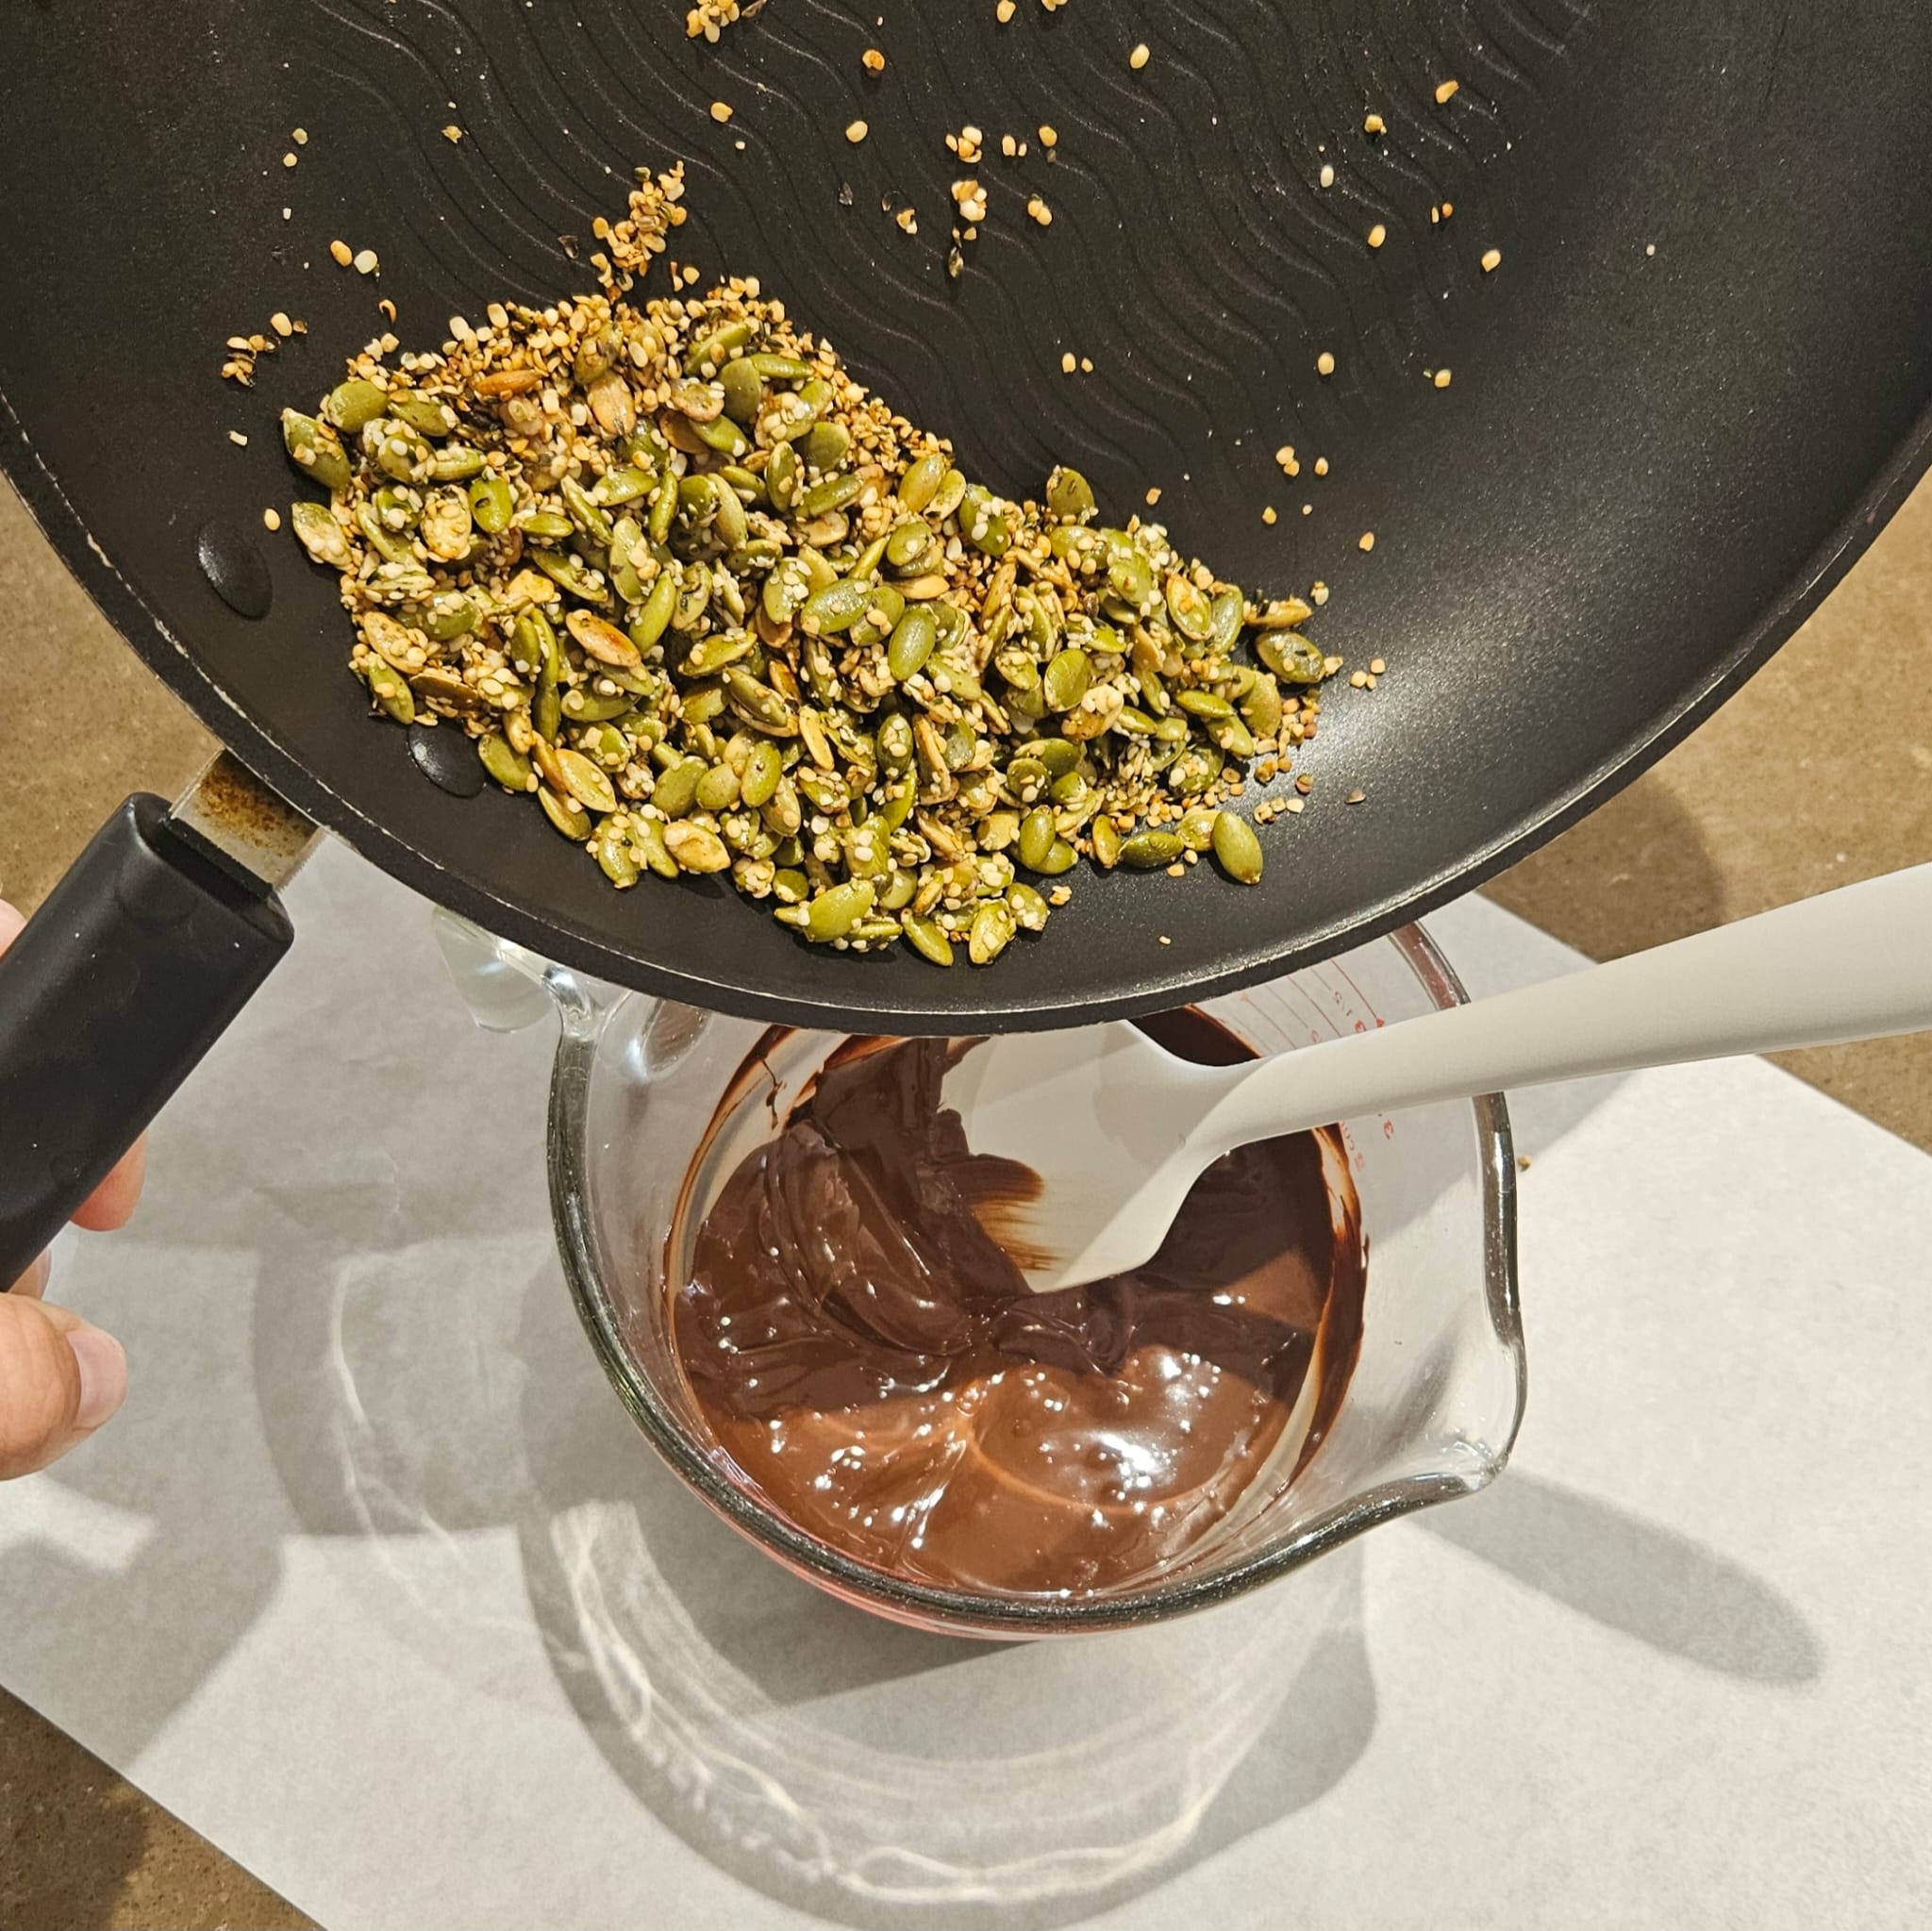
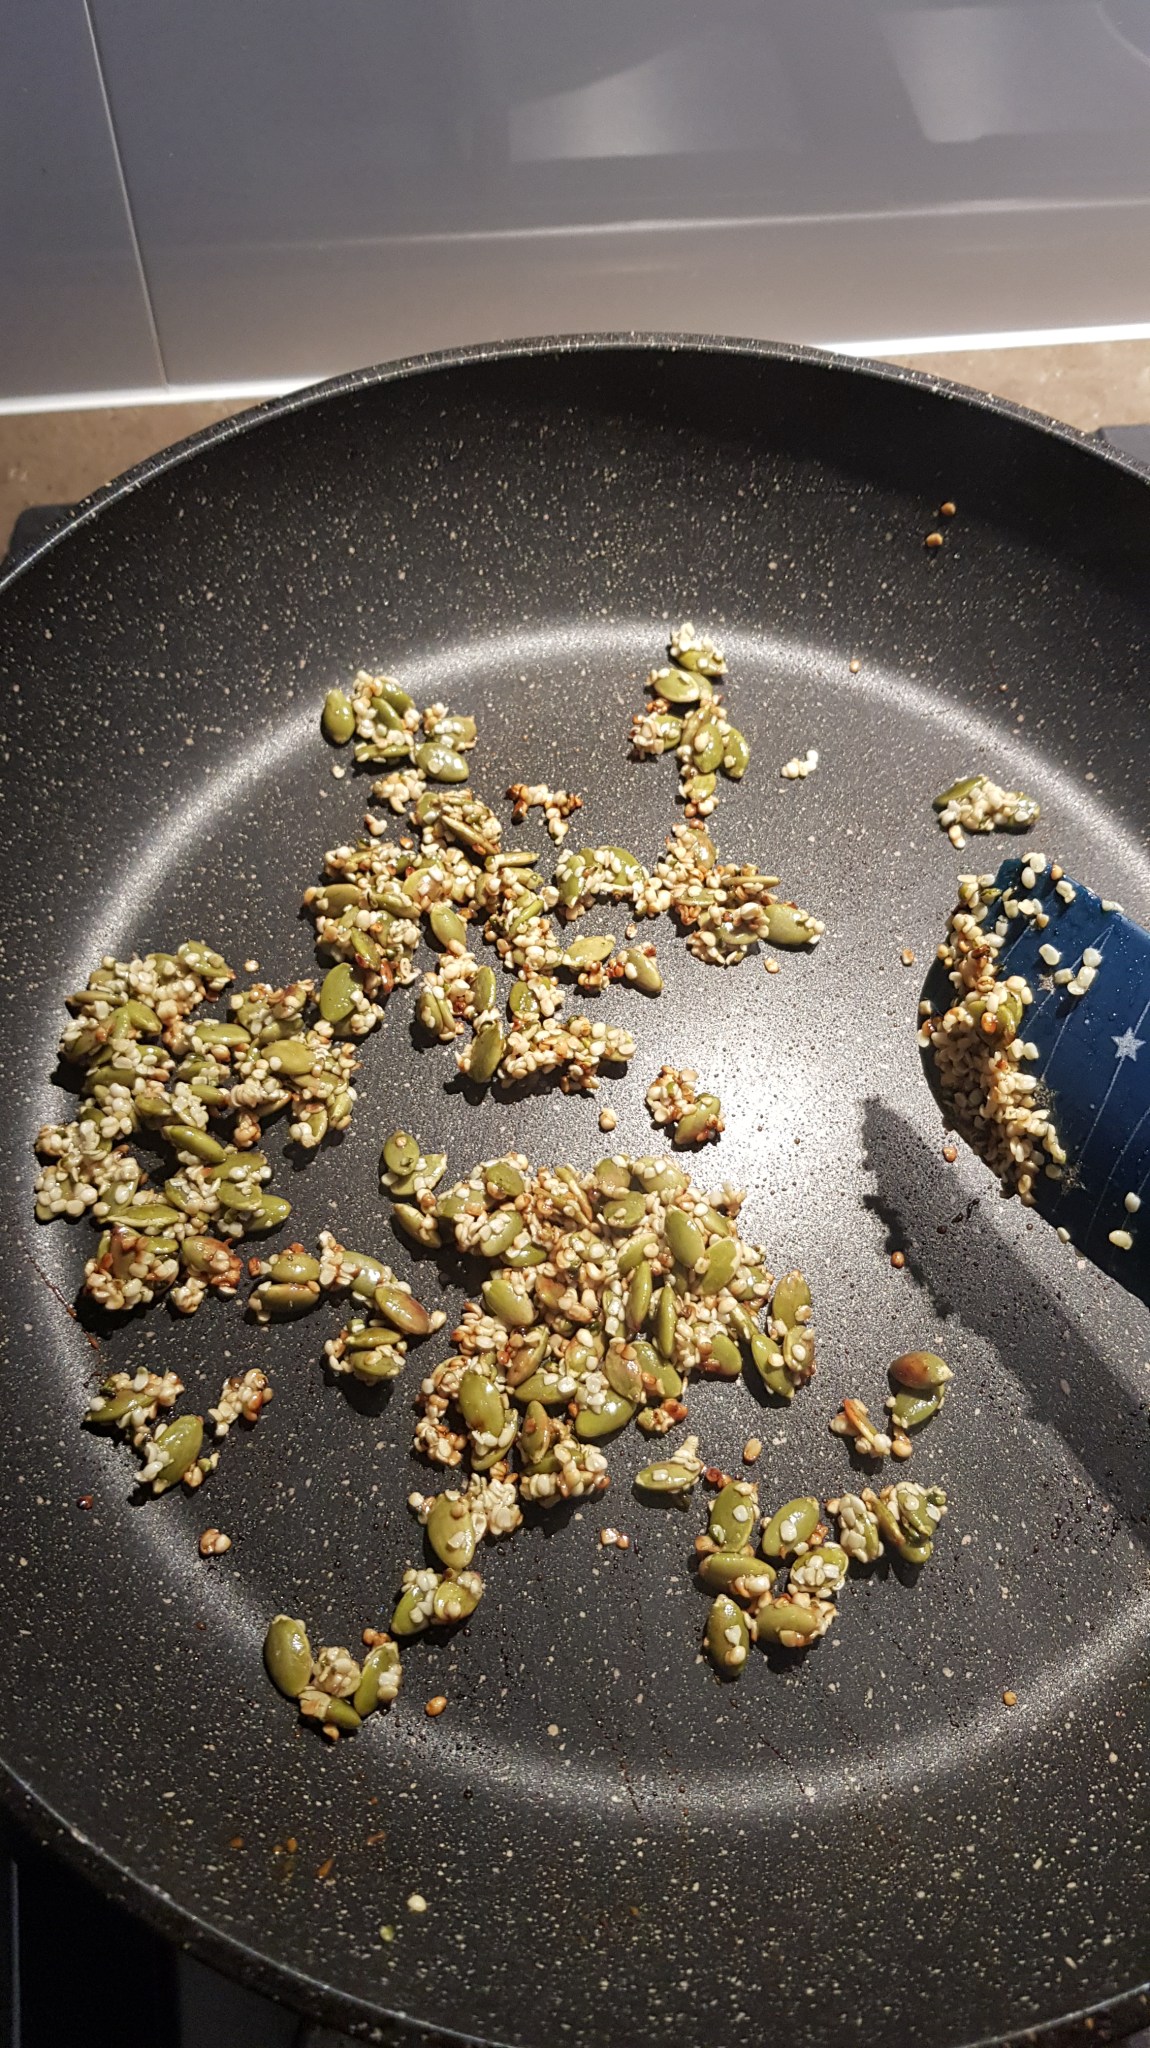
Heating a frying pan to medium heat and add in the pumpkin seeds. Dry fry them, stirring very frequently.
When they start to look a little golden, add in the hemp seeds. As they are so tiny, these cook much faster than the pumpkin seeds. Dry fry them, stirring very frequently, until they are golden brown – it doesn’t take very long!
Put the seeds to to the side.
Melt the chocolate until it is very runny … I use my microwave in about 30 second bursts.
Tip the seeds into the melted chocolate and mix well. It helps if the seeds are still warm.
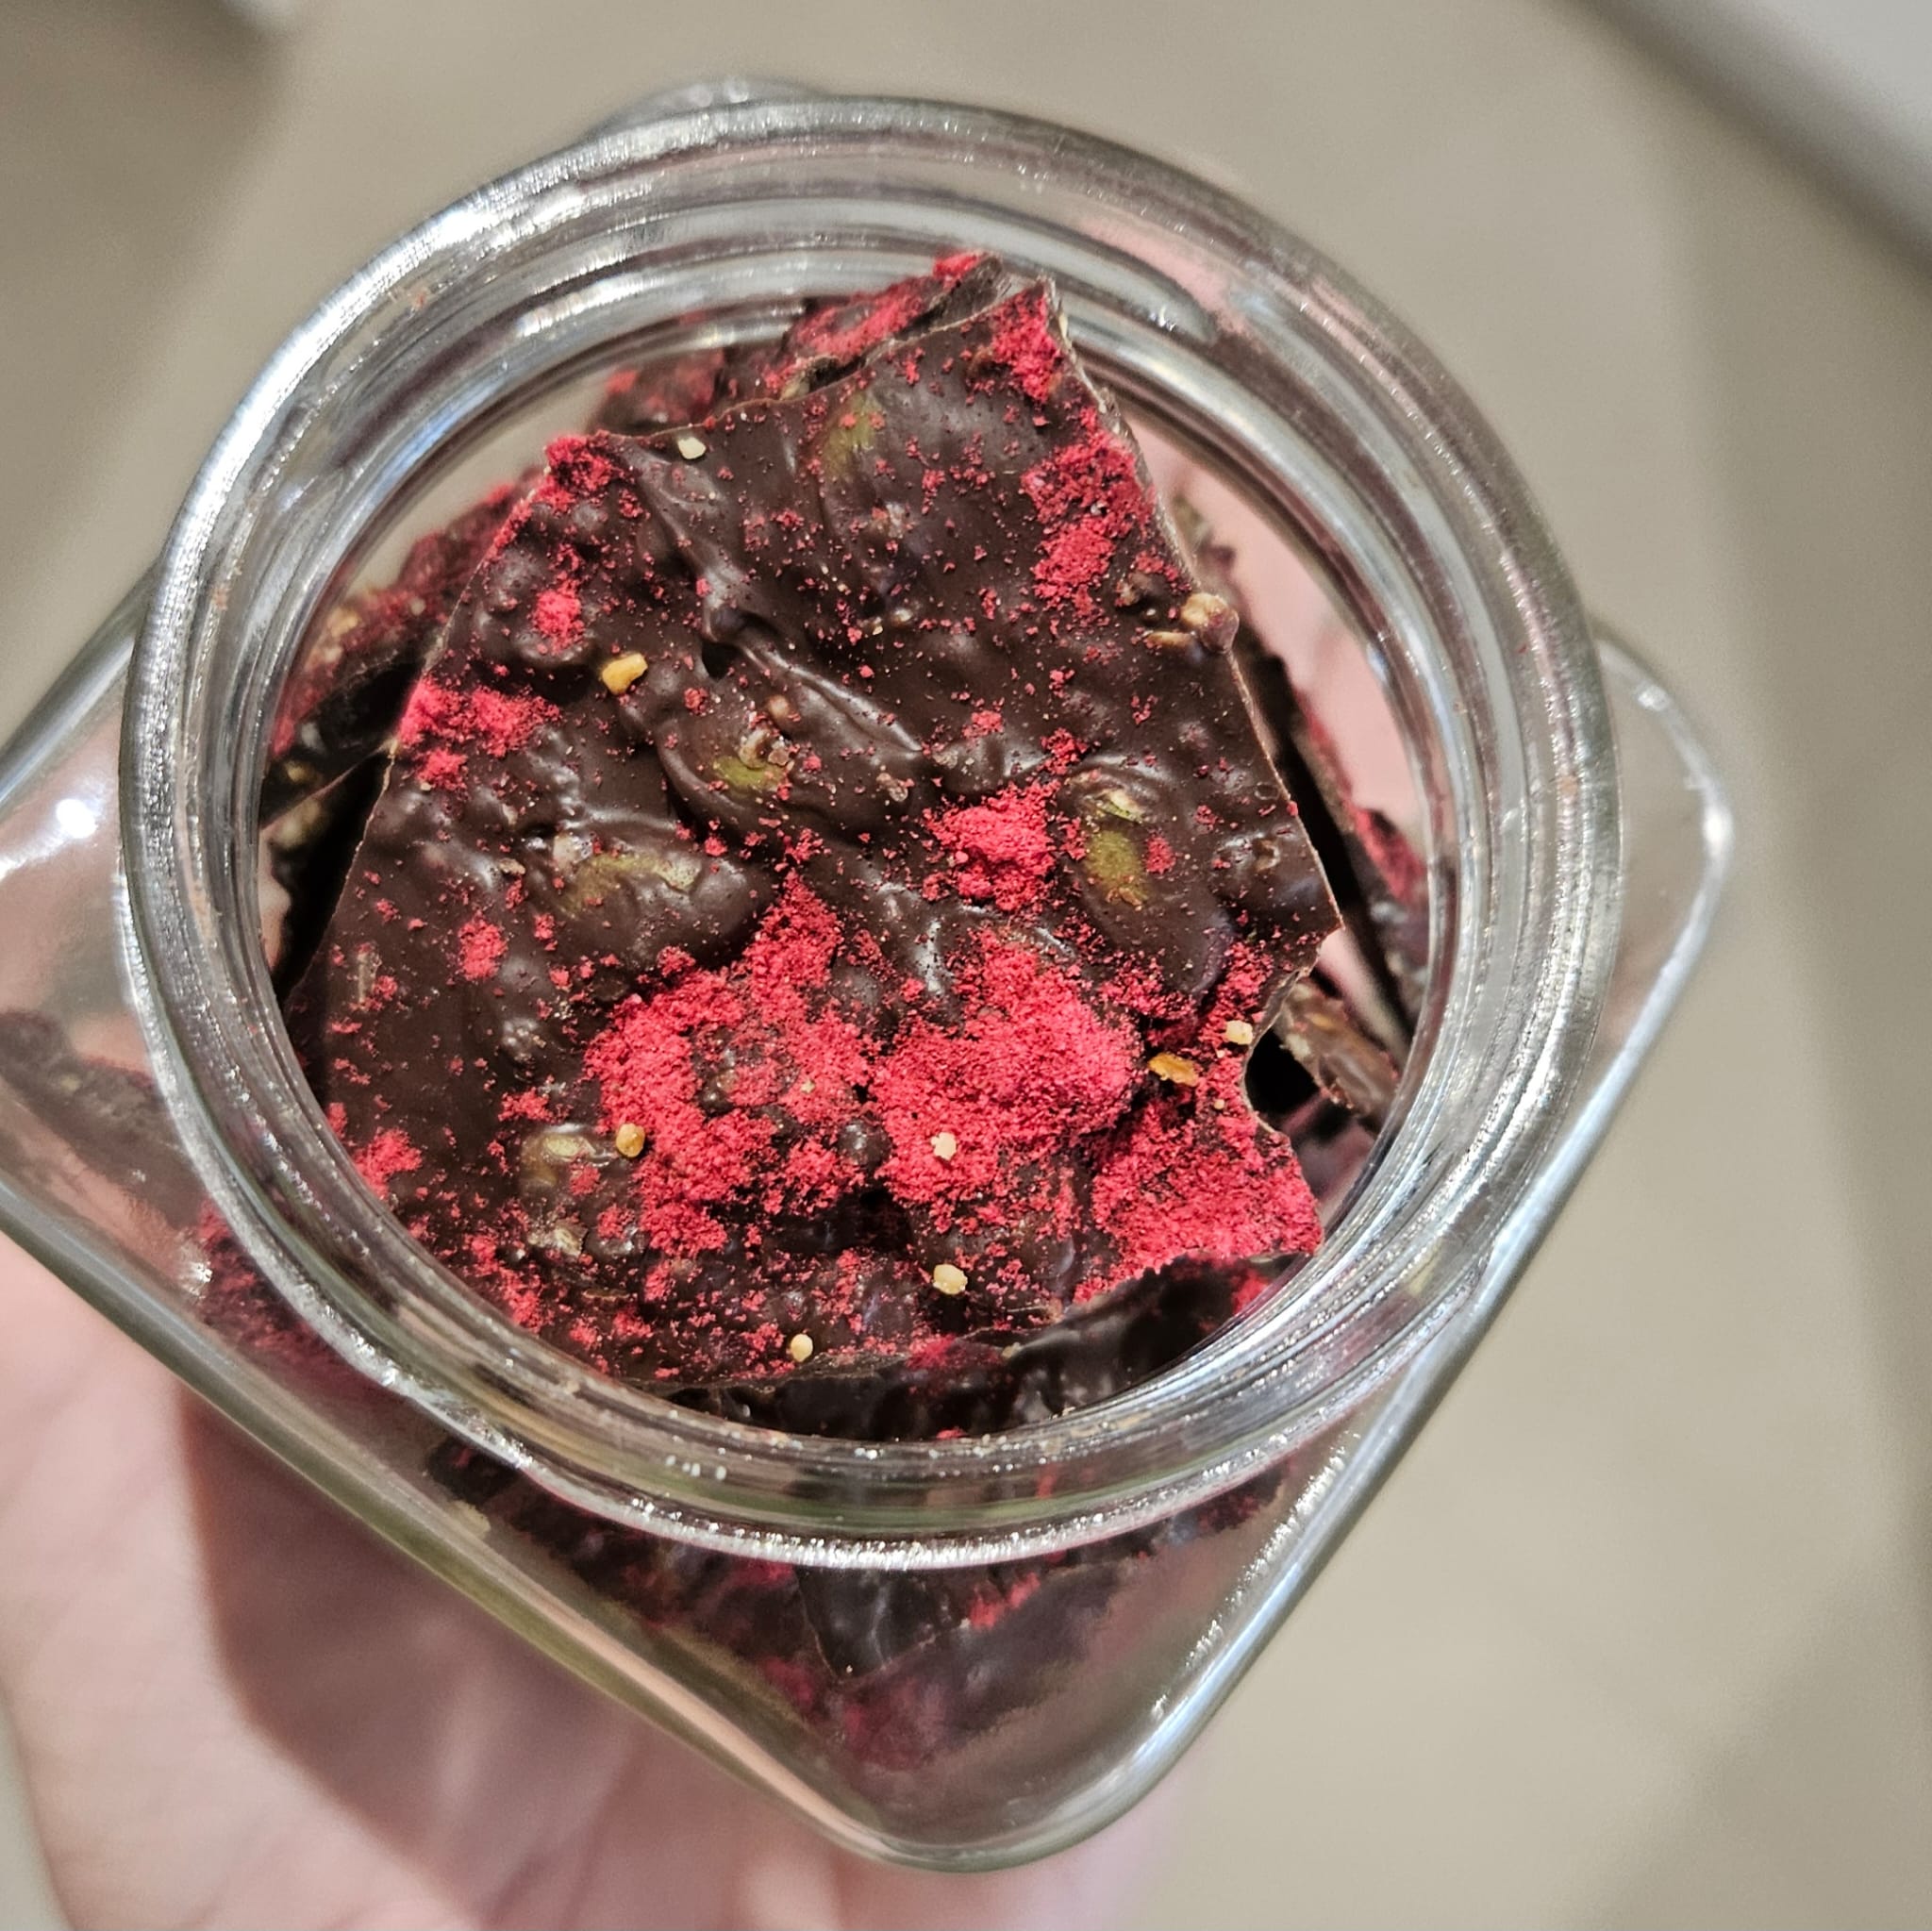
Pour the chocolate mix onto a sheet of baking paper and spread it out as thin as you are able.
Before the chocolate sets, sprinkle over the raspberry powder.
Allow to cool and set before snapping into pieces.
Enjoy however you wish … my preference is for a couple of pieces along with a book and a hot coffee ☕️
*A note on the raspberry powder: I got mine from Weigh n Pay in Woodvale. It is fairly expensive as a single ingredient but the taste is so beautiful and strong and a little goes a loooooong way. Thanks to Craig for all of your helpful advice!!!
You will need to eat this within a couple of days because the raspberry power will draw in moisture and get a little clumpy … but trust me … that shouldn’t be a problem!!
You can find waffles recipes pretty much everywhere.
They’re not new.
So why would I share my waffle recipe? 👩🍳
Well, my family LOVE them. But also, this is Itchin’ Kitchen version. I have worked at making them more nutritious and more filling. Plus giving you allergy friendly options.
Let me be clear – there is absolutely nothing wrong with regular waffles. NOTHING. If you love your waffles, then you keep going 👍
But I have big, super active teens and kids who are always hungry. So at the moment, my priority is working at ways to get my kids the nutrients they need to function well, to keep them full AND to do it in ways that will not break my budget (good luck right?!).
These waffles have more protein, more heart healthy fats, more fibre and are lower in sugar than your standard waffle, BUT importantly they still taste delicious!
1 1/2 cups self raising flour
1/2 cup almond meal
1/2 tsp baking powder
1/3 cup hemp seeds
1/2 tsp cinnamon
1 medium banana, very ripe
2 eggs
1 tsp vanilla bean paste
1 cup milk
25g butter, melted
Mix together all of the dried ingredients in a large bowl and set aside.
Into blender/bullet/thermomix, place the banana, eggs, vanilla and milk. Blend until very smooth (Speed 5, 8 secs).
Add the wet mix to the dry mix and mix until well combined (Speed 4, 12 secs. Scrape down and process again for 5 seconds if necessary). The mix doesn’t need beating.
Add in the melted butter and mix until well combined (Speed 4, 5 secs).
Into a preheated waffle maker, place approx 1/2 cup mixture of the batter, and cook until golden brown – this usually takes a couple of minutes, and I like to flip the waffle part way through to get an even colour … but that might just be my waffle maker!
Serve warm with your favourite toppings. Nut or seed better with berries is my favourite, and it will help to keep those tummies satisfied. Chopped banana and a drizzle of honey is great too
Makes 5-6 depending on size … I usually (ok, always!) make a double batch 😆
To freeze, allow to cool completely and then lay on a paper towel in a single layer inside a ziplock bag. A great solution for when a speedy school day breakfast is required.
Need Gluten free? Use the same amount of a one-to-one GF flour blend, or use 1 1/3 cups of a standard GF, SR flour mix.
Need Dairy Free? Use equal quantities of a plant based milk (look for high protein and calcium fortified – we use high protein soy or almond mostly), and a vegan butter.
Need Egg Free? Use an egg placement mix (the Orgran one is great), or use another 1/2 a ripe banana and 3 tbsp of aquafaba. Add the egg replacement mix or the aquafaba in at the same time that you would add the butter, not at the blending stage.
Need Nut Free? Replace the almond meal with a seed meal, or 1/2 cup of roughly blended oats.
Enjoy 🙂
P.S if you would like a chocolate version (and why wouldn’t you?! 😆) … Replace the almond meal with hazelnut meal, add in 2 tbsp of cocoa, 1/4 cup sugar and 2 tbsp more milk.
Knowing that I am always on the look out for delicious, nutritious food to feed my crew, my awesome Mum saw a recipe for a cereal bar on Facebook and tagged me in it:
They did look good – but I needed to make it fit our needs (and likes), so 15 minutes after I saw her tag I had my version in the oven! 😆 You can find the original version here on Weetbix
It’s a great high energy, nutrient dense bar, that works really well (like you can see above) to fuel the biggest one who regularly does a day that includes school sport, 10km of bike riding, a game of footy immediately followed by an hour of parkour training. Yes. All in the same day. He is 15, 6 foot 2 and ACTIVE!
Mr Itchin’ Kitchen thinks they are delicious and has been happily taking them in his work lunchbox too.
The ingredients are all pantry staples for us and you can buy all of them at your regular grocery store.
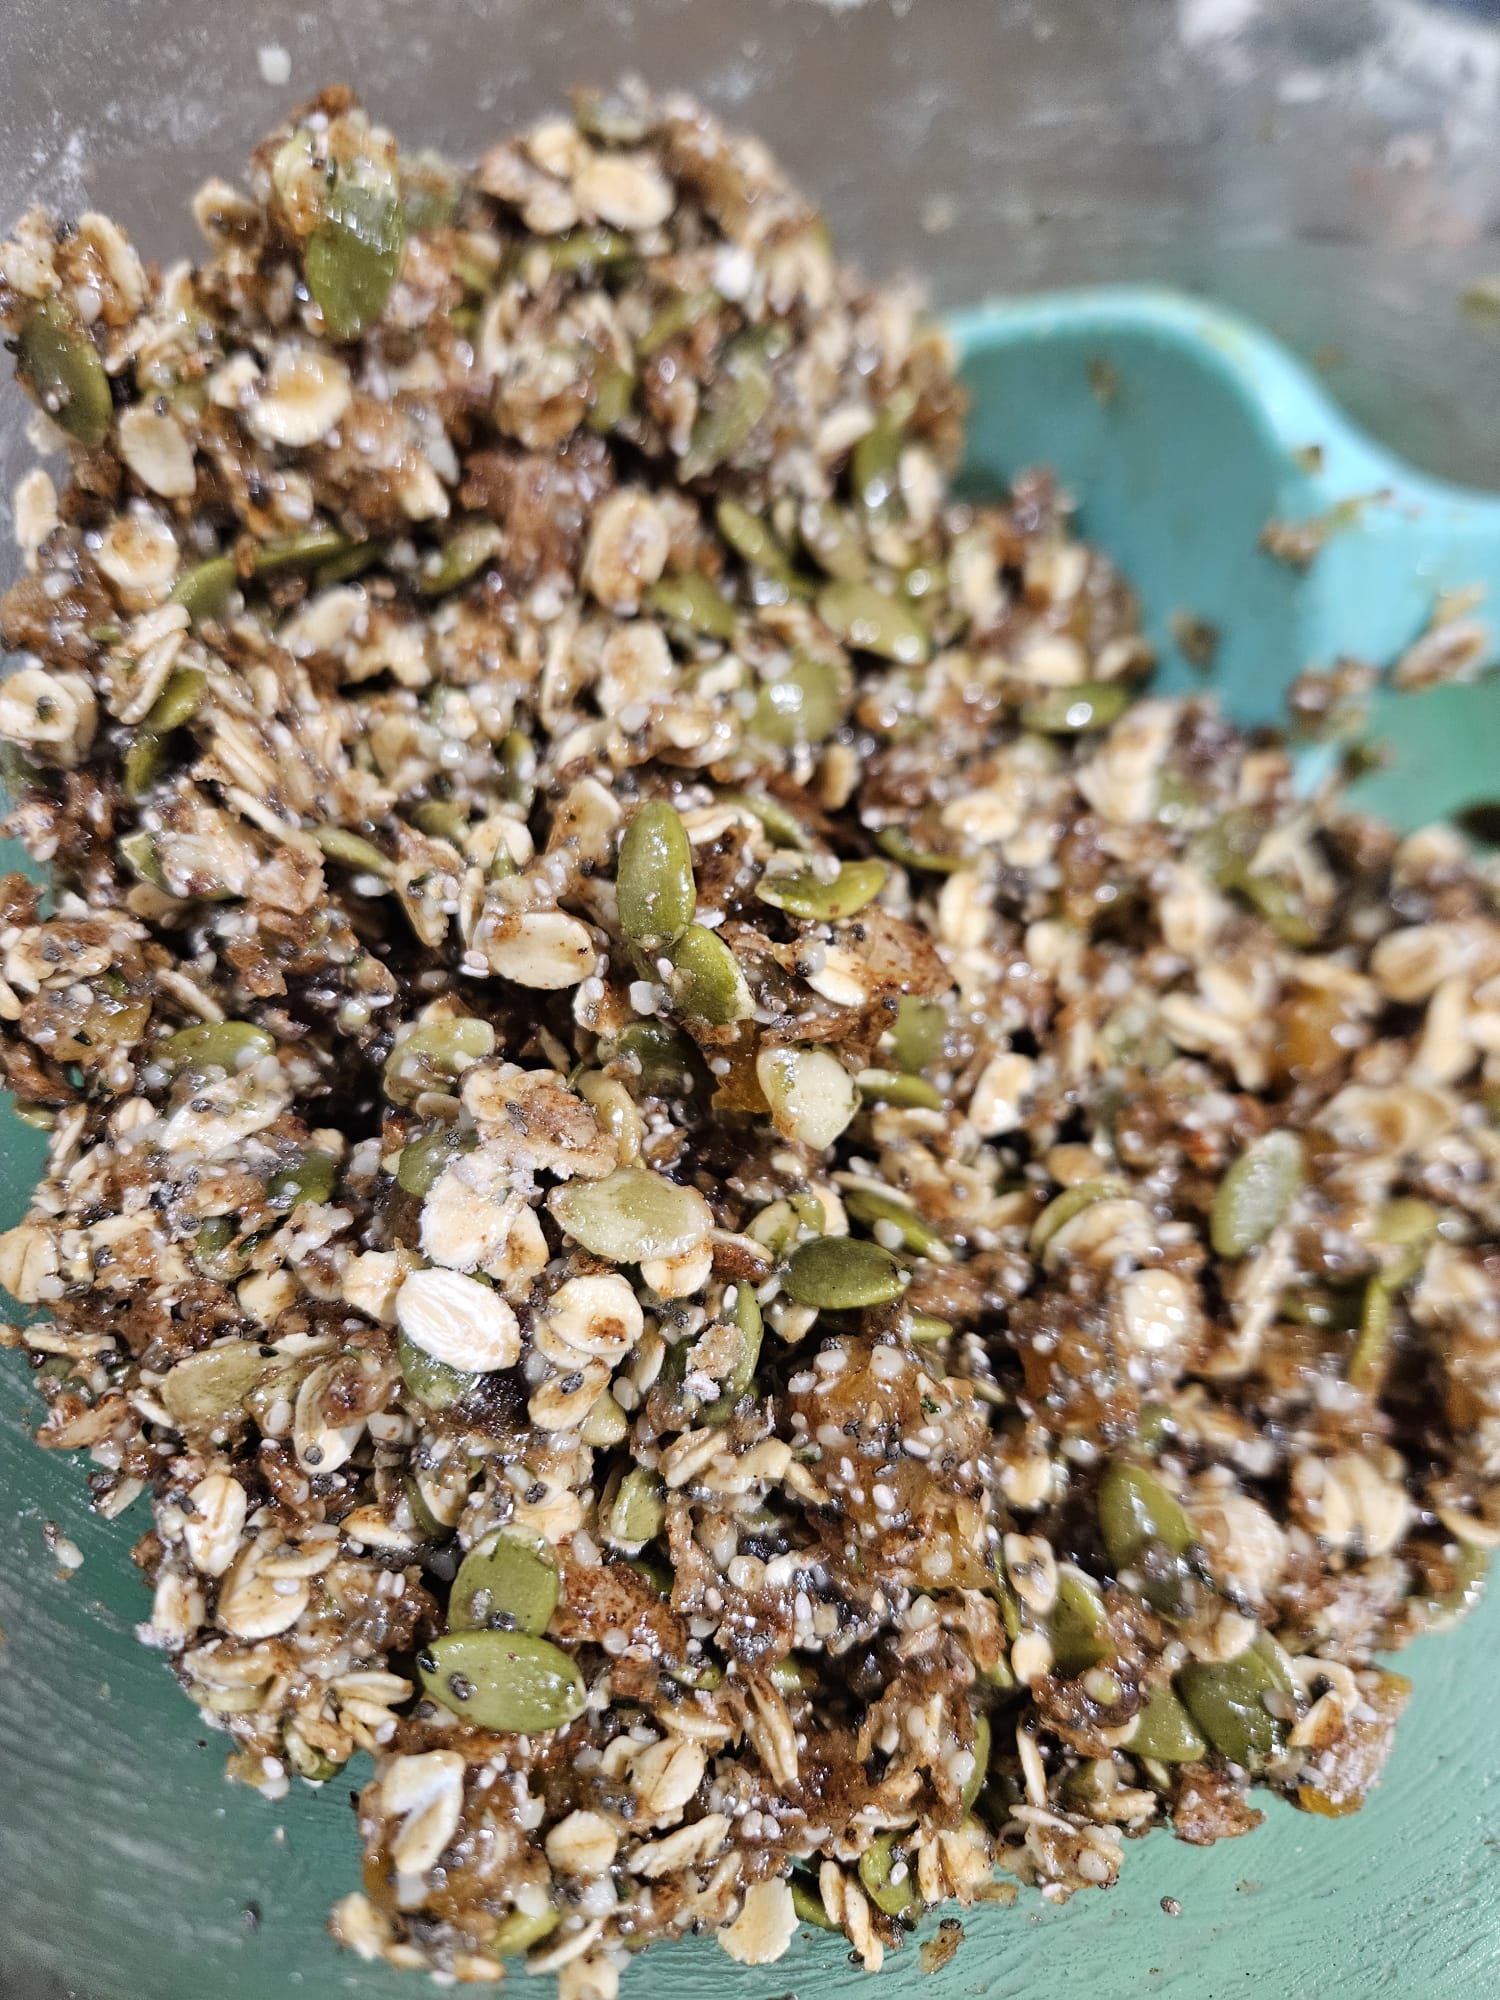
3 Weet-Bix, crushed (we use the sorghum gluten free Weet-Bix)
50g butter/plant based butter
125ml honey/maple syrup
100g pumpkin seeds
2 heaped tbsp hemp seeds
2 heaped tbsp chia seeds
50g dried apricots, diced
50g medjool dates, diced
1 tsp vanilla bean paste
75g rolled oats*
75g self-raising flour (plain or Gluten Free)
Melt the butter, honey and vanilla over gentle heat. (Saucepan or microwave).
Add in the chia seeds, stir well and allow to sit for 5 minutes to thicken.
Mix together the remaining dry ingredients and dried fruit in a separate bowl.
Pour the dry mixture into the wet and combine until all of the dry mix is moistened. It will initially seem like not enough liquid, but keep stirring.
Place the mixture into a lined 20cm tin and smooth the surface, pressing down firmly with damp hands.
Bake in a 160°C oven for about 25-30 minutes or until golden. Leave in the tin for 20minutes to cool before slicing.
We cut this one into 10 bars.
Need it Gluten Free? Make sure you use a gluten free flour and use equal weight of either rolled quinoa or shredded coconut in place of the oats
This year I just haven’t had time to make my own hot cross buns… We wanted treats to take out but had no time to wait for 2 rises!
So instead these ones start with a modified scone dough and come together very quickly!
Dough:
2.5 cups SR flour* (plus extra for rolling out)
1/2 cup almond meal**
80g cold butter (or nuttelex)
1 tbsp sugar
1 cup milk of choice (I use high protein almond milk)
Filling:
1 large Apple, finely diced
8 medjool dates, finely chopped
1/2 cup walnuts (optional), finely chopped
2 tsp butter (or nuttelex), melted
1/2 tsp mixed spice
Icing:
2 heaped tsp butter (or nuttelex), melted
4 heaped tbsp pure icing sugar
1 tsp vanilla bean paste
1 tsp milk of choice
*To make this gluten free: swap the flour for 2 1/4 cup SR GF flour mix and add 1 tsp of psyllium husk **To make this nut free: swap out the almond meal for an extra half cup of flour and omit the walnuts
Place the flour, almond meal and sugar in the food processor and pulse to combine.
Add in the butter and pulse numerous times until the mix resembles breadcrumbs.
Add in milk then process until dough is well combined (speed 4, 6 seconds).
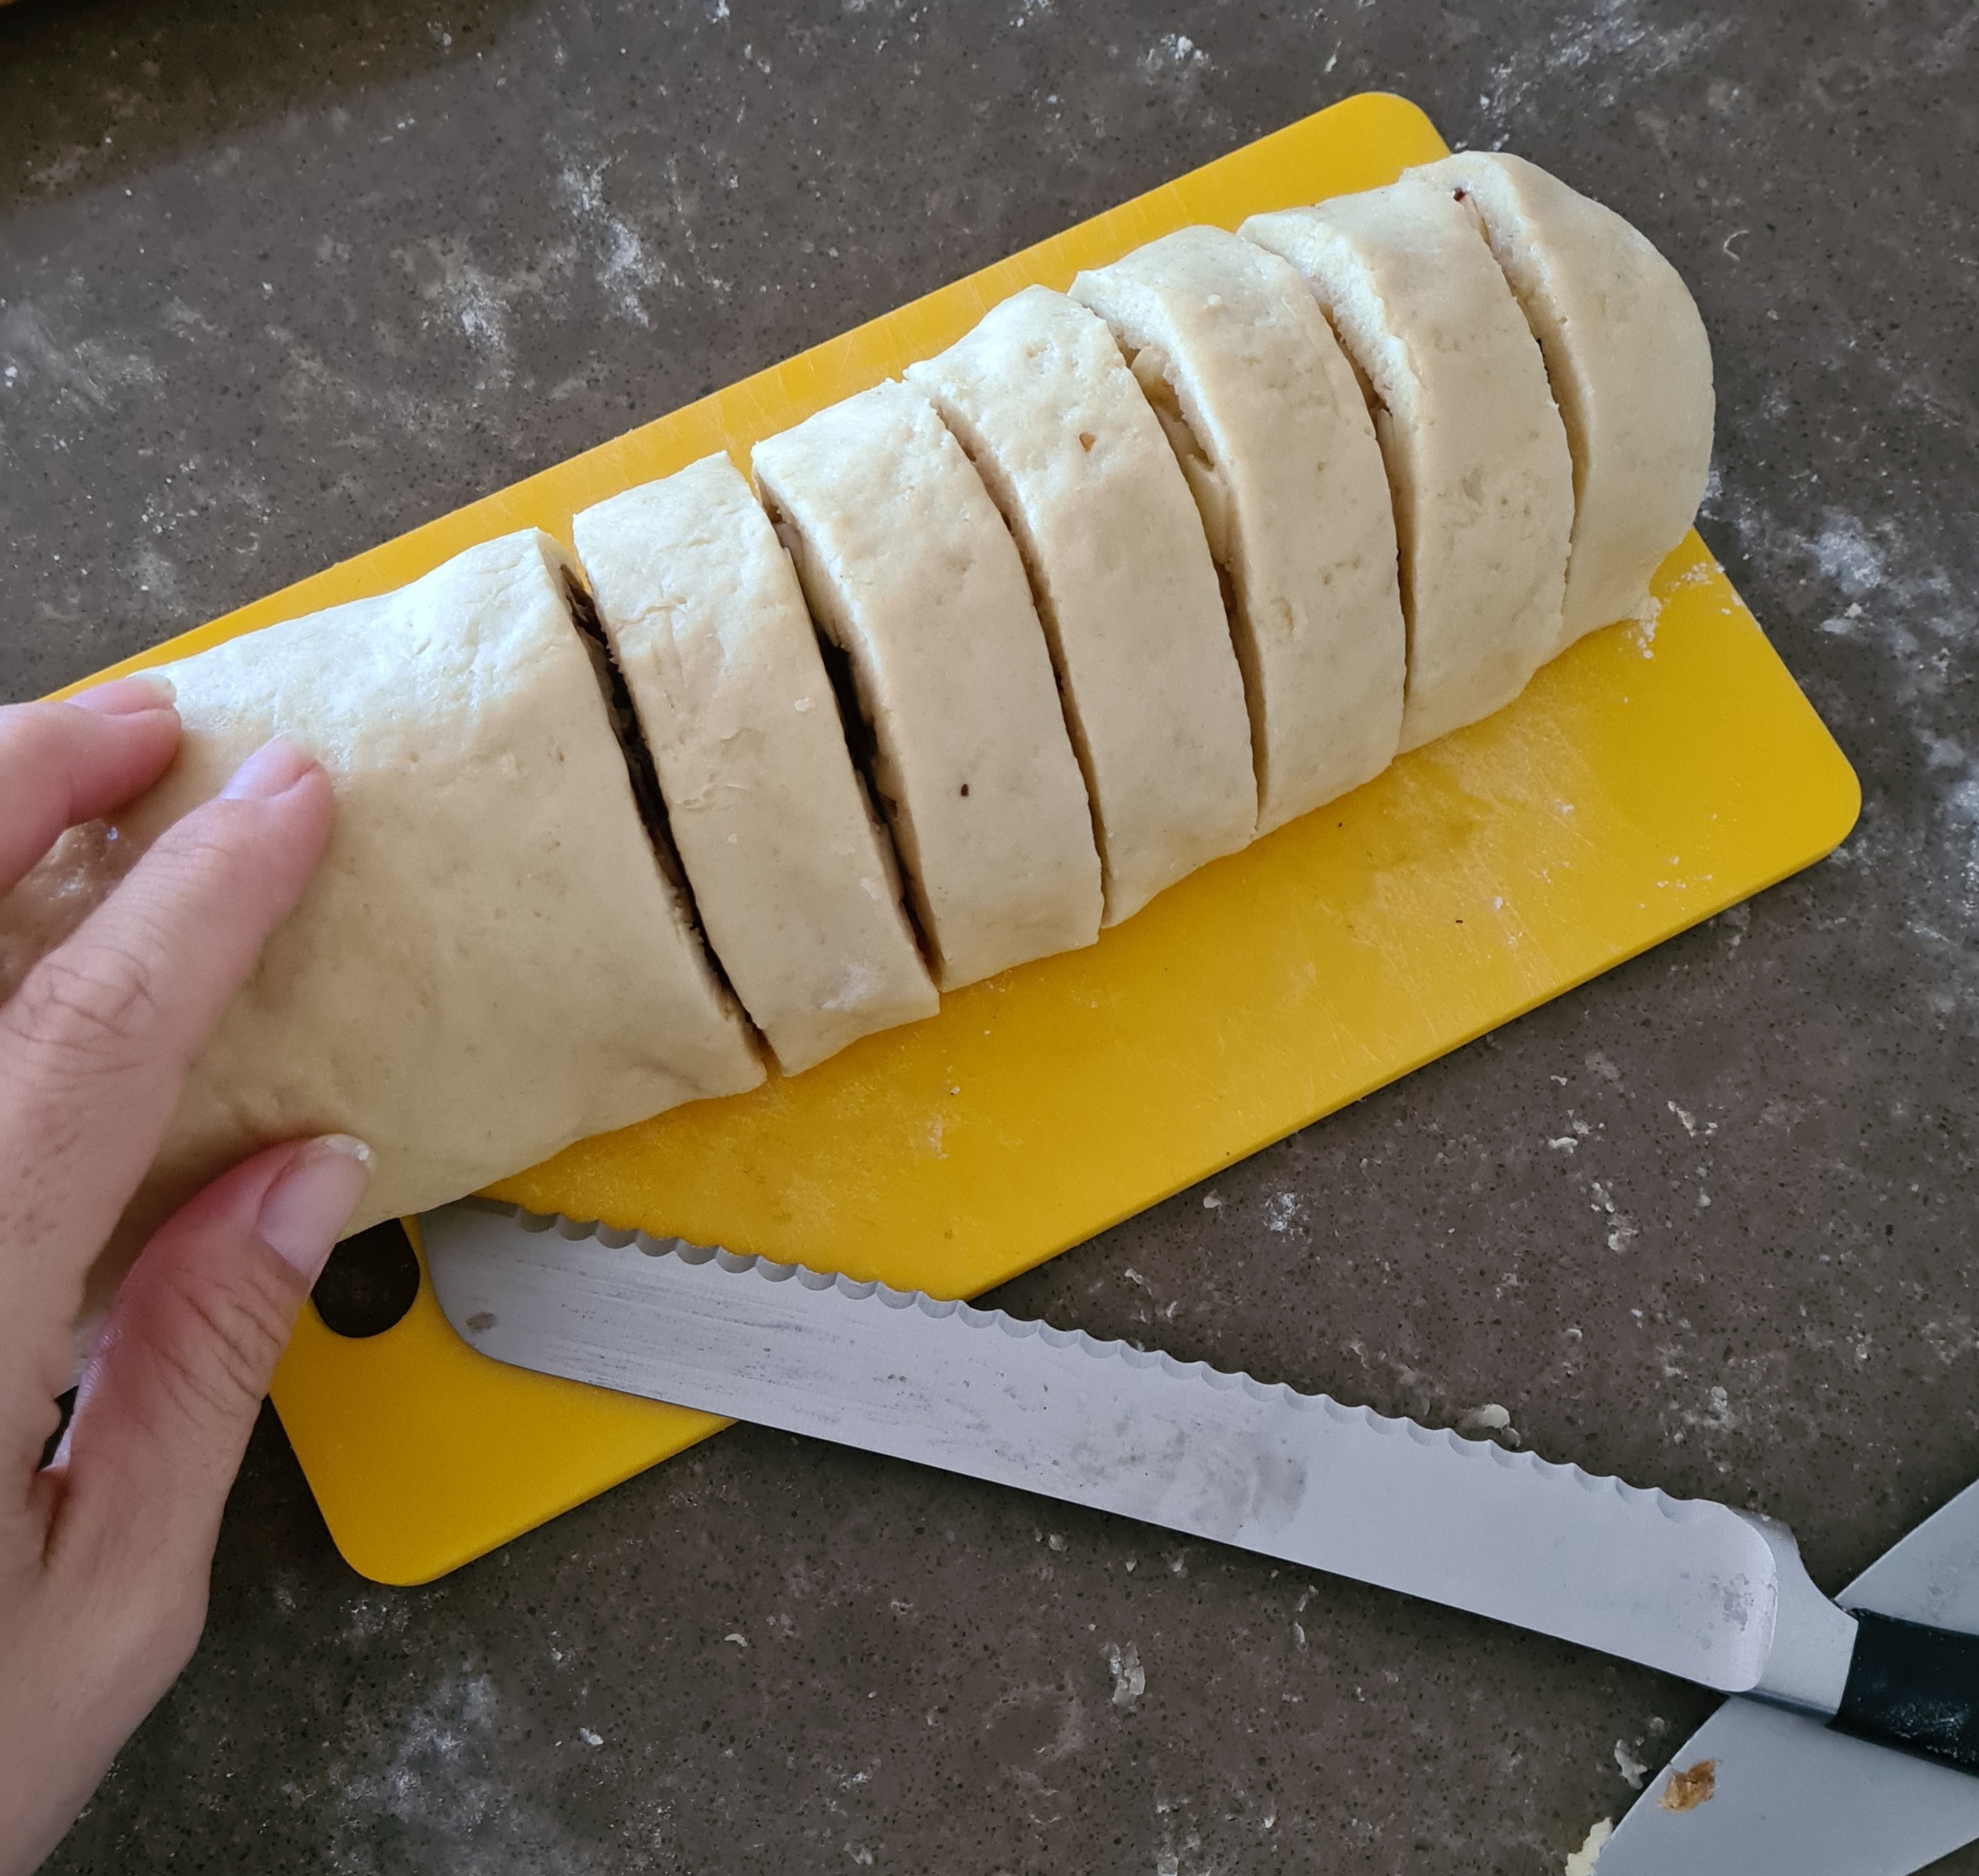
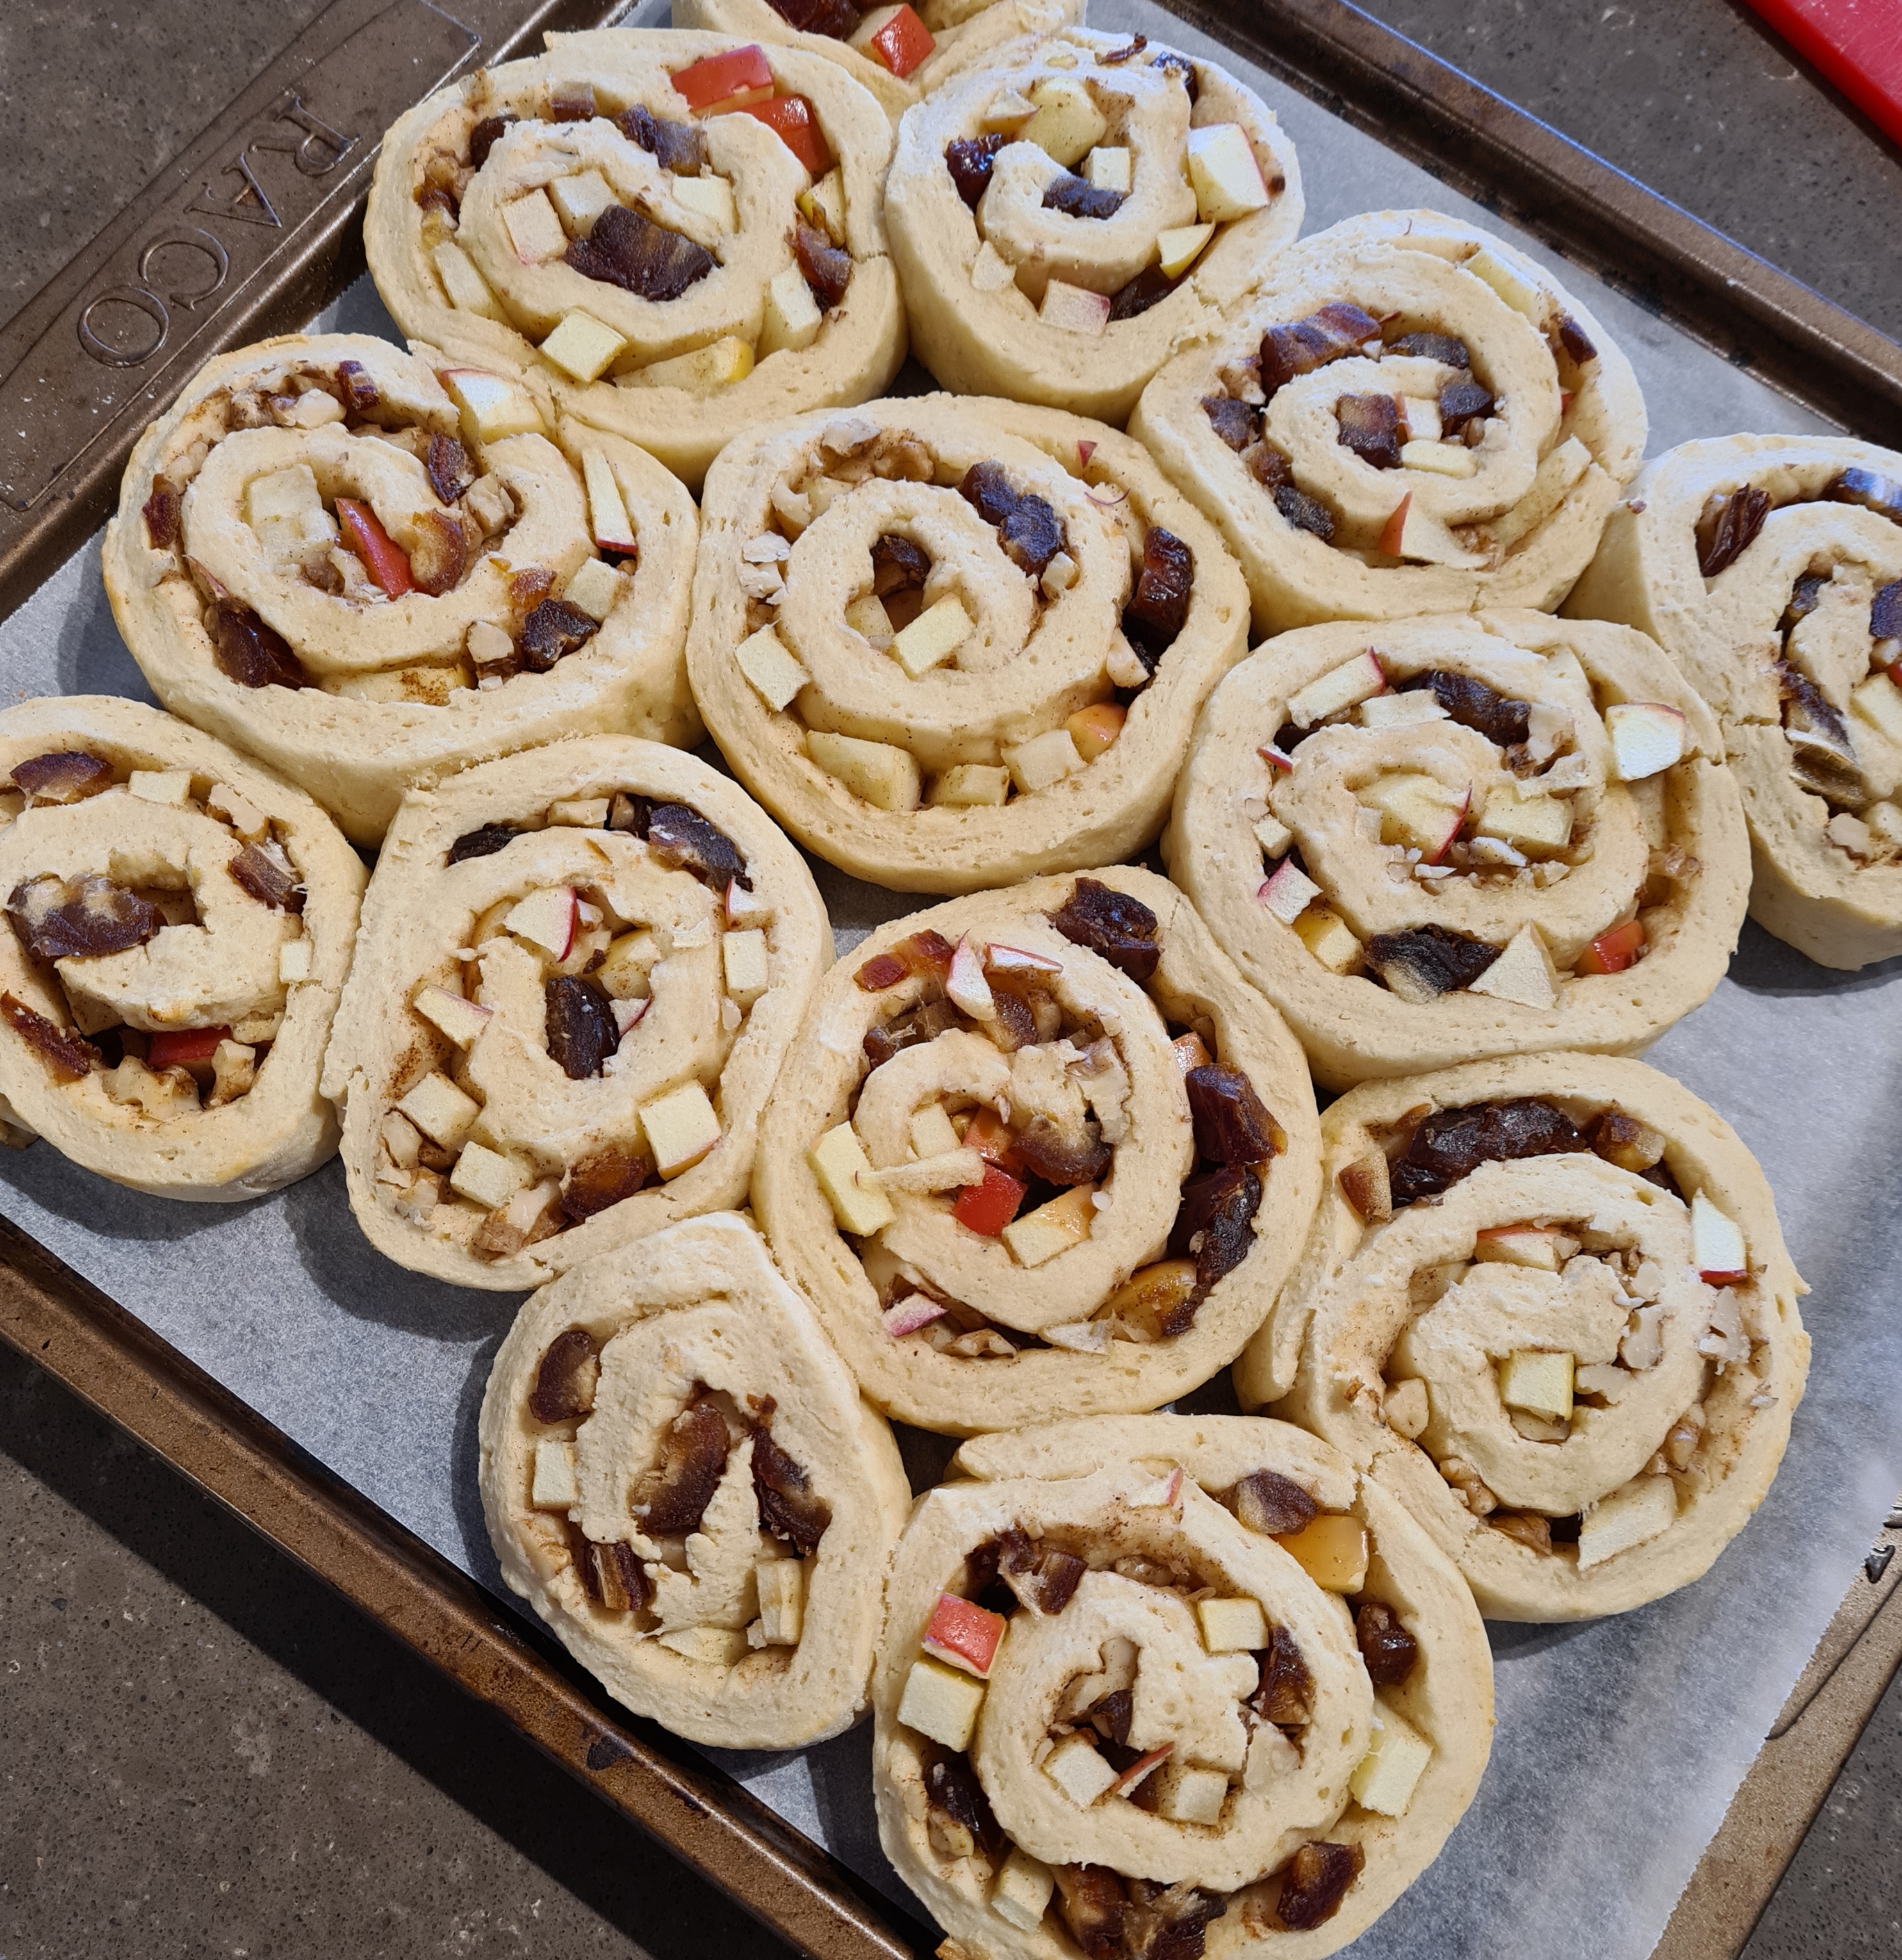
Tip the dough into a well floured surface, bring together with your hands and then roll into a rectangular shape, about 1/2cm thick.
Mix together the Apple, dates, Walnuts, mixed spice and melted butter and spread over the dough.
Roll the dough over on top of each other to form a log.
Cut the log into slices about 2cm wide and then lay on a lined baking tray.
Place them fairly close together and into a preheated 200C oven for about 20 minutes.
Allow to cool for about 10 minutes before icing.
For the icing- mix together the melted butter, icing sugar and vanilla until smooth and then add in the milk to thin it out before drizzling over the top of the scrolls.
Very simple, inexpensive, easily sourced ingredients. Amazingly good at feeding your super gut bugs. Quick to make, cooks in bulk and freezes well for weekday lunches. Allergy friendly ….. AND YUMMY!!!
400g Broccoli (1 medium size), roughly chopped
600g Cauliflower (1 large), roughly chopped
1 small brown onion (about 120g), diced
1 tbsp olive oil
2 tbsp veggie stock paste
8 cups boiling water
150g cream cheese (*dairy, soy or nut based – you can even use a light silken tofu here)
If you don’t have stock paste you can use 2 cups liquid stock and then only 6 cups water.
Heat the oil in a large saucepan then add in the onion and cook, stirring, until it is soft and golden.
Add in the cauliflower and broccoli plus the stock paste and stir well. Cook down for about 3 minutes then add in the boiling water.
Cover and simmer for about 20 minutes or until the veggies are very soft. *If you need a quicker cooking time you can give them veggies a quick blitz in your food processor first.
Remove from the heat and add in the cream cheese.
Use an immersion blender to blend until the soup is very smooth. If you are using a blender/thermo cooker/bullet machine to blend – BE VERY CAREFUL! Allow it to cool quite a bit first and then do small batches.
Serves 8.
If Macros are important to you, here they are for 1 serve.
I love this slice because it is fragrant and lightly sweet, uses only the things that I always have in my cupboard so it is inexpensive, you can have it in the oven in 5 minutes flat and it is really simple to make it allergy friendly.
And even better … my kiddo who has an Oral Allergy Syndrome reaction to raw apple can tolerate some cooked apple so everyone in our family can share!
**See below the main recipe for allergy friendly swaps and more options**
2 large apples
2 cups of flour (I use spelt and do half wholemeal)**
2 tsp GF baking powder
1 tsp ground cinnamon
1/2 cup sugar (I like coconut sugar for the caramel taste)
3/4 cup rolled oats
185g melted butter
Mix together all of the dry ingredients.
Add in the melted butter, then core and dice (but don’t peel) the apples and mix them through.
Press them mix firmly into a greased 20×20 baking dish and place in a preheated 180C for about 25 minutes.
Allow to cool for 5 minutes in the tin before moving to a wire rack.
Cut into about 16 squares and serve warm or cold.
To change it up:
Gluten Free – replace the flour with 1 3/4 cup of a gluten free flour mix plus 1 tsp of psyllium husk. Then replace the oats with shredded coconut or puffed rice.
Dairy Free – use a plant based butter
Can’t do apples? Pears are a great switch
Want something a bit fancier? Crumble some chopped almonds over the top and sprinkle with a tsp of extra sugar before baking and serve warm, with custard.
Got a super sweet tooth? Add in 6 chopped medjool dates or 1/2 cup of sultanas
Not sending it to school? Replace 1/2 a cup of the flour with almond meal
I did not grow up in a family that ate lasagne much – but my husband did! It was my lovely mother-in-law’s go to dish!
He has missed it since we were married, so I’ve worked hard at making a dish that we both enjoy AND fits all of our dietary needs. This one is also a winner with the kids – and the left overs taste even better the next day!
Heads up – this is in no way a traditional lasagne, I’m not event pretending it is … in fact I have had friends tell me that I am not allowed to call it lasagne if it doesn’t have either pasta or cheese … sorry … I’m going do it anyway!!
**Check out below the main recipe to see how I make this one completely plant based**
This is a meal that takes a little more time and fiddling in the kitchen than I normally like, but the end result is worth it and it does make 10 large and very filling servings, so I’ll allow it!
1 tbsp garlic olive oil
1 small brown onion, diced (about 125g)
OPTIONAL: 1/2 tsp dried chilli flakes
1kg beef mince
400g tin brown lentils, drained and rinsed
1 medium zucchini (about 1.5 cups chopped)
150g fresh spinach
200g button mushrooms
400g tin red kidney beans, drained and rinsed
70g tomato paste,
1 tsp dried oregano
salt to taste
Large egg plant (about 1kg)
spray olive oil
125g grated cheese (dairy or vegan)
For the Sauce:
1 large cauliflower (approx 900g-1kg), roughly cut up
1 tbsp olive oil
1 tsp dried onion flakes
1/2 tsp dried garlic flakes
1 cup high protein almond milk (or soy or dairy milk if they suit you)
1 cup hot veggie stock
4 heaped tbsp nutritional yeast
Salt to taste
Heat the olive oil in a large saucepan. Add in the onion and garlic flakes. (Steam Temp, speed 1, set for 15 minutes)
Then add in the cauliflower and stir well to coat in the oil. (Turn up to speed 2)
Add in the milk and stock and cover, allowing to come to a gently simmer. (Leave in Steam temp, speed 2 with the m/c off)
Simmer for 10-15 minutes or until the cauliflower is soft and you can easily pierce it with a fork.
Add in the nutritional yeast and then use an immersion blender to mix until smooth – you can transfer to a blender if you need to but be VERY careful! (Start by turning off the temperature function and gradually build to speed 8 until very smooth).
Taste the sauce and add a little salt to taste (dairy cheese is quite salty and when you remove it you need to add in a little salt to help with flavour). Set the sauce aside.
Onto the meat mix:
Start by creating the veggie mix you’ll stir in to the meat.
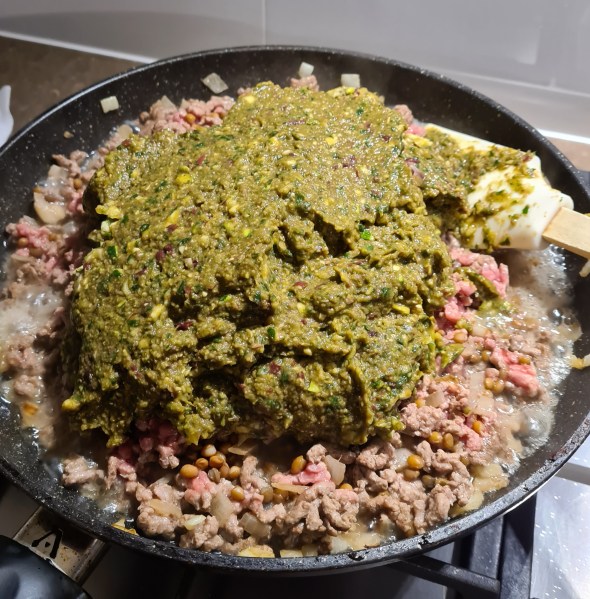
In your food processor or thermo cooker, add in the zucchini, spinach, mushrooms, kidney beans and tomato paste, then blitz until quite fine. (Speed 6, 8 seconds, scrape down and repeat until you get your desired consistency). Set aside.
In a large frying pan heat the olive oil then add in the diced onion and cook, stirring until translucent.
Add in the beef mince and herbs/spices. Break it up well and when it has roughly browned, add in the lentils and mix well.
Now add in the whole processed veggie mix to the meat mix and stir very well.
Bring to a gentle simmer for about 15 minutes.
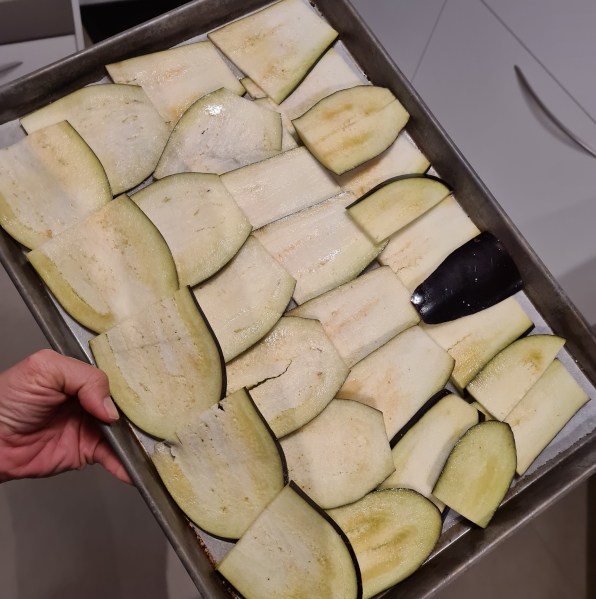
Now the egg plant while the meat is simmering:
Slice finely. Lay on a baking tray, spray with a little olive oil, sprinkle with a little salt and place under the grill in your oven.
Once the top side is golden brown (it only takes a few minutes), turn over and cook the other side.
The remove from the oven and set aside.
Now build the layers:
Lightly grease a large baking dish (I actually use 2 – awesome for freezing one too!)
Layer half of the meat mix into the bottom, then lay down half of the egg plant, then half of the cheese sauce and then repeat.
Then sprinkle either dairy or vegan grated cheese over the top.
Pop into the preheated 180C oven (fair warning …. you’re best to place it on a baking tray to catch any drips or bubbling sauce!) for about 30 minutes or until golden and bubbling – a quick minute under a grill at the end really helps to give you golden cheese, especially if you are using a plant based cheese.
Slice and serve…. and Enjoy!
**If you want to make this meal completely plant based: I use my lentil bolognese recipe but I omit the pasata (other wise there is too much liquid)**
*Of course, if you just want dairy free but you still love your pasta, then go ahead and use whichever lovely, fresh sheets suit you.
*And if you are not an eggplant fan but you still need a Gluten Free option, then I have used both of these Orgran and San Remo Lasagne sheets in the past.
If Macros are important to you here are the details for 1 serve – that is 1/10th of the meat based meal (I have kept the cauliflower ‘cheese’ sauce separate as I know people like to use it in other dishes!). You will just need to additionally factor in whichever cheese you use on top.
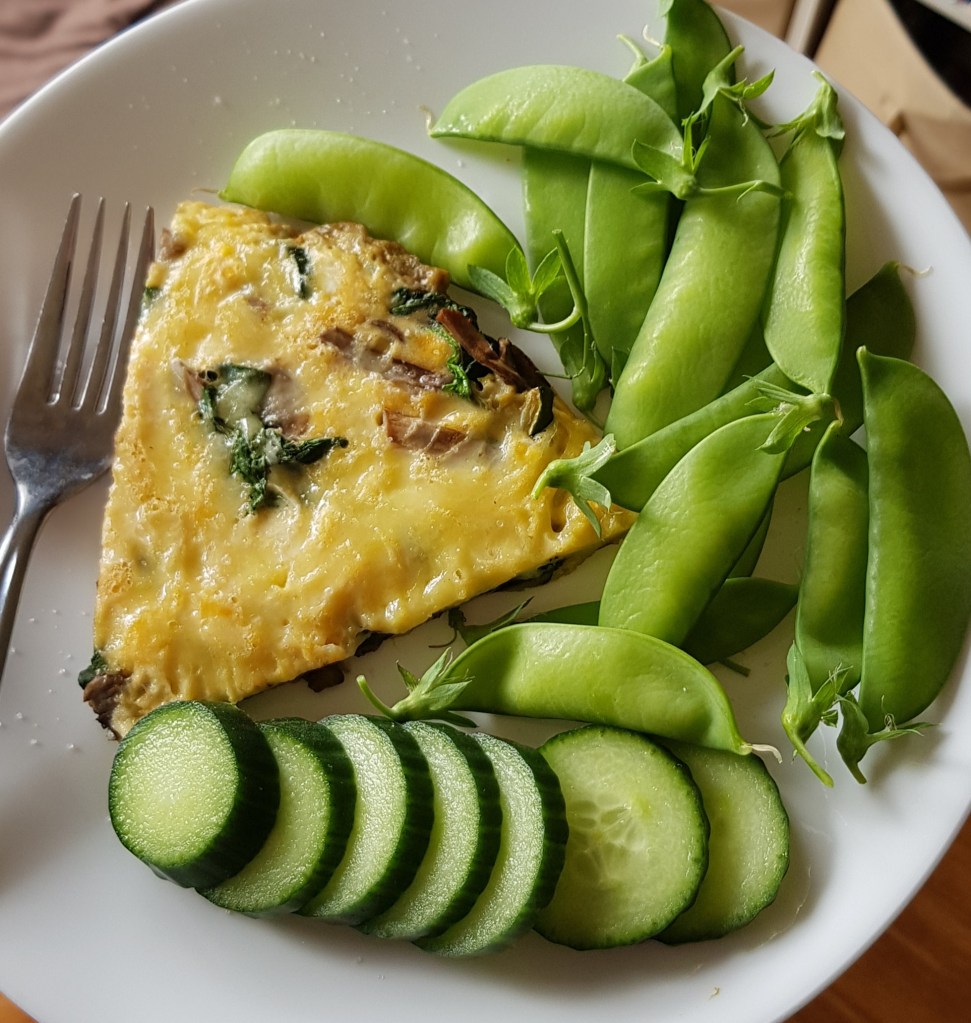
A little while ago I posted my Salmon Tart and I have had a few requests for a vegetarian version.
So, here is a my baked veggie omelette – you’ll need a frying pan that can transfer from the stove top into an oven.
I tend to make tarts like these so I have them on hand work work lunches – delicious cold or warm . Or if you’re in a rush, grab a couple of slices out of the fridge and steam some extra greens – speedy and filling dinner!
8 medium eggs
1 large zucchini
12 swiss brown mushrooms, finely sliced
250g spinach
1 tsp olive oil
1 tbsp nutritional yeast
salt and pepper to taste
Optional: 50g grated tasty cheese
Heat the oil in the frying pan, then slice the zucchini into rounds and place into the frying pan.
Fry for 1 minutes until the first side is golden, then flip over the zucchini before adding in the mushrooms to the pan. Cook, stirring for another minute until the mushrooms start to soften. Then add the spinach to the pan.
it’s a LOT of spinach!
Add in the salt, pepper and nutritional yeast and stir through to make sure the veggies are evenly coated.
Whisk together the eggs and then pour evenly over the veggies.
Turn the frying pan to a gentle heat and allow to cook until the side of the omelette just start to pull away from the sides of the pan – the top of the omelette will still be very wet at this point.
Sprinkle the top with cheese if you wish before popping it in a pre-heated 180C oven for about 10 minutes or until the top just stops wobbling … Remember that the eggs will keep cooking while it is warm so if you leave it in the oven for too long you’ll get a rubbery omelette.
Let it cool and then slice into 6.
Store it in the fridge for about 3 days.
If macros are important to you here are the details (which includes the cheese) for 1 slice, which is 1/6th of the omelette:
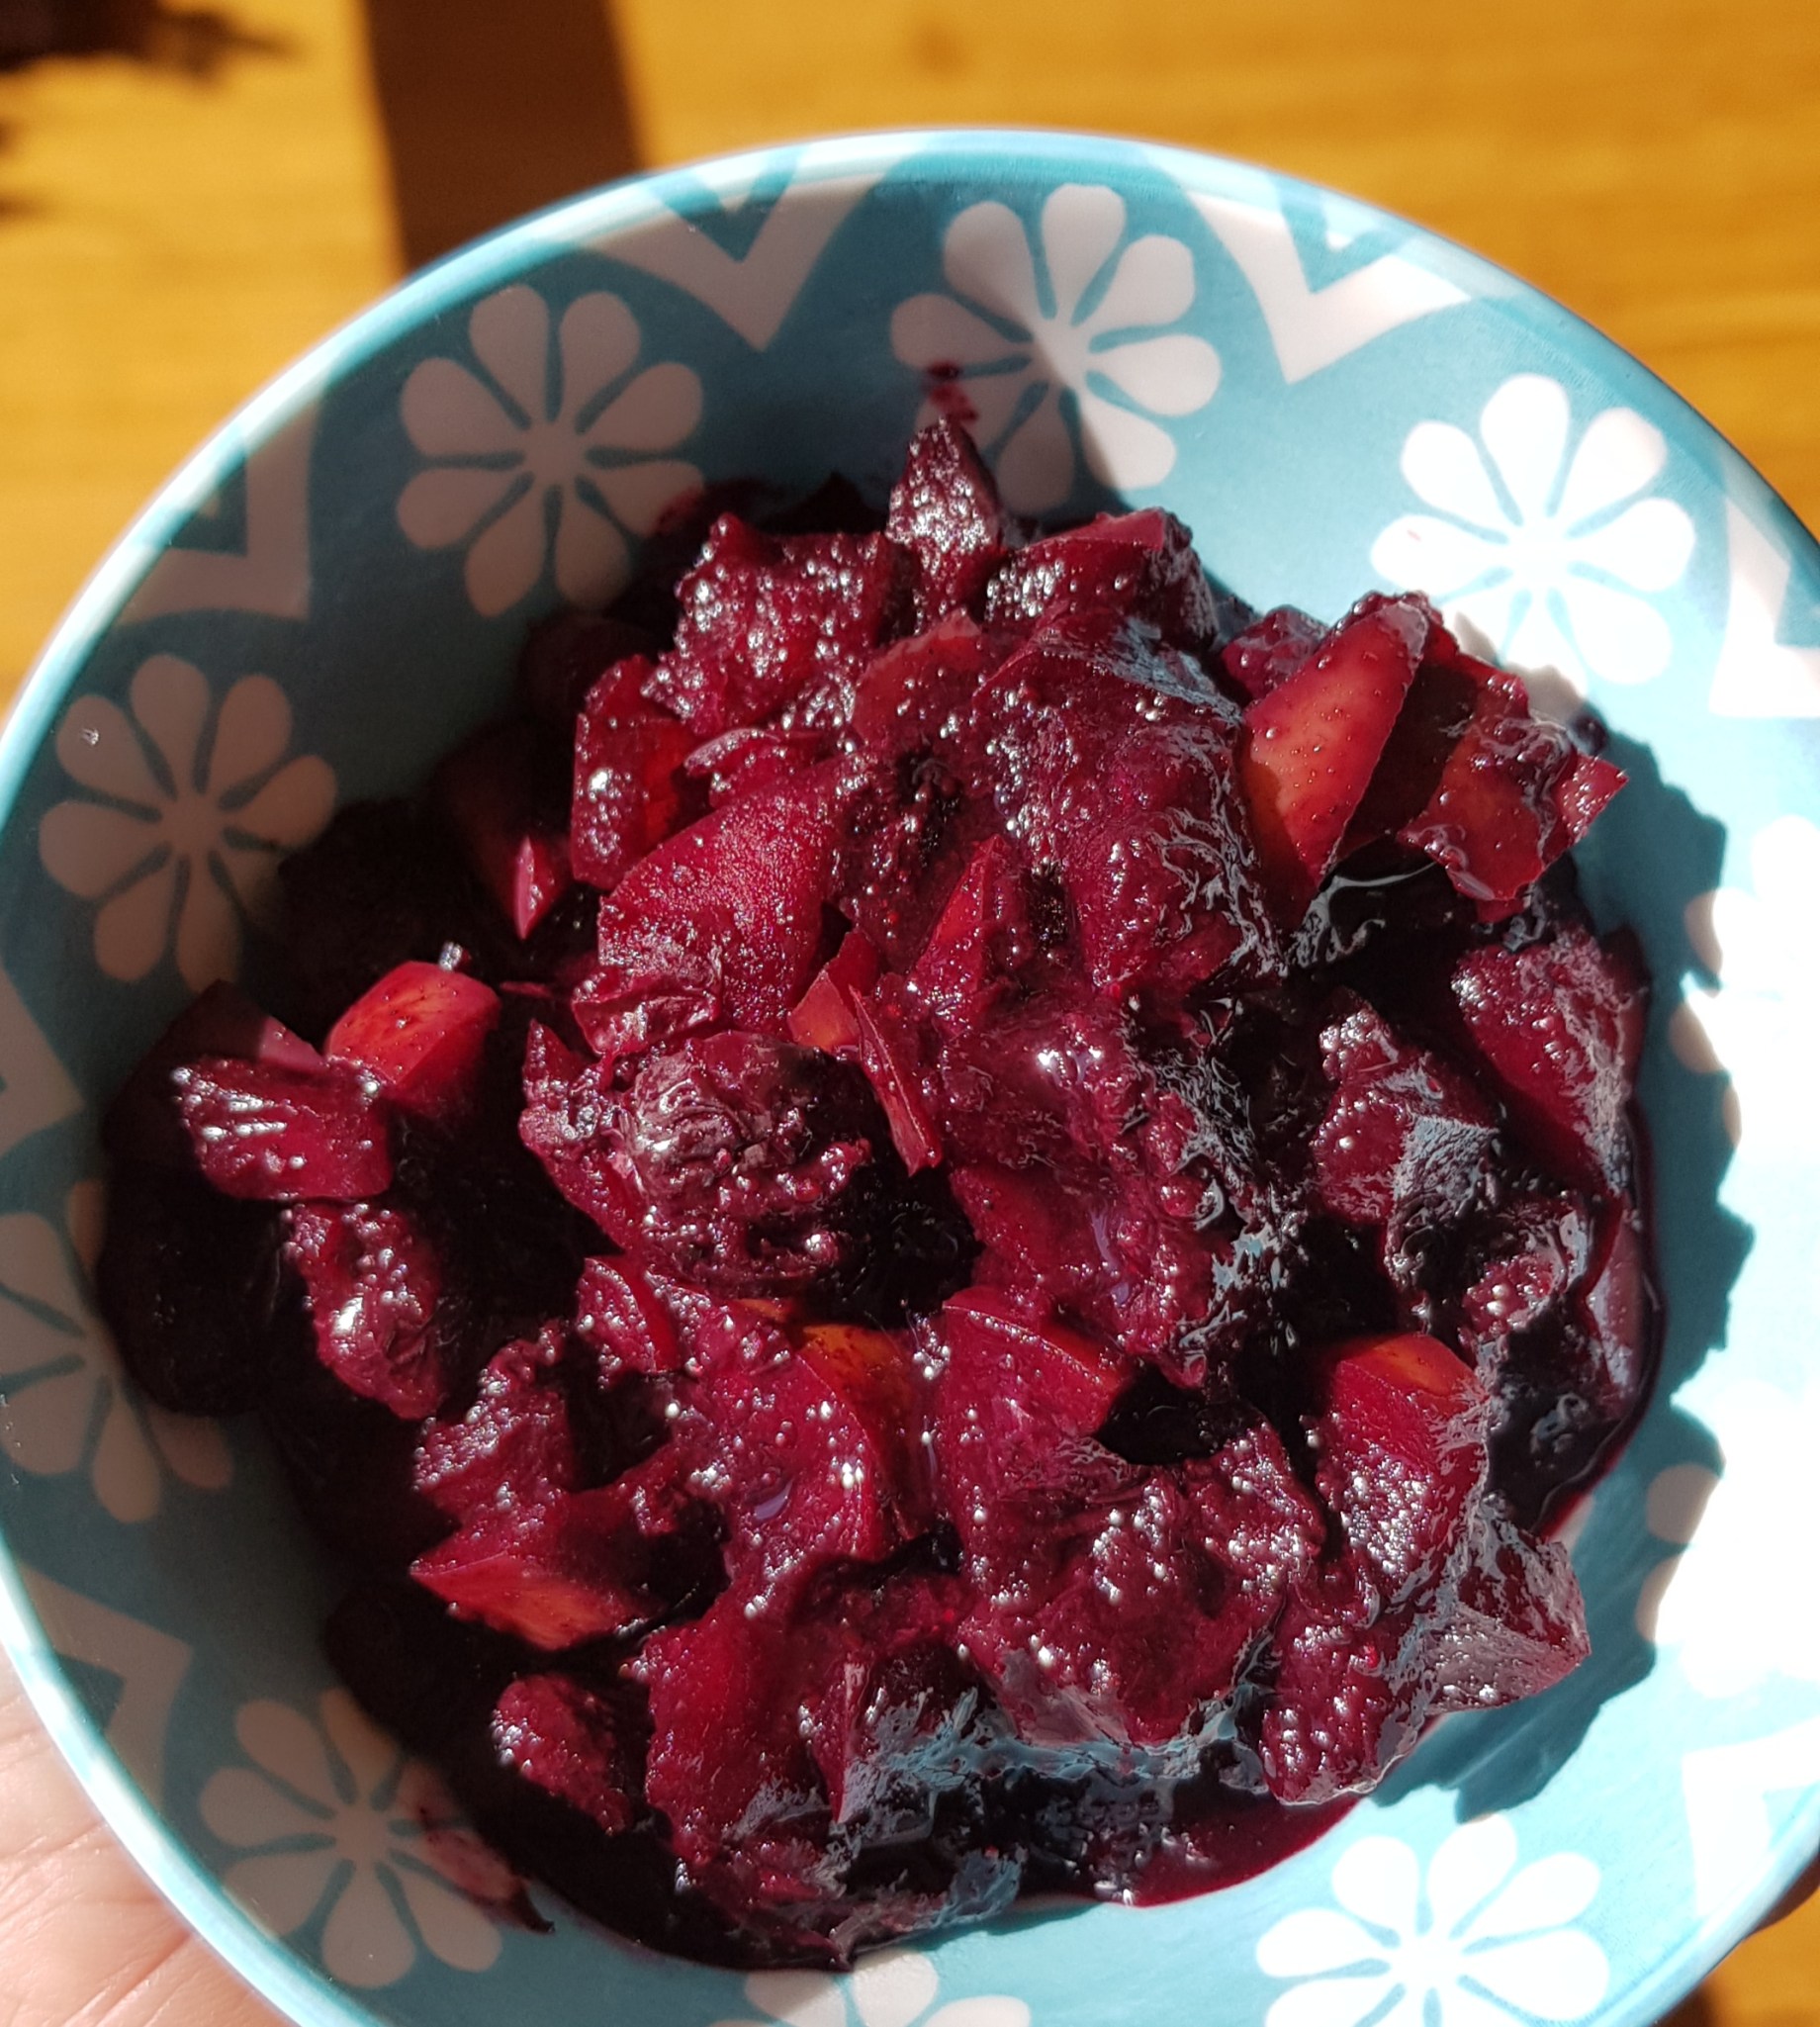
So simple to make. Quick and delicious … and you can adapt it to whatever fruits you have lying around.
1 cups frozen berries*
1 medium apple or pear, finely diced
Lemon peel (peel into strips for easy removal)
1 tsp vanilla bean paste
Optional: 1-2 tsp maple syrup
*if you are using fresh berries and not frozen, you’ll need to add a little splash of water when you first start cooking.
Place all ingredients into a small saucepan and turn on to a low heat.
Stir regularly until the juices from the berries release.
Allow the mix to come to a simmer and then leave to a very gentle simmer for about 10 minutes, stirring occasionally. Leave the saucepan partially covered with the lid to stop it splattering!
It is ready when you can very easily slide a fork through the apple and the juices in the pan are becoming thick and sticky.
Remove the lemon peel and if you want a smoother compote, use a potato masher to crush down the fruit.
Thermo Cooking instructions:
Place all ingredients into a bowl and turn on to Speed 2, 100C. For about 10-12 minutes.
Remove the lemon peel. If you want smoother compote, turn off heating, increase speed to 4, in 5 second bursts until you are happy with the texture, scraping down the sides as required.
—–
Serve warm on cakes, scones or pancakes, or allow to cool and serve with yoghurt, custard or ice cream … or just eat it on it’s own!!