Lactation Cookies

Being a new Mumma can be tough and one of the things that can make it even more tricky is getting breastfeeding right and the worry about supply etc.

I was lucky enough to  feed all four of my babies into toddler hood (and beyond!), despite the difficulties of our allergy restricted diet.

To help keep up my milk supply I made sure that I drank heaps of water (about 3L a day) and ate nutritious foods to fuel my body.  One of the ways that you can make sure you are getting in some good nutrition is these bikkies. They contain good fat, fibre and brewer’s yeast which has been long reported to improve milk supply.

Do not swap out the Brewer’s yeast for instant dried yeast, or nutritional yeast – they are not the same! You can find Brewer’s yeast in health food shops, on line or in supermarkets that sell home brew kits.

My midwife mother in law told me how they used to tell new mothers to drink a good stout before feeds to boost their supply! Not recommended so much any more 🫣 – but the brewer’s yeast is still great!

**I am not a qualified breastfeeding professional, so if you are struggling with feeding or milk supply, please make sure you call the Breastfeeding Support places in your area or seek help in person from a qualified Lactation Consultant**

See below the recipe for a more gluten intolerant friendly option.

  • 1 cup wholemeal spelt flour/buckwheat flour/rye flour
  • 1/2 tsp GF baking powder
  • 1/2 cup butter/vegan butter
  • 1/2 cup sugar
  • 2 tablespoons flaxseed meal mixed with 2 tbsp water
  • 3 tbsp aquafaba (the liquid drained from a can of chic peas) OR 1 whole egg
  • 1 tsp vanilla bean paste
  • 1 teaspoon cinnamon
  • 10g brewers yeast
  • 1/2 tsp flaked salt
  • 1 & 1/2 cups rolled oats*
  • 6 medjool dates, pitted

*Replace the oats with 1/2 cup shredded coconut, 1/2 cup rolled quinoa and 1/2 cup puffed rice for a GF option

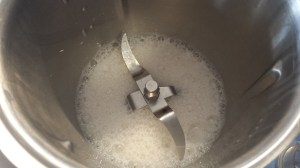
Using a food processor cream together the butter and sugar (Speed 4, 10 seconds)

Add in the vanilla, cinnamon, salt, yeast and baking powder and mix again to combine (Speed 4, 6 seconds)

Drop the pitted dates one at a time onto spinning blades through the chute at the top, then process until dates are finely chopped (speed 4 whilst adding dates, then up to speed 7 for about 10-15 seconds)

Add in the flax whilst mixing.

Add in the aquafaba OR egg whilst mixing and process until combined.

Add in the flour and process til just combined (Speed 4, 12-15 seconds)

Then add in the oats and process again until mixture is well combined (Speed 4, 15-20 seconds).

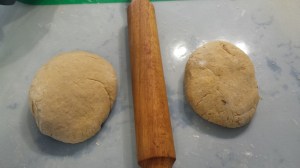
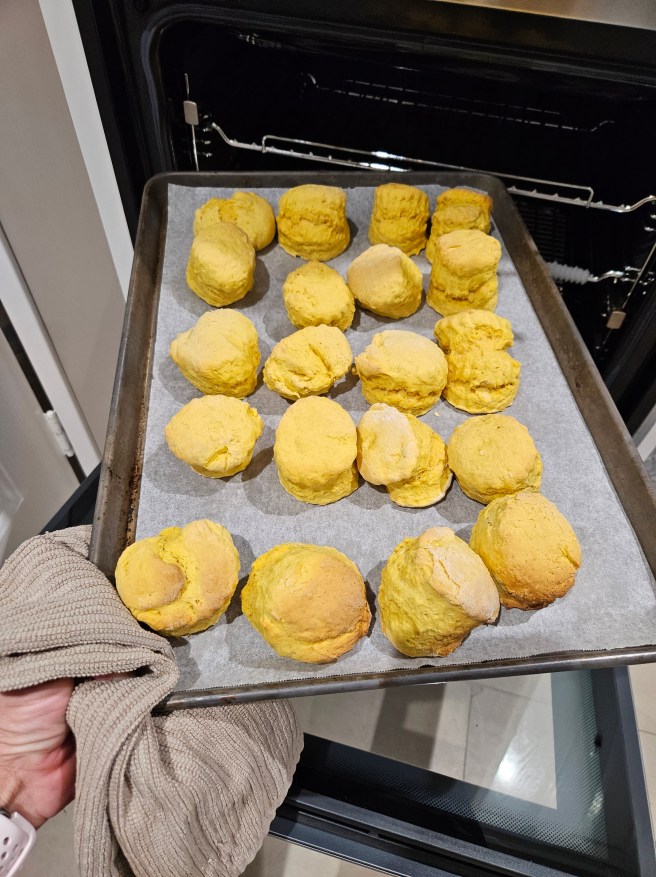
Roll spoonfuls of mixture into balls, then press down onto a lined baking tray and baking in a preheated moderate oven for about 15 minutes.

20160214_120454

The cookies will still be soft when you remove them. They will harden as they cool. Allow to cool on the tray for 10 minutes before transferring then to a wire rack to finish cooling.

20180519_171704

Makes about 18-20.

These stay fresh for about a week, but I made double batches and froze mine in zip lock bags for convenient snacks – they defrost quickly when you pull them out of the freezer.

Important note – Brewer’s yeast is not considered to be gluten free, as it is grown on barley so it will depend on your level of sensitivity.

If you’re not breastfeeding – these are still a delicious bikkie! You could leave out the yeast to make shopping easier (or if you have a yeast allergy).

Enjoy …. and maybe you could take a batch to a friend next time a new bub arrives to show them how much you care 🥰

Choc Chip Chick Pea cookies

These yummy cookies are a cross between my regular Choc Chip Cookies and my Date, Chick Pea and Sunflower seed butter cookies.

I love that they look like a regular choc chip cookie but have some hidden extra goodness.

  • 40g Nuttelex or other vegan butter
  • 80g Sunflower Seed butter (or nut butter if your diet allows)
  • 120g chic peas (drained and rinsed)
  • 1/2 cup coconut sugar OR Maple Syrup
  • 1 3/4 cups spelt flour (OR 1 1/2 cups GF flour plus 1/4 cup almond meal)
  • 2.5 tsp baking powder
  • 1 tsp vanilla bean paste
  • 3 tbsp aquafaba (the liquid drained from a can of chick peas)
  • 1/3 cup choc chip/chopped chocolate of choice

Place the Nuttelex, seed butter, chic peas, sugar and vanilla into your processor and process until smooth (Speed 4, 15 seconds, scrape down and repeat).

Add in the aquafaba and baking powder and pulse a few times to combine.

Add in the flour and process until it forms a stiff dough (Speed 4 in 10 second intervals).

Add in choc chips and mix until combined.

20160130_155741

Roll teaspoons of mix into balls and place on a lines tray. Press down with the back of a fork. Try to stop your little helper eating all of the raw dough 😉

20160130_160221-1

Place in to a preheated moderate oven and bake for about 12 minutes.

Allow to cool on the tray.

Makes about 20 – store in an airtight container for a week.

20160130_170341.jpg

Enjoy 🙂

Yoghurt Apple Cake

Many (many!) years ago now, I was lucky enough to spend 6 months living in France. So much amazing food that was quite new to this (then) unadventurous Aussie girl’s taste buds! Sadly, not so good for my wasitline, but I have never forgotten those delights!

I recently came across this recipe for a yoghurt cake, which reminded me of my time there – this is my healthier, allergy friendly version.

The cake is light and moist – perfect for afternoon tea, so go on, have juste un petit gout!

See below the recipe for a gluten free-coeliac friendly version

  • 100g coconut sugar
  • finely grated zest and juice from one lemon
  • 5 tbsp aquafaba (liquid drained from a can of chick peas)
  • 175g soy yoghurt/coconut yoghurt
  • 125g Nuttelex/vegan butter/tasteless coconut oil
  • 1 tsp vanilla bean paste
  • 275g spelt flour
  • 1.5tsp GF baking powder
  • 1tsp bicarb soda
  • 2 small apples, cored and finely sliced
  • 1 extra tsp of Nuttelex
  • 1 extra tsp coconut sugar.

Preheat the oven to 180C.

Grease a tin and layer the apples on the bottom of the tin.

Melt the tsp of Nuttelex and brush over the top of the apples, then sprinkle with the 1 tsp of coconut sugar. Place in the oven for about 5 minutes while you make the next step of the cake.

20160122_123810

Into your food processor, place all of the remaining ingredients and process until smooth. (Speed 4, 10 seconds then speed 5, 8 seconds).

Remove the tin from the oven and scoop the cake mix to the top of the apples. Smooth over and return to the oven for about 30 mins or until golden brown and a skewer comes out clean.

20160122_125046

20160122_134023

Allow to cool in the tin for 5 minutes before inverting onto a plate.

20160122_134844

Serve warm or allow to cool, dust with GF icing sugar and add an extra dollop of yoghurt if you’d like.

20160122_160101-1

Makes about 12 slices.

I haven’t frozen this one yet, but it lasts well in the fridge until the following day, and I suspect it’s freeze well.

To make a gluten free coeliac friendly version of this cake: replace the spelt flour with 1.5 cups plain GF flour mix and 1/4 cup of almond meal.

Enjoy 🙂


Sweet Chilli Sauce

For the first time I have got chillies growing great guns in my garden. We use chilli a bit but not quite enough to keep up with the supply we are currently getting. So we wanted to preserve some in order for us not to waste them!

We all like Sweet Chilli Sauce, but we are trying to reduce refined sugar (of which there is a heap in store bought varieties!), so it was the next step to give our own version a go.

Super easy and super tasty!

  • 1 cup white vinegar
  • 1 cup rice malt syrup
  • 1 tsp minced garlic
  • approx 50g very hot red chillies

If you would like a less hot sauce, then use a larger variety chilli or remove the seeds before processing.

20160103_134913
These little guys are labelled ‘extreme heat’!

Finely chop chillies.

Then place all ingredients into a heavy based saucepan and bring to the boil.

Turn down to a gentle simmer and allow to simmer uncovered, stirring occasionally for about an hour, or until the mixture has reduced by about half. Mixture will thicken furterh on cooling.

Pour into sterilized glass bottles and seal.

20160119_114610

To do this in a Thermal Cooker, blitz chillies on Speed 6 for 6 seconds. Then add remaining ingredients and set on Speed 1, Steam/Varoma temp for a couple of minutes, until it reaches a boil. Remove the measuring cap and set on Speed 1, 80C for about 45-50 minutes or until mixture as reduced by half.

Enjoy 🙂


Breakfast Muffins

In just a couple of short weeks school will be going back. Back to early rising, back to strict bedtimes and (almost) military style routines, back to a mad rush to leave the house with all 4 children fed, washed, clothed, packed and ready by 8am. Gosh,  I love holidays!!!

Almost always porridge is the go for breakfast at our place. They all enjoy it and I can make up a big saucepan-full and everyone is happy. But for some reason, on some mornings, the getting ready process just doesn’t work well and we run late (please tell me that this happens to everyone!!).

To help on those occasions, I like to have these muffins in the freezer so I can give them a decent breakfast that they can eat while we’re walking to school. Most muffins are pretty well cakes in disguise but these guys have fruit sugars and lots of fibre and wholegrains to keep their little bodies going.

See below the recipe for a coeliac friendly option

  • 2 medium overripe bananas (I keep some frozen)
  • 4 Gluten-free Weetbix
  • 50g rolled oats
  • 6 large medjool dates, pitted
  • 80g melted tasteless coconut oil, or other light tasting oil
  • 235g milk of choice (we mostly use oat milk or unsweetened vanilla almond milk)
  • 200g spelt flour (I do half wholemeal)
  • 2 tsp GF baking powder
  • OPTIONAL: 1/2 cup frozen blueberries or 2 tbsp Chocolate Drinking mix

Place the oats in the food processor and blitz until fine (Speed 6, 10 seconds).

Add in the weet-bix, flour and baking powder and process well (Speed 5, 10 seconds). Tip out and set aside.

20160117_124536

Place the banana, milk and oil in the bowl and begin processing, adding the dates one at a time through the chute at the top. Process until the dates are finely chopped and evenly distributed. (Speed 4 whilst adding the dates, and then up to speed 7 for 10 seconds).  This also works really well in a blender or nutribullet.

Add dry mix to wet and process until combined (Speed 4, 12 seconds). I think this is has a lighter result if you fold through by hand though.

I normally separate the mix into 2 at this point as I have 1 child who doesn’t like blueberries (weird!). Fold the blueberries through the mix you do want them in and then scoop mix into a lined muffin tin.

Place into a preheated moderate oven and bake for about 20 minutes or until golden brown and skewer comes out clean.

20160117_133210

Makes 14 muffins. They freeze well and are especially yummy served slightly warm.

To make these coeliac friendly: Use 1 extra weet-bix and 1 tbsp rolled quinoa to replace the oats. To replace the spelt, use 200g GF flour mix. Increase the milk up to 240mls.

If you don’t have or enjoy dates then you could use a few tbsp of maple syrup or even coconut sugar in their place.

They are also particularly yummy if you replace the dates and berries with 2 tablespoons of my chocolate drinking mix (gives them a great nutritional boost too!)

20161101_065143

Sometimes I make these and remove the oats and weet-bix with 1 tbsp each of Sunflower seeds, pumpkin seeds, flax seeds and chia seeds, plus 25g raw almond, 1 tbsp psyllium and 30g rolled quinoa. Milled down and stirred through the flour – this gives an especially good result when you’re using a gluten free flour.

Enjoy 🙂

Light Lemon Cheesecake

Recently we had our traditional, school holidays Girls Lunch. And for the first time my lovely almost sister in-law was able to come. Man can she cook … with the beautiful cheesecake she brought along, she seriously raised the standard for dessert!

Since it was school holidays my bigger boys were there and my biggest boy, Will, was particularly enamoured with this cake. When we saw fresh raspberries on sale in the shops the following day he begged me to make him one ‘like Aunty Michelle made’. How could I resist?

Trouble was, that there was almost no safe ingredients in it for us – so we set about experimenting. For the first time I tried something really cool …. replacing pouring cream with whipped aquafaba. Yep, allergy friendly and it just about halved the calories for the dessert – win!! Hope that you enjoy it as much as we did!

  • 350g soy cream cheese (we use Tofutti)
  • 6 tbsp aquafaba (the liquid drained from a can of chick peas), slightly warmer than room temp
  • pinch  of cream of tartar
  • 1/3 cup icing sugar (increase to half a cup if you like sweeter, less tart desserts)
  • zest 1 lemon, finely grated
  • 1 tbsp lemon juice
  • 3 tsp powdered gelatine
  • 60 mls warm water
  • 350g GF/DF/EF gingernut biscuits (we use the Leda brand)
  • 110g Nuttelex or other vegan butter
  • 200g fresh raspberries
  • fresh mint to garnish

In your food processor place the gingernuts and process until they are a fine crumb (Speed 6, 8 seconds).

Add in the Nuttelex and pulse multiple time until you have a crumb that resembles wet sand.

Grease your dish and tip the crumb into it. Press down firmly into the tin, making sure that you press the mixture a little way up the side of the dish too. Place in fridge.

Mix together the gelatine and warm water and whisk with a fork until dissolved. Set aside. Then work quickly so the gelatine isn’t sitting for too long.

In the small bowl of your stand mixer, place the aquafaba and the cream of tartar and beat on very high speed until soft peaks form (about 5 minutes). Set aside.

20160112_123955


In the large bowl of your mixer place the soy cheese, lemon juice and zest, sugar and beat until smooth, soft and creamy. Add in the gelatine mix and beat again until well incorporated. (Use the blunt blade for 20 seconds on speed 4, the add gelatine and use speed 4 for for a further 8 seconds).

20160112_123947

Pour in the beaten aquafaba and fold through until evenly distribute. (Attach butterfly/mixing tool and use speed 3 for about 20 seconds).

Pour the cream cheese mixture into the biscuit base, top with fruit and place in the fridge to set for 2 hours.

20160112_124358

20160112_163708-1

Garnish with mint and serve.

20160112_183718

Makes about 12 slices.

To make this a vegan dish you just need to replace the gelatine with agar agar, probably 2 tsp … but I haven’t experimented with the liquid quantity required yet (as you need to bring the powder and liquid to the boil and then simmer for a few minutes before using the gel it forms). Please let me know if you do!

Enjoy 🙂

Beef Burritos

So, it’s already established that we are a Mexican food loving family, this is another great simple meal that we’ve added to our Mexican list. I’m not sure how authentic they are but they are definitely yummy and well received by all in our house – and even our guest tonight.

For the tortillas, you can buy those that you enjoy in store, but we use my Masa Tortillas 

  • 700-800g gravy beef
  • 2 tbsp Mexican Seasoning (also my husbands wants it spicier so I’ll use 3 next time!)
  • Salsa (I make this recipe and use 1/3 of it for this meal)
  • 2 x 400g tin corn kernels, drained and rinsed
  • 400g tin red kidney beans, drained and rinsed
  • 400g tin re-fried beans
  • 400g tin black beans

Place the beef in the  bottom of your slow cooker. Sprinkle over the seasoning.

20160112_083255

Add the salsa to the top and ensure even coverage, then place lid on and cook on low for 4 hours.

20160112_083554

Remove lid and add corn and beans. Stir well so that the re-fried beans are evenly distributed. Return lid and cook on low for another 3-4 hours.

20160112_134221

Remove lid and using a fork, gently pull apart the beef so that the meat is now shredded. Mix well and allow to cook for a further half hour on low.

Make or warm your tortillas.

To serve we use a couple of chopped ripe avocados seasoned with pink salt, ground black pepper, a squeeze of lime juice and a sprinkle of fresh chopped coriander. Add grated cheese of choice too if you wish (We use Bio Cheese for Ellie).

20160112_181119-1

Place spoonfulls of meat in the middle of the tortilla, add avocado mix and cheese to the top then fold into a burrito and eat immediately.

This quantity of meat makes enough for our family of 6 for 2 dinners plus a couple of lunches. It freezes well.

For a lighter option I also use a large lettuce leaf in place of a tortilla … Delish and so fresh and crunchy!

20170121_192443-1

Enjoy 🙂

Pumpkin Scones

One of my lasting memories of church as a little one was heading out to morning tea after the service, dearly hoping that Rilda was on roster, and devouring her amazing pumpkin scones.

Rilda has gone to be with God now, but we still remember her fondly – I hope this recipe might go some way towards doing justice to her scones 🙂

When I served them up to my husband and kids this morning they were certainly devoured! 2 enthusiastic thumbs up from everyone. I had to hide 4 of the 16 away before there were only crumbs remaining!

  • 1/2 cup cooked and mashed pumpkin (roughly 135g)**
  • 1/2 cup milk of choice
  • 1 tsp apple cider vinegar
  • 50g butter/plant based butter
  • 60g sugar
  • 1 tsp ground ginger
  • 1/2 tsp ground nutmeg
  • 2 tbsp aquafaba (liquid drained from a can of chick peas) or 1 egg
  • 2 1/2 cup plain flour (or 2 cups GF flour and 1/2 cup almond meal)
  • 2 1/2 tsp GF baking powder.

Place the milk and vinegar in a bowl and whisk together vigorously until it is quite frothy (Speed 4, 20 seconds). Then set aside.

20160103_094844

Cream together the butter and sugar in a stand mixer (Speed 4, 20 seconds, scrape down)

Add in the egg/aquafaba and mix well (speed 3, 6 seconds).

Add in the pumpkin and stir through until combined (Speed 4, 8 seconds)

Whilst mixing, gently add in the frothy milk mix (Speed 3)

Add in the spices and baking powder and mix briefly, then add in the flour (and almond meal if using) and mix to bring together. (Speed 4, 10 seconds, scrape down and repeat).

Tip on to floured surface and bring together – dough is quite sticky.

20160103_100648
Spelt dough on left and GF on right

Roughly roll out to about 2cm thick and use scone cutter to cut out.

Place on a lined baking tray and put into preheated 200C oven (190C if fan forced) for 12-14 minutes.

20160103_101317
Spelt on left and GF on right – oops, I rolled the GF ones a little too thin this time!

Scones should rise, be golden brown and sound hollow when sharply tapped on the bottom.

20160103_103008

Serve warm or cool with vegan butter.

Makes about 18

20240425_215559

Enjoy 🙂

**P.S I have taken to making extra when I do roast pumpkin for dinner and I keep aside the 135g I need to make scones for the next day. I think the roasted veg gives an even better flavour!

Chocolate Rice Cereal (Cocoa Pops)

When we were growing up, my brother and I, used to hang out for school holidays and the much coveted ‘1 box of holiday cereal’!

It was always either Froot Loops or Cocoa Pops – stuff that was never otherwise allowed in our home! We would be up at the crack of dawn the first day to make sure that one of us didn’t get a bigger serve than the other 😀

Now the ‘special cereal’ tradition has been passed on to my kids … but there is just no way I could put that stuff in my trolley … even if it wasn’t for the allergies! Freedom Foods makes a pretty decent chocolate cereal that is fairly low in sugar and has extra fibre from chic peas and psyllium but it is a little box and with 4 excited kids – it makes it a very expensive treat that disappears after only 2 days!

So, I’ve had a go at making my own version of Cocoa Pops, inspired by my Sweet and Salty Puffed Corn. They are yummo – Even I have been tempted by a bowl 😉

  • 170g puffed brown rice
  • 2 tbsp tasteless coconut oil
  • 1 tbsp sunflower seed butter (or nut butter)
  • 3 tbsp rice malt syrup
  • 3 heaped tsp cocoa powder (or 2 of cacao)
  • 1/4 tsp Himalayan salt
  • 1 tsp vanilla bean paste

In a saucepan, place the oil, seed butter syrup, salt and vanilla. Cook over a gentle heat until all melted (90C, speed 2, approx 90 seconds).

Remove from heat and stir in the cocoa until you have a smooth but runny chocolate syrup.

20151231_092207

Pour in puffed rice and mix until well coated. Initially it wont seem like enough mixture, but keep mixing, it will cover it all. I find this easier to do either in a very large saucepan or my big roasting tray – the thermal cookers aren’t quite big enough for this quantity, but do half at a time if you’d prefer to do it in one. Use the blunt blade (or reverse function in the TMX) and a very low speed.

Spread out on 2 lined baking trays (so it’s not too thick a layer) and place in a pre-heated 160C oven. Bake for 12-15 minutes, stirring once about half way through.

20151231_093310-1

Allow to cool completely so they go crispy. Store in an airtight container in the cupboard, and serve as you would any cereal.

20151231_105047


My kids have enjoyed it with cold milk and also just eating it as a snack!

20151231_104812

Enjoy 🙂

20151231_105340-1


French Onion Soup – Dry Mix


French Onion Soup as a dry mix is such a tasty addition to casseroles, potatoes and dips etc. But sadly the store-bought variety have gluten in them, sometimes milk, soy and  lots of additives and preservatives and as such, it has been off the menu for us for quite some time. So I have been experimenting and have come up with a great substitute.

You can use it in exactly the same way as you’d use a packet of the dry soup mix. About 30g is the equivalent of 1 packet.

  • 4 heaped tbsp Onion flakes
  • 1 heaped tbsp Garlic flakes
  • 1 tsp celery salt
  • 1 tsp black peppercorns
  • 1 heaped tbsp beef style stock powder (I use Massel as it is vegan too)
  • 3/4 tsp dried parsley
  • 1 tsp dried paprika

Mix all ingredients together and mill until peppercorns are fine.

20151229_202552-1

You could use ground pepper if you don’t have access to a machine that mills, then just blitz all together in a food processor/blender etc.

Store in an airtight container and this will last many months (if you don’t use it first!)

Enjoy 🙂