Orange Weet-Bix slice

The original version on this slice was another childhood favourite of mine. It was a regular feature in our school lunchboxes. But until today it hasn’t been possible to pass it on to my kids. But we have discovered this new product:


July 2014 377

It’s made with sorghum and although I’m not the biggest fan of the original as a cereal, it fits our allergy requirements, my kids are excited and I’m pleased to be able to use them in baking!

  • 160g Nuttelex, melted
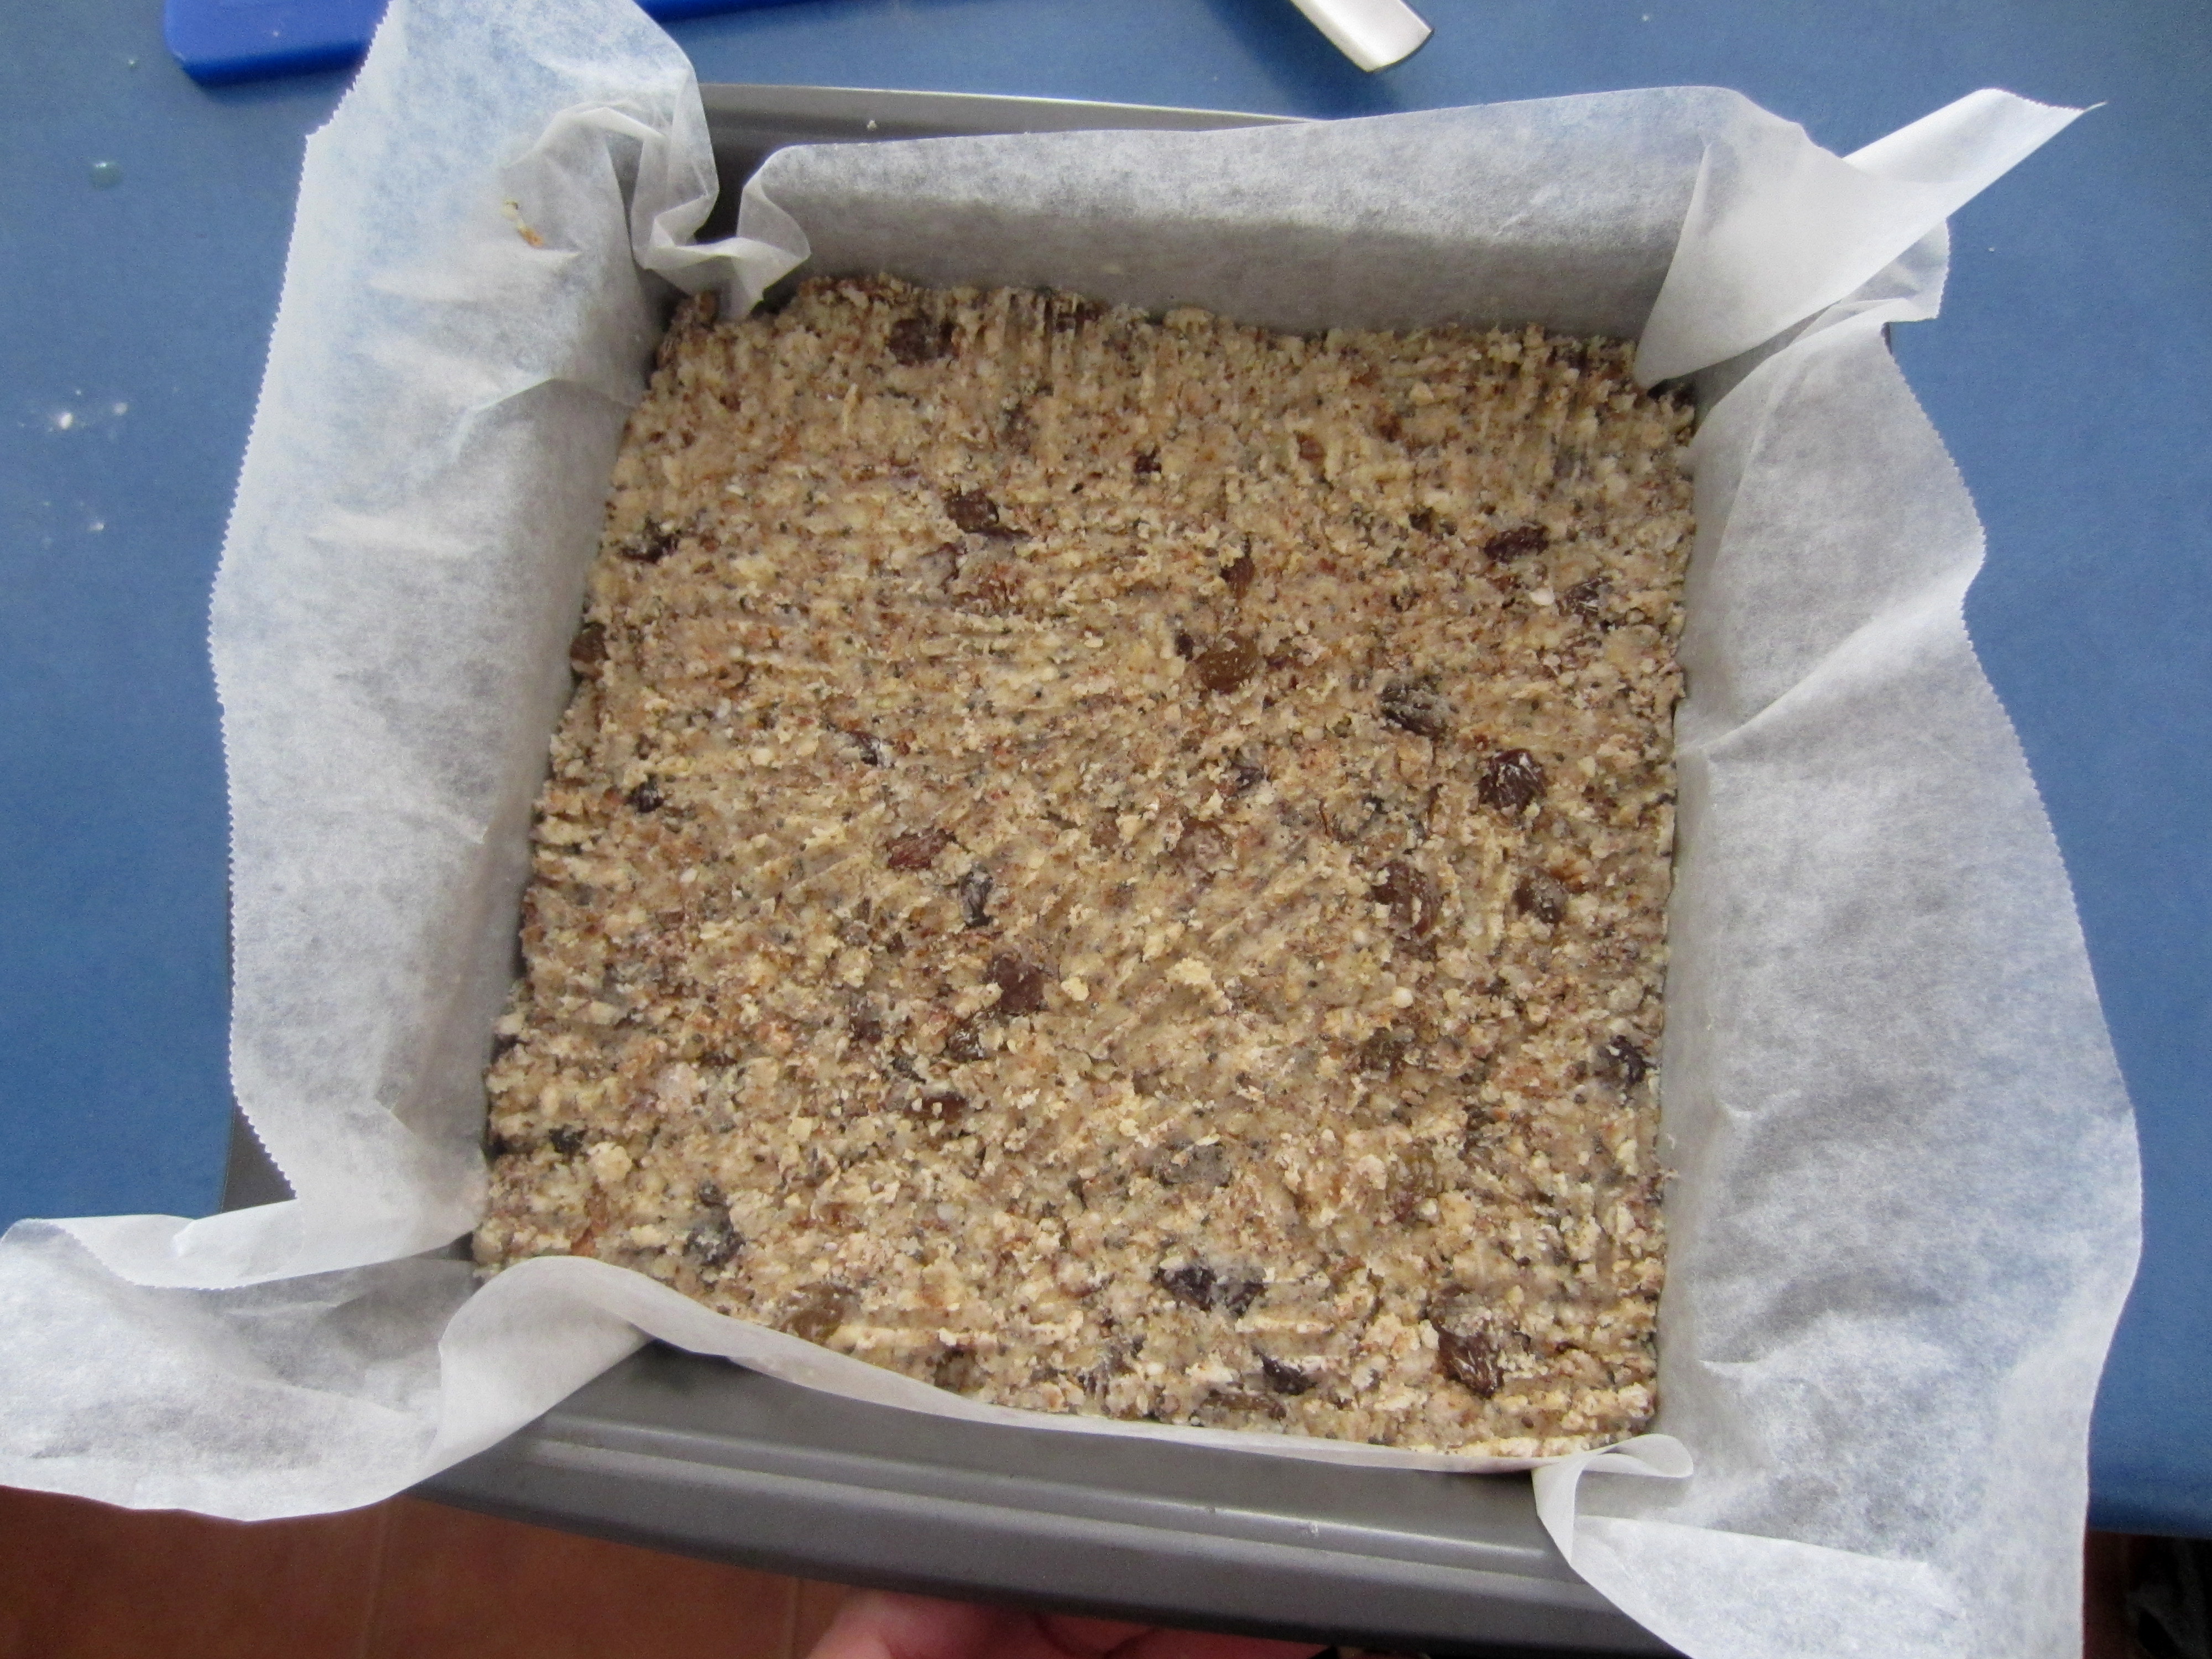
  • 4 weetbix, crushed
  • 1.5 cups SR GF flour
  • 1/3 cup sugar
  • 1/2 cup flaked quinoa or rolled oats
  • 1 tbsp chia seeds
  • 5 tbsp orange juice

Mix together the dry ingredients then pour in the Nuttelex and juice and mix well.

Press firmly into a lined baking tray (mine was 20x20cm).

Bake in a preheated 180C oven for 25 minutes.

Cool and then ice with orange icing, made with the finely grated rind of one orange, a tsp of melted Nuttelex, a couple of tbsp of orange juice and pure icing sugar.

Slice and store in airtight container in the fridge. Makes 16 slices.

July 2014 375

Enjoy 🙂

To adapt for a Thermal cooking machine (Thermomix, Bellini, Mistral etc):

Add Nuttelex and sugar and melt at 100C on speed 3 for 1 minute.

Add in the quinoa, chia, flour and weet-bix. Mix on speed 4 for 20 seconds.

Pour in the orange juice and pulse 3-4 times to combine, the mix on speed 6 for 20 seconds.

The Chocolate Cake

Growing up, my mum was famous for her chocolate cake. So much so that it was known simply as ‘The Chocolate Cake’.

It was the base for most (if not all!) of mine and my brother’s birthday cakes and it made an appearance at a lot of special family occasions. Since our diet has had to change I have so missed that cake! So since we are off to a birthday party tomorrow where we will need to take ‘safe’ cake along for Ellie … here is my attempt at living up to Mum’s cake!

See below the recipe for a coeliac friendly version.

  • 1 3/4 cups flour (half wholemeal)**
  • 2 tsp GF baking powder
  • 1/2 – 3/4  cup sugar (use more or less depending on your sweet tooth!)
  • 2 tbsp cocoa
  • 125ml light olive oil
  • 1 cup milk of choice
  • 1 tsp vanilla bean paste
  • 3 tbsp aquafaba (liquid drained from a can of chic peas)/one medium (overripe) pureed banana/ 1 whole egg

** To boost the nutritional value of this cake, I often leave out 1/2 cup of flour and replace it with 1/2 of almond meal cup or milled seeds (I like a mix of chia, flax and pepita) – the ground chia and flax also help the bind the cake without an egg present too.

Mix together the oil, milk and vanilla until well combined.

In the large bowl of your mixer mix together the flour, sugar, cocoa and baking powder.

Mix the wet mix into the flour mix and beat until to combined. While the mix is beating, add in the aquafaba or egg.

Pour into a lined cake tin or 14 regular muffin holes.

Bake in a preheated moderate oven for approx 45 minutes (for the cake) or 20 minutes for the muffins, or until a skewer comes out clean.

Allow them to cool and then ice as desired.

I have made a simple icing from 1 tbsp melted Nuttelex, 1 tsp cocoa, a splash of milk and pure icing sugar. But my kids enjoy them equally un-iced.

It’s not quite the same as Mum’s but it is a pretty close substitute and the kids seem to agree!

It freezes and thaws well too.


20170929_081017-1-1


To adapt for a Thermal cooker:

Place the oil, vanilla and milk in the jug mix on speed 4 for 5 seconds.

Add in the sugar, baking powder and cocoa and mix on speed 4 for 15 seconds.

Add the flours and mix on speed 4 for 30 seconds. Whilst mixing, add the aquafaba or egg through the opening in the top of the lid.

Enjoy 🙂

To make this into a coeliac friendly version make sure you use an appropriate milk and replace the flour with 1 1/2 cups of a plain GF flour mix and 1 tsp psyllium husk. Reduce the mixing time when  you’ve added the gf flour so that you mix just until the flour in combined.

I recently made a double mix of this cake for miss Ellie’s 3rd birthday party. And it worked well as a based for the fondant icing too.

Ellie's 3rd 080

Apricot and Date quinoa biscuits

You might have already guessed from many of my previous posts that I have a bit of a sweet tooth. I love bikkies and cakes and almost anything sweet, so I am always looking for ways to make yummy snacks that also have a bit of extra fibre and protein in them … these are my latest experiment and happily they have been very well received.

William says they are ‘even better than ones from a packet’ and even my husband’s work colleagues have been enjoying them, so I hope you do too!

  • 250g NuttelexBlog 100
  • 2 1/4 cups rolled oats
  • 2 1/4 cups plain GF flour
  • 1/4  cup coconut sugar
  • 2 tbsp maple syrup
  • 2 tsp bi-carb soda
  • 4 tbsp boiling water
  • 1 cup flaked quinoa
  • 100g diced dried apricots
  • 100g diced dried dates

In a medium saucepan melt together the Nuttelex and syrup. You don’t want it to boil, just to be all melted and well combined.

In a large mixing bowl place the oats, flour, quinoa, sugar and dried fruit. Mix well.

In a glass or small container mix together the bi-carb and boiling water. Immediately add this mix to the syrup mix. It will froth and bubble to about twice its volume.

Pour this mix into the dry mix and stir until well combined.

Place heaped teaspoon fulls on the mix onto a lined baking tray.

Press down gently with a fork before baking in a slow oven (150C) for about 25 minutes or until golden brown.

These will be soft when you take them out of the oven but will harden as you allow them to cool on the tray.

Makes about 36 (although … I suspect it might have been slightly more if it wasn’t for the quantity of dough eaten by my little helper!).

Keeps for about a week in an airtight container.

Blog 102

Enjoy 🙂

Choc Oat Slice

IMG_2815
Ready!

After a simple afternoon tea slice straight from the pantry? Here’s one I cooked up this week that was free of our allergens and delicious too.

(See below Libby’s recipe for a Coeliac Friendly version from Jess)

It made enough for a piece each for two afternoons with one or two left over (hmm, not sure where they went…?!) but it is easily doubled so that it lasts longer (or serves more people).

125g Nuttelex
1/2 cup sugar (I used raw sugar and just didn’t fuss that it wasn’t all dissolved)
1/2 cup oats
1/4 cup cocoa
1 cup SR flour

1. Mix cocoa and oats together in a bowl (whilst preheating the oven to 180C)
2. Melt the Nuttelex and sugar together in a saucepan until sugar dissolved (or almost!)
3. Remove from heat and pour it over the cocoa and oats and mix them together.
4. Mix in self raising flour.
5. Press into a 20cm x 15cm baking dish (I used a small pyrex dish lined with baking paper)
6. Bake for 15min at 180 degrees Celsius. Cool in the dish.

Yum! For regular people, just change the Nuttelex to regular margarine or butter.

Verdict
5 thumbs up! Crumbs devoured.

IMG_2816
Yum. Love baked treats.


For a coeliac friendly option: replace the flour with a standard gluten free flour mix plus 1 tsp GF baking powder. Replace the oats with crushed GF weet-bix, shredded coconut, or rolled quinoa.

Ice if you like.

20160130_184727-1

Enjoy 🙂

Mulberry Jam

I should start this post by saying that I am a total jam novice …. this is my first ever go at making jam but it was much less scary than I thought and it tastes so yummy that I am inspired to make more.

I am very fortunate that my parents-in-law have a sprawling, very heavily laden mulberry tree in their backyard, so picking over 2kg of berries to have a go was very easy (and fun!).

I have made this one with quite ‘Christmassy’ flavours so it is another great gift to give for teachers  (or even those great Aunts and second cousins once removed that are really tricky to buy for 😉 )

  • 1.3kg Mulberries
  • 1.5kg jam setting sugar (made by CSR, it already has some pectin in it)
  • finely grated zest of 2 large oranges
  • 1 heaped tsp of ground cinnamon
  • juice of 1 lemon
  • 8-10 glass jars, scrubbed clean

Wash berries and drain very well. Remove any obvious stems and place in a large saucepan.

1-Blog 078

Crush with a potato masher. How much you crush depends on how smooth or lumpy you like your jam … I like some lumps so I didn’t mash too much.

Tip in the zest, juice and cinnamon and mix well.

2-Blog 080

Turn on the stove to a low heat and add the sugar.

Stir continuously over low heat, until ALL of the sugar has dissolved.

Turn up the stove to a high heat and bring to a rolling boil. And continue the boil for 4 minutes.

3-Blog 082

Remove from the heat.

During these 4 minutes boil the kettle and soak the jars and lids in the boiling water. Dry the outside of the jar with a clean tea towel.

As soon as you have removed the jam from the heat, use a jug, like a pyrex style measuring jug to scoop out the jam and pour it into the jars. Please be very careful with this part … it is a really hot mixture and you will need to protect your hands.

Fill the jars, place the lids on and immediately invert them. Allow them to stand upside down for an hour. This allows the jars to reseal and keeps them airtight.

Then turn the jars up the right way and wipe them … it is a messy process! Allow to cool and set overnight – don’t put them in the fridge as you might crack the glass. Only use jars with a plastic lid if you are going to use it straight away or if you have jam seals underneath.

4-Blog 084

You can easily decorate the jars to give as gifts. We did a pretty label and some glossy red and green bows. They look great!

Delightful!
Delightful!

He has waited a looong time for this jam!

Stained Glass gingerbread

One of my favourite things to do leading up to Christmas is baking!! The kids enjoy helping and sharing their spoils too.

This year my William is in kindergarten and has asked to take in Christmas treats for all of his little friends, and I was on roster to do craft for the kids at our Bible study break up … so I made a (huge!) batch of Libby’s yummy gingerbread and we turned them into stained glass biscuits. Fun to make for the kids, yummy to eat and they make lovely presents with a bit of cellophane and bright ribbon!

Please note that the gingerbread recipe itself is soy free but there is a small amount of soy in the only boiled lollies I was able to find, so the stained glass part is not soy free.

You will need 2 packets of boiled lollies and gingerbread as per this recipe: https://itchinkitchen.com/2012/12/03/gingerbread-cookies/

Split the colours of the lollies up into bags then smash them up on a hard surface with a hammer. Best to have a tea towel folded around the bags so stop all spillage if you split the bags!

4-crushed lollies

Remove the gingerbread dough from the fridge and cut out the gingerbread shapes.

On a lined baking tray (it must be lined with baking paper and not just greased as the boiled lollies will stick like rocks without the baking paper!) place the shapes and then use an apple corer (or similar) to cut out holes.

1-Blog 070

Fill the holes with the crushed lollies – careful not to overfill them as they will turn to liquid and overflow during baking!

2-Blog 071

Bake in a moderate oven for about 10-15 mins or until golden brown.

Leave them to cool for at least 15 minutes on the tray before attempting to remove them to a wire rack – the liquid ‘glass’ centre needs time to harden and stick to the biscuit.

3-Blog 072

Allow to cool completely before wrapping and sharing as gifts … or enjoying at Christmas parties 🙂

1-snow man stain glass

Chocolate mousse cake

Last night we had a get together with a group of friends that had been months in the planning. A few sets of friends were visiting from all over the world … what better reason to get together and share a whole lot of yummy deserts?! I was asked to bring along an allergy friendly desert … and this cake what I came up with – it is almost a replacement for cheesecake.

Just before he tasted it, I was having a conversation with a friend who was telling me how it is really awful when people try to pass off ‘that avocado stuff as chocolate mousse’ … and then he ate it and loved it … so I’m counting that as a win 😀

To make the base you’ll need1-October 2013 379

  • 2 packets of Macro gingernuts
  • 3tbsp Nuttelex

Place in a food processor and process until the crumbs resemble damp sand.

Press the crumb down firmly with a fork into a greased springform pan.

Then make the mousse.

I used a double quantity of this recipe for the chocolate mousse

Tip the mousse on to the top of the crumb base and spread out evenly.

Place in the freezer until solid. This is a cold dessert so it is best left in the freezer until almost ready to serve.

2-November 2013 002

Makes quite a large cake – serves probably 12-16.

I really enjoy the ginger flavour, but I think next time I make this I might have a go at using  Rowies Anzac Biscuits so that the chocolate flavour is the more dominant one.

Hope you enjoy!3-Blog 067


Update: I have recently been making this cake with a different base and have enjoyed it even more than the original.

  • 2 packets of Leda’s Arrowroot biscuitsOctober 2014 1398
  • 1 tbsp flaked quinoa
  • 1 tbsp almond meal
  • 8 fresh dates, pitted
  • 1 1/2 tbsp tasteless coconut oil.


Lemon Drizzle Cake

Lemon Drizzle
Retro Mummy inspired me to go the rustic look with the baking paper and I love it!

I enjoy reading Retro Mummy’s blog and we have been loving her recent cake recipes. I adapt them to be dairy and egg (and nut when required) free and usually they turn out really well. The best so far has been the Lemon Drizzle Cake. You can see Corrie’s recipe here. I made my cake in my KitchenAid and loved using fresh lemons from our tree, saving them from ending up as balls for my kids to play with in the garden! I have a feeling that this cake would even cope with being gluten free as well – the flavours are so good.

Ingredients
  • 1 cup caster sugar
  • grated lemon rind from 2 lemons
  • 125g Nuttelex
  • 1tsp vanilla essence/extract
  • 2 eggs equivalent of No Egg, made up with water and mixed well.
  • 3/4-1 cup soy milk (or whatever milk you can have – coconut milk might work really well) I had a juicy lemon so didn’t need as much milk.
  • juice of 1 lemon
  • ½ cup or 55g desiccated coconut (I used shredded and it was good!)
  • 1½ cups/250g SR flour

Drizzle icing

  • juice of 3 lemons (2 would be enough if they were as big/juicy as the ones off my tree)
  • 1½ cups icing sugar
Method
  1. Cream the butter, lemon rind and sugar until thick and creamy.
  2. Add in vanilla and combine.
  3. Add in No Egg mixture, milk and juice of 1 lemon and mix until creamy.
  4. Add in flour and coconut and mix until well combined and creamy and fluffy. I’m not sure why mine went super fluffy but I did leave it for a little bit to attend to children so I think the No Egg really got working like eggs. Worth being distracted for!
  5. Pour into a lined cake tin and bake for about 40 minutes in a 170C/340F oven.
  6. While cake is cooking combine the icing sugar and juice of two lemons in a bowl. Leaving it for a while ensures any icing sugar lumps are dealt with by the juice.
  7. When cake is cooked, remove from tin and leave to cool
  8. Drizzle icing over the cake. I drizzled the icing over while the cake was still warm, like Corrie suggested. I think it absorbs it better too.
  9. Enjoy while still warm – mmm mmm!

Results

5 thumbs up and lots of ‘more’ signing from Miss Emmalyn!

Rich mud cake

This is the cake mix that I keep at the back of the pantry for emergencies! I find it in the alternative section at Woollies.

It is very simple to make and delicious – even for those without allergies … my Dad polished off 3 for arvo tea while we were working on the house 😉

The instructions on the back tell you to add 1/2 a cup of water, 1/2 cup oil and 2 eggs. I have found this to be too oily.

So instead I add1-July 2013 037-001

  • 1/3 cup rice bran oil
  • 1/2 a cup, plus a splash more water, and
  • 2 tsp no egg powder.

I divide in to 12 muffin pans and cook for about 20-25mins in a 160C fan forced oven.

They freeze and defrost perfectly and are wonderful to take to parties for Ellie so that she (or I ;)) don’t miss out.

Enjoy 🙂

Banana Custard

We have recently been offered and accepted a job back in Perth, so we are in the midst of packing to leave Roxby Downs. It is a time of very mixed emotions – we are very sad to be leaving behind our lovely friends and small town lifestyle here but also very excited to be moving closer to family and friends …. and not to mention the excitement of being able to have loads more choice for our foods!!

One of the things I like least about moving is the process of running down the pantry and fridge/freezer. I discovered heaps frozen overripe bananas in the back of my freezer the other day (that I had totally forgotten about!) so I have been experimenting with ways to use them up. Custard was the best of the bunch 😉

Banana Custard

  • 3 defrosted overripe bananas1-May 2013 086
  • 500ml oat milk
  • 2 heaped tsp of No Egg powder
  • 50g coconut sugar
  • 30g pure Cornflour
  • good pinch of cinnamon

Place the Bananas, sugar and cornflour in the food processor and process until smooth. (Speed 6 for 10 seconds for a thermal cooker, then scrape down).

Add in the No egg, milk and cinnamon and process again until well mixed and very smooth. (Start low and gradually build up to speed 6 for 20 seconds in a thermal cooker).

Transfer mix to a saucepan and place over medium heat, stirring for about 12 minutes until the mixture thickens. (for a thermal cooker, mix on speed 1, 100C for about 20 mins).

Serve warm or cold, topped with extra sliced banana or sprinkled with cinnamon sugar.

Makes about 6 serves.

I kept the left overs for a couple of days in the fridge in reusable squeezy containers.

If you want to make a chocolate variety, just add 1 tbsp of cocoa when you are adding the cinnamon.

If you don’t have frozen bananas just use fresh overripe ones.

🙂

Hope you enjoy your baking – I’ll be back in a few weeks from Perth!