Moroccan Lamb Soup

This morning it actually felt a little cool in Perth – hooray!! Cooler weather in my book means soup! Out comes the slow cooker!

We are getting to the last 2 weeks of our 3 months of meat bulk buy so I am starting to need to get a bit creative with the cuts left and my pantry staples. Thankfully I have had an abundance of pumpkins in my garden so that has helped.

This delicious, hearty soup got rave reviews from my husband, the small one and the 2 big boys (both gave it 9/10) …. miss fussypants refused to even try – but that’s not unusual!

Such a great way to use a really cheap ‘left over’ cut of meat so about $4 of meat makes enough for our family of 6 twice over – hello easy freezer meals!

  • 1 medium butternut pumpkin, peeled and diced
  • 1 large gold sweet potato, peeled and diced
  • 2 400g tins chic peas, drained and rinsed
  • 400g tin crushed tomatoes
  • 4 cups very hot chicken stock (I used Massel)
  • 800g lamb soup bones
  • 2 tsp Moroccan seasoning ( I make this one)

Place the pumpkin, potato and chic peas in the bottom of the slow cooker.

Add in the tomatoes, stock and seasoning. Mix well.

Add the bones to the mix and press them down so that they are covered with liquid.

20160405_071140

Place on the lid, and set on low. Leave for 8 hours.

Remove the bones from the soup and use a fork to pull off the meat.

20160405_171957

Return the meat to the pot.

Use a stick mixer to blend until smooth (or a blender/processor/thermal mixer in smaller batches – please be VERY careful blending hot liquid inside a confined space!!). Season with salt and pepper to taste – I didn’t need to add any tonight.

20160405_172622

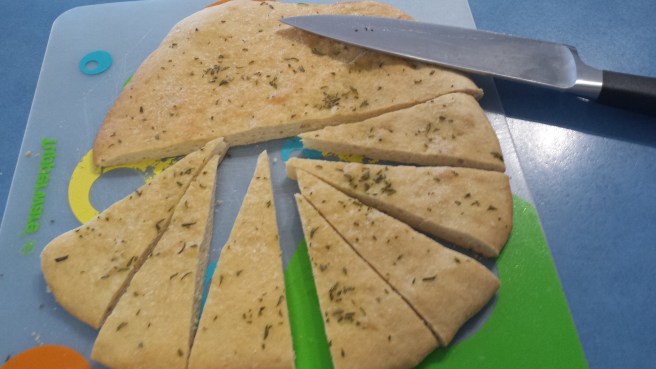
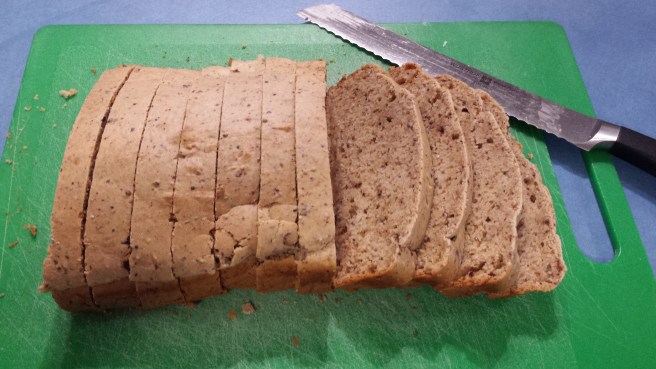
Serve immediately – it’s particularly yummy with warm garlic bread damper (see recipe below)


20160802_182000-1.jpg

Enjoy πŸ™‚

For the garlic damper process (Speed 5, 15-20 seconds) together 3 cups spelt flour (I did wholemeal and white), 3tsp GF baking powder, 1 tbsp Nuttelex/Vegan butter, 1 cup milk of choice and 1 tsp garlic salt. Bring together to a rough disc, press on to a lined baking tray, use your hands to rub 1 tsp of garlic olive oil over the top and sprinkle with flaked salt, slash the top and place into a preheated moderate oven for about 25 minutes or until golden and the base sounds hollow when tapped.

20160405_175254


Preserving Chilli

There’s not much nicer in the kitchen than being able to cook with the food that you have grown only metres away!

Our chilli plants have been very productive this summer and these are a couple of the ways I have used them.

Chopped/Minced Chilli – use 1 flat tsp in place of 1 fresh chopped chilli in any recipe.

  • 150g chilli
  • 2 tbsp white vinegar.

Place whole chillis and vinegar in your processor and process until well chopped. (Speed 6, 10 seconds).

20160331_125509

Of course, if you don’t have a processor you can just finely chop by hand and then stir through the vinegar.

Store in small, sterilised glass jars.

Chilli Infused Olive Oil –Β use in place of regular olive oil in cooking to add a bit of extra bite, or as a dip for some delicious crunchy bread.

  • 400ml extra virgin olive oil
  • 6 small chillis (mine were the size of my index finger)

Slice chillis lengthways and place in a saucepan with the oil.

20160331_130248

20160331_130507

Bring to a gentle simmer Β (100C, Speed 1, about 4-5 minutes) and then remove from the heat and allow to stand for 10 minutes.

Pour into sterilised glass bottles, through a sieve to remove the seeds. Then add the remaining chilli flesh into the bottles and seal.

20160331_131417

20160331_132312-1

Enjoy all year ’round πŸ™‚

Gravy

You have probably read about my Mum being a fabulous cook many times on this blog. I’m always hopeful that I can come close to approximating her meals with our dietary limitations.

However, as a kid, I only remember gravy being made in instant form from powder in a packet (Sorry Mum!)… most probably because it was much quick and less fatty. So as an adult learning how to make gravy has been a bit of a challenge for me…. and it seems I’m not alone! It was always a little hit and miss until I recently saw a very old episode of ‘Good Eats’, hosted by Alton Brown. His method for making gravy was to thicken with a roux (fat and flour), so that the flour has already cooked out before it combines with the meat juices. And now we get great gravy every time.

I tend to cook in bulk, and gravy is no exception. This recipe makes about 3 cups of gravy. I pour into reusable squeezey containers and freeze. It means when I cook a leg of lamb that does us for 3 meals – I have the gravy ready to go for each of the following meals too.

  • 3 cups Meat juices (I get about this from a large leg of lamb that I have slow cooked)
  • 2 tbsp fat (either from the meat or Nuttelex)
  • 2 tbsp flour (I use either spelt or a GF flour mix)

A general ratio of 1 tbsp fat, 1 tbsp flour to each 1.5 cups of liquid.

After I have removed the meat, I strain the meat juices and reserve the liquid.

20160326_223649

Sit the liquid in the fridge for a couple of hours so that the fat separates and solidifies on the top. Then I scoop off the fat.

20160327_104823

In a medium saucepan warm the juices back up – they will be quite jelly-like after cooling.

In a large saucepan, over a medium heat, melt your fat of choice, either the fat scooped off the top of the top of the cooled meat juice or use Nuttelex.

Then add in your flour. Whisk it to combine well. This is your roux and it needs to cook for about 4-5 minutes, whisking regularly, to allow the raw taste of the flour to cook out.

20160329_152609

Then add 1/2 a cup of the warmed meat juices at a time into the roux, whisking whilst you add, and waiting till all combined before you add the next 1/2 cup.

Cooking, whisking regularly over a very gentle heat until you see the mixture come to a very slight simmer. Remove from the heat and serve with your meal.

20160329_153056
Silky smooth!

20160329_154031-1

Mixtures thickened with flour will continue to thicken on cooling, so try to serve as soon as possible. You can add a little boiling water if you wish to have runnier gravy.

Of course, you can use this method for all meats and add extra flavours to intensify those already in the juices.

Enjoy!


Garlic bread

This is a super simple appetizer or addition to dinner – we have even taken it as a snack to picnics.

I use my yoghurt dough recipeΒ – there are both vegan, soy free and GF options.

Most regularly I use a spelt/soy mix.

  • 1 quantity dough (though 1/2 is sufficient for 1 large base)
  • 1-2 tbsp garlic olive oil
  • 1 tsp Himilayan salt
  • 1 tsp fresh, finely chopped, rosemary.

Roll out dough to a pizza shape (thickness depends on how doughy or crispy you like your garlic bread) then brush with oil.

20160213_134004
My gorgeous little helper πŸ™‚

Sprinkle with salt and rosemary.

20160213_134217

Place into a preheated moderate oven and bake for about 15 minutes or until golden.

20160220_082114.jpg

Slice into wedges and serve.

20160213_151257.jpg

I often make a whole quantity of dough, then freeze half uncooked (tightly wrapped in plastic wrap and placed in a zip lock bag), for an even quicker bread next time.

Enjoy!


Chicken and Gravy Pot Pie

I don’t like waste … in any form! Time, money, food and energy are all precious to me so I try to use them all to the best of my capability. This pie kind of exemplifies that! It uses scraps of left over meat, pantry staples and veggies that might be looking a little sad in the fridge, and it makes 2 meals at once. Love it.

A couple of weeks back I bought 2 bbq chickens to take to a picnic. After I’d pulled all of the firm, white meat off, there was a heap left that was brown meat, or a bit soft and fiddly to eat at a picnic, so I pulled every last shred off and froze it to use later – I got 350g off 2 chickens – easily an extra meal!

*If you’re not eating any meat, check below the recipe for a simple tweak to make this a vegan pie.

20160304_134119

Then I make a simple chicken style gravy (not actually any chicken in it!). You need:

  • 2 cups very hot chicken stock (I used Massel brand)
  • 1 tbsp Nuttelex/vegan butter
  • 1 tbsp spelt or pure corn flour
  • 1/3 cup white wine
  • 1 tsp fresh chopped thyme
  • ground black pepper to taste

Melt the Nuttelex in a saucepan then add in the flour, whisking immediately to avoid lumps (Speed 2, 100C for 2 mins or until melted, then add flour and continue speed 2, 90C for 4 mins). Cook, over medium heat, for about 4-5 minutes, stirring regularly. Then add in 1/3 Β of a cup of chicken stock at a time, whist whisking (Speed 2, 90C, and add stock through hold in lid). Once all the stock is combined, add in the wine, thyme and pepper and allow to simmer very gently for 2-3 minutes (Speed 2, 80C for 3 minutes). Set aside.

To make the filling of the pieΒ you will need:

  • 2 tbsp garlic oil
  • 1 brown onion, finely chopped
  • 10-12 large button mushrooms, sliced
  • 2 cups roughly chopped green beans
  • 400g tin chic peas, drained and rinsed (save the brine when you drain it to use as an egg replacer!)

Heat the oil in a large pan (fabulous if this pan/dish can go from stove top to oven!), add the onions and good until translucent. Add in the mushrooms and cook, stirring until softening, about 4-5 minutes. Add in green beans and chic peas.

20160304_134107-1

Pour gravy over the top of the veggie mix, then add the chopped cooked chicken, mix well and then bring to a gentle simmer for a few minutes.

20160304_134549

To make the topping of the pieΒ (which is a type of savoury scone dough!)Β you will need:

  • 45g vegan butter
  • 1.5 -1.75 cups spelt flour (or 1.25-1.5 cups GF flour plus 1 tsp psyllium)
  • 2 tsp GF baking powder
  • 1 heaped tbsp Nutritional yeast
  • 1 tsp Himilayan salt
  • 5-6 grinds back pepper
  • 1 tsp fresh chopped thyme.
  • 1/2 cup milk of choice – or water works well too.

In your food processor pulse together the Nuttelex with 1.5 cups of flour and baking powder.

Once it resembles bread crumbs stop the processor and add nutritional yeast, salt, black pepper, thyme. Process to combine (Speed 4, 5 seconds)

Then whilst the mixer working (used speed 3), gradually add in 1/2 cup milk or water.

Process to bring together (adding 1 tsp of flour extra at a time if your dough is too wet) then tip on to a floured surface and knead gently.

Roll to shape of you pie dish and top. Cut little vent holes.

Place in preheated 200C oven and bake for about 20-25 mins or until risen and golden brown minutes. It’s like having dumplings with a thick chicken casserole!


20160419_174317

20160419_174905

This quantity of filling is actually too much for one meal for our family, so I froze half for an easy meal down the track!

It is super simple to make a vegan version of this pie – simply leave out the chicken and double the quantity of chic peas and mushrooms.

Enjoy πŸ™‚


Vanilla Almond Cake

You might have already noticed, but chocolate flavoured anything is a fairly firm favourite in our house, for all 6 of us! Just occasionally, it’s nice to change it up a bit though πŸ™‚

In the coming week, my 2 youngest boys and my husband have birthdays. We are having a joint birthday party (along with my Nanna!) and each has requested a cake. I couldn’t imagine taking along 3 chocolate cakes, so decided to have a go at a vanilla flavoured base for George’s “Daddy Raa” (Lion King) cake. It is based on my regular Chocolate Cake (which you should try too!). This is was the result – and it is yummy … thumbs up from everyone!!

See below the recipe for a coeliac friendly version.

  • 1 1/4 cup spelt (I do half wholemeal)
  • 1/2 cup almond meal (use extra flour or seed meal for a nut free option, see note below)
  • 2 tsp GF baking powder
  • 1/2 Β cupΒ coconutΒ sugar (use white sugar if you want a lighter coloured batter)
  • 100g Nuttelex/vegan butter/tasteless coconut oil
  • 1 cup milk of choice (I use oat/rice/vanilla almond)
  • 2 tsp vanilla bean paste
  • 3 tbsp aquafaba (liquid drained from a can of chic peas) 1 egg of egg replacement powder OR 1 egg

Mix together the oil, milk and vanilla and heat until melted and well combined.

In the large bowl of your mixer sift together the flour, sugar and baking powder.

Mix the wet mix into the flour mix and beat well so the mixture is light. While the mix is beating, add in the aquafaba.

Pour into a lined cake tin or about 14 regular muffin holes.

20160303_130030

Bake in a preheated moderate oven for approx 50 minutes (for the cake) or 25 minutes for the muffins, or until a skewer comes out clean.

20160303_135807

Allow to cool for 10 minutes in the tin before transferring to a wire rack. Ice as desired.

(I make a simple icing from 1 tbsp melted Nuttelex, 1 tsp vanilla bean paste, a splash of milk and pure icing sugar).

20160303_152253.jpg

To adapt for a Thermal cooker:

Place the oil, vanilla and milk in the jug and cook on speed 2 at 100C for 2 1/2 mins, or until the oil is melted.

Add in the sugar, baking powder and mix on speed 4 for 15 seconds.

Add the flours and mix on speed 4 for 30 seconds. Whilst mixing, add the aquafaba through the opening in the top if the lid.

Enjoy πŸ™‚

To make this into a coeliac friendly versionΒ make sure you use rice or almond milk and replace the spelt flour with 1 cup of a plain GF flour mix and increase the almond or seed meal to 1 cup.

I make the seed meal by milling 3 tbsp each of flax, sunflower and pumpkin seeds.

20160206_110539-1
Seed Meal

This makes a great double batch cake to take to church for supper, or to slice and freeze for lunchboxes too.

20160303_152547.jpg

Cheeky Monkey Bread – Banana Yoghurt loaf

This yummy quick bread is a major hit with all 4 of my little guys at the moment.

It is super simple to make, freezes beautifully and is a great, not too sweet, treat for lunchboxes.

  • 125g soy/coconut/dairy yoghurt
  • 75ml milk of choice
  • 2 tbsp honey/maple syrup
  • 1 large overripe banana
  • 1 tsp ground cinnamon
  • 100g Nuttelex/vegan butter/light tasting oil, melted
  • 1.5 tsp GF baking powder
  • 1.5 cup spelt flour, about 1/2 wholemeal (OR 1.25 cups GF flour mix plus 1/4 cup seed/almond meal mix)
  • 1 tsp apple cider vinegar

Optional extras:

  • 1/3 cup mixed milled seeds (remove 1/3 cup of flour if you use this option)
  • 4 squares dark chocolate

Place all dry items, except the chocolate, together in your food processor (or just a bowl with a whisk) and process until well combined. (Speed 4, 8 seconds).

If using, grate or finely chop the chocolate into the mix and process again until combined (Speed 4, 5 seconds).

Set aside the dry mix.

In your processor/blender/nutribullet/thermal cooker, place the melted butter/oil, aquafaba, honey, vinegar and banana and process until well combined and smooth (Speed 5, 10 seconds).

Pour wet mix into the dry mix and fold through until combined (Use speed 4, 8 seconds, scrape down and repeat)

Pour into lined loaf tin and bake in a preheated moderate oven for about 40 minutes or until golden brown and an inserted skewer comes out clean.

20160227_113213.jpg

Leave to cool in tin for 10 minutes, before transferring to a wire rack. Allow to cool completely before slicing.

20160515_175137

20180116_154858-1
Watch out for hungry superheroes!

Freezes and defrosts well.

20180116_154954-1

Enjoy πŸ™‚

Lactation Cookies

Being a new Mumma can be tough and one of the things that can make it even more tricky is getting breastfeeding right and the worry about supply etc.

I was lucky enough to Β feed all four of my babies into toddler hood (and beyond!), despite the difficulties of our allergy restricted diet.

To help keep up my milk supply I made sure that I drank heaps of water (about 3L a day) and ate nutritious foods to fuel my body. Β One of the ways that you can make sure you are getting in some good nutrition is these bikkies. They contain good fat, fibre and brewer’s yeast which has been long reported to improve milk supply.

Do not swap out the Brewer’s yeast for instant dried yeast, or nutritional yeast – they are not the same! You can find Brewer’s yeast in health food shops, on line or in supermarkets that sell home brew kits.

My midwife mother in law told me how they used to tell new mothers to drink a good stout before feeds to boost their supply! Not recommended so much any more 🫣 – but the brewer’s yeast is still great!

**I am not a qualified breastfeeding professional, so if you are struggling with feeding or milk supply, please make sure you call the Breastfeeding Support places in your area or seek help in person from a qualified Lactation Consultant**

See below the recipe for a more gluten intolerant friendlyΒ option.

  • 1 cup wholemeal spelt flour/buckwheat flour/rye flour
  • 1/2 tsp GF baking powder
  • 1/2 cup butter/vegan butter
  • 1/2 cup sugar
  • 2 tablespoons flaxseed meal mixed with 2 tbsp water
  • 3 tbsp aquafaba (the liquid drained from a can of chic peas) OR 1 whole egg
  • 1 tsp vanilla bean paste
  • 1 teaspoon cinnamon
  • 10g brewers yeast
  • 1/2 tsp flaked salt
  • 1 & 1/2 cups rolled oats*
  • 6 medjool dates, pitted

*Replace the oats with 1/2 cup shredded coconut, 1/2 cup rolled quinoa and 1/2 cup puffed rice for a GF option

Using a food processor cream together the butter and sugar (Speed 4, 10 seconds)

Add in the vanilla, cinnamon, salt, yeast and baking powder and mix again to combine (Speed 4, 6 seconds)

Drop the pitted dates one at a time onto spinning blades through the chute at the top, then process until dates are finely chopped (speed 4 whilst adding dates, then up to speed 7 for about 10-15 seconds)

Add in the flax whilst mixing.

Add in the aquafaba OR egg whilst mixing and process until combined.

Add in the flour and process til just combined (Speed 4, 12-15 seconds)

Then add in the oats and process again until mixture is well combined (Speed 4, 15-20 seconds).

Roll spoonfuls of mixture into balls, then press down onto a lined baking tray and baking in a preheated moderate oven for about 15 minutes.

20160214_120454

The cookies will still be soft when you remove them. They will harden as they cool. Allow to cool on the tray for 10 minutes before transferring then to a wire rack to finish cooling.

20180519_171704

Makes about 18-20.

These stay fresh for about a week, but I made double batches and froze mine in zip lock bags for convenient snacks – they defrost quickly when you pull them out of the freezer.

Important noteΒ –Β Brewer’s yeast is not considered to be gluten free, as it is grown on barley so it will depend on your level of sensitivity.

If you’re not breastfeeding – these are still a delicious bikkie! You could leave out the yeast to make shopping easier (or if you have a yeast allergy).

Enjoy …. and maybe you could take a batch to a friend next time a new bub arrives to show them how much you care πŸ₯°

Choc Chip Chick Pea cookies

These yummy cookies are a cross between my regular Choc Chip Cookies and my Date, Chick Pea and Sunflower seed butter cookies.

I love that they look like a regular choc chip cookie but have some hidden extra goodness.

  • 40g Nuttelex or other vegan butter
  • 80g Sunflower Seed butterΒ (or nut butter if your diet allows)
  • 120g chic peas (drained and rinsed)
  • 1/2 cup coconut sugar OR Maple Syrup
  • 1 3/4 cups spelt flour (OR 1 1/2 cups GF flour plus 1/4 cup almond meal)
  • 2.5 tsp baking powder
  • 1 tsp vanilla bean paste
  • 3 tbsp aquafaba (the liquid drained from a can of chick peas)
  • 1/3 cup choc chip/chopped chocolate of choice

Place the Nuttelex, seed butter, chic peas, sugar and vanilla into your processor and process until smooth (Speed 4, 15 seconds, scrape down and repeat).

Add in the aquafaba and baking powder and pulse a few times to combine.

Add in the flour and process until it forms a stiff dough (Speed 4 in 10 second intervals).

Add in choc chips and mix until combined.

20160130_155741

Roll teaspoons of mix into balls and place on a lines tray. Press down with the back of a fork. Try to stop your little helper eating all of the raw dough πŸ˜‰

20160130_160221-1

Place in to a preheated moderate oven and bake for about 12 minutes.

Allow to cool on the tray.

Makes about 20 – store in an airtight container for a week.

20160130_170341.jpg

Enjoy πŸ™‚

Yoghurt Apple Cake

Many (many!) years ago now, I was lucky enough to spend 6 months living in France. So much amazing food that was quite new to this (then) unadventurous Aussie girl’s taste buds! Sadly, not so good for my wasitline, but I have never forgotten those delights!

I recently came across this recipe for a yoghurt cake, which reminded me of my time there – this is my healthier, allergy friendly version.

The cake is light and moist – perfect for afternoon tea, so go on, have juste un petit gout!

See below the recipe for a gluten free-coeliac friendly version

  • 100g coconut sugar
  • finely grated zest and juice from one lemon
  • 5 tbsp aquafaba (liquid drained from a can of chick peas)
  • 175g soy yoghurt/coconut yoghurt
  • 125g Nuttelex/vegan butter/tasteless coconut oil
  • 1 tsp vanilla bean paste
  • 275g spelt flour
  • 1.5tsp GF baking powder
  • 1tsp bicarb soda
  • 2 small apples, cored and finely sliced
  • 1 extra tsp of Nuttelex
  • 1 extra tsp coconut sugar.

Preheat the oven to 180C.

Grease a tin and layer the apples on the bottom of the tin.

Melt the tsp of Nuttelex and brush over the top of the apples, then sprinkle with the 1 tsp of coconut sugar. Place in the oven for about 5 minutes while you make the next step of the cake.

20160122_123810

Into your food processor, place all of the remaining ingredients and process until smooth. (Speed 4, 10 seconds then speed 5, 8 seconds).

Remove the tin from the oven and scoop the cake mix to the top of the apples. Smooth over and return to the oven for about 30 mins or until golden brown and a skewer comes out clean.

20160122_125046

20160122_134023

Allow to cool in the tin for 5 minutes before inverting onto a plate.

20160122_134844

Serve warm or allow to cool, dust with GF icing sugar and add an extra dollop of yoghurt if you’d like.

20160122_160101-1

Makes about 12 slices.

I haven’t frozen this one yet, but it lasts well in the fridge until the following day, and I suspect it’s freeze well.

To make a gluten free coeliac friendly version of this cake: replace the spelt flour with 1.5 cups plain GF flour mix and 1/4 cup of almond meal.

Enjoy πŸ™‚