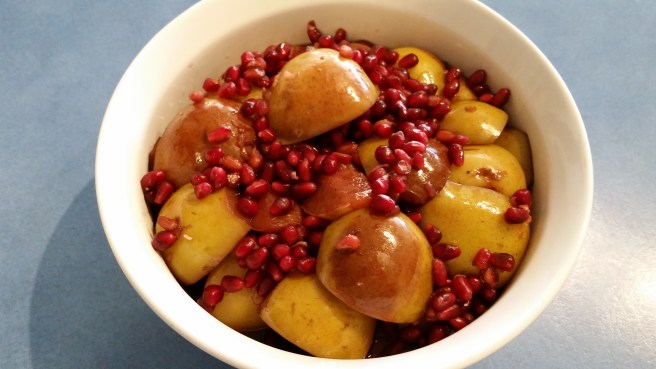
My gorgeous sister in law recently gave me some beautiful fat, juicy pomegranates (thanks Mish!) and I was dreaming up ways to use them, when I noticed the pears that I had bought the previous week sitting, a bit past their best, in the bottom of the fridge. And there next to it was the pomegranate juice I’d used in another recipe …. I like to be creative with what I’ve got on hand and avoid waste …. so we had a very delicious, and very easy, dessert!
500ml Pomegranate juice
1 tbsp coconut sugar
1 tsp mixed spice
peel of 1 lemon, sliced
6 medium pears
1 cup pomegranate seeds
Optional: toasted slivered almonds
Place juice and sugar in bottom of slow cooker, whisk together and cook on high for 10 minutes.
Whisk in spices and add lemon peel.
Core and slice pears into quarters. Peeling is optional (I tend to leave it on for more fibre)
Place pears into the slow cooker juice mixture, place lid on slow cooker and cook on low for 4 hours. Add in the seeds and cook for a further 30 minutes with the lid off.
Remove lemon slices, and serve warm, sprinkled with the almonds (if using), with a cream, ice cream, yoghurt or custard that suits your diet. Alternatively, serve cold on top of breakfast porridge, or granola, use as the fruit base in dessert crumbles or blitz in your processor until smooth and use as a fruit puree.
I love it with my crunchy granola and natural yoghurt for dessert!
It is just perfect with an afternoon cuppa or in a lunchbox to fuel busy little bodies and brains at recess time.
Plus, no oil, no eggs, no dairy and very low sugar make it a healthier ‘cake’ option.
See below the recipe for a Coeliac friendly option too.
200g butternut pumpkin
6 medjool dates, pitted and halved
1 cup very hot water
1/4 cup coconut sugar
50g sunflower seed butter
1/2 teaspoon bicarbonate of soda
2 cups wholemeal spelt flour
2 tsp GF baking powder
1 tsp ground ginger
1/2 teaspoon mixed spice
1 medium, very ripe bananas
1/4 cup pepitas
Place roughly chopped pumpkin into Thermal cooker or food processor and process until well chopped, Speed 6, 8 seconds.
Now add dates, water, sugar and bicarb in the Thermal cooker and cook at 110C on speed 2 until the mix comes to the boil (a few minutes), then a further 2 minutes.
Add in the banana and seed butter and start processing on speed 3 and working your way up to speed 5 for about 12 seconds, or until the mixture is fairly smooth and consistent.
(Do this in a saucepan over a medium heat with regular stirring and then transfer to a food processor or blender to do this without the thermal cooker)
In a large separate bowl mix together the flour, baking powder and spices (speed 5, 8 seconds).
Pour the pumpkin and date mix into the flour mix and fold together until all combined. Don’t over mix.
Pour into lined loaf tin and sprinkle with the pepitas
Place into a preheat 160C oven for 35mins or until an inserted skewer comes out clean.
Cool in tin for 10 minutes before transferring to a cooling rack. Allow to mostly cool before slicing. Serve on it’s own or even serve with some cream or ice cream for dessert.
To make this cake Coeliac friendly replace the spelt with 1.5 cups of plain GF flour mix and 1/3 cup of almond/seed meal.
For a lower sugar version remove the coconut sugar and add another 2 dates.
This is a moist cake and freezes and defrosts beautifully – Enjoy 🙂
This is lovely dense cake… Not too sweet though, so it’s not overpowering if you ice it or serve it with ice cream or cream.
Instead of butter or oil, this torte uses the delicious, creaminess of avocado and richness of seed butter to provide the fats. Delicious and nutritious!
Don’t worry, despite the unusual ingredients, there’s no taste of the hidden avocado when it’s baked!
1 3/4 cups spelt flour (I use half white and half wholemeal) OR 1 1/2 cup GF flour mix
1/4 cup hemp seeds (optional)
2 tsp GF baking powder
3/4 cup coconut sugar*
2 tbsp cocoa
70g very ripe avocado
1 heaped tbsp sunflower seed butter (or other nut butter)**
1 cup milk of choice
1 tsp vanilla bean paste
3 tbsp aquafaba (liquid drained from a can of chic peas) OR 1 whole egg
*if you’re a sweet tooth or you are serving this uniced or in its own you might like to increase the sugar to 1 cup.
**Olive oil is a delicious substitution here for the nut or seed butter. Use 2 flat tablespoons.
Mix together all dry ingredients and whisk to combine evenly (Speed 5, 10 seconds). Set aside.
In your blender/processor/thermal cooker/bullet place the milk, avocado, vanilla, seed butter and aquafaba then blitz until smooth (Speed 6, 10 seconds, scrape down and repeat).
Add the wet mix to the dry mix and mix until well combined and smooth. (Speed 4, 8 seconds, scrape down and repeat).
Pour into a lined, greased cake tin or approx 14 regular muffin holes.
Bake in a preheated moderate oven for approx 40 minutes (for the cake) or 25 minutes for the muffins, or until a skewer comes out clean.
Allow them to cool and then ice as desired.
You could use; a simple melted dark choc ganache or just dust with pure icing sugar. I like to use an icing made from melting together tasteless coconut oil, seed butter, maple syrup, vanilla essence, whisk it until smooth and then add pure icing sugar till you get the consistency you want.
With the seed butter and maple syrup icing, ready to share at a church lunch
Serve on its own or with cream or ice cream of choice.
Serves 12
If you’d like a more decadent cake, you can grate a handful of dark chocolate into the flour before you add the wet mix. We like Lindt dark 70%.
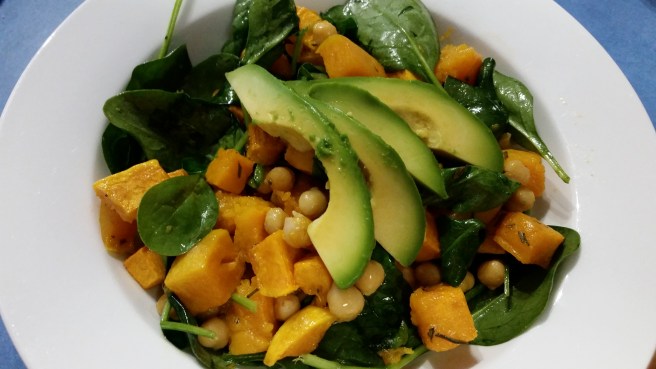
I love my salads … but as the cooler weather comes, they don’t quite hit the spot like they do in Summer.
This is a great way to be able to enjoy salads all year ’round!
1 kg butternut pumpkin
400g can chick peas
2 tbsp garlic olive oil
2 sprigs fresh rosemary
1 tsp pink salt flakes
4 large handfuls of baby spinach
1 tbsp balsamic vinegar
avocado to serve
Dice the pumpkin and toss it in the olive oil. Place it in a lined baking tray and sprinkle with the rosemary and salt.
Place in a preheated 200C oven for about 45 minutes.
Add the chick peas to the pumpkin and mix in well to coat in oil. Return to oven for further 15 minutes.
Remove from the oven and drizzle with the vinegar.
Then add in the spinach and mix well so that the leaves are coated.
Serve into bowls and top with avocado.
Enjoy 🙂
If you are going to eat this one over a couple of days, store in an airtight container in the fridge leave the avocado off so that you can warm the salad before adding fresh avocado each day.
So now we’ve added this version to our repertoire. So very delicious!
50g Rice vermicelli noodles
1 ripe avocado
2 cheeks of ripe mango
1/3 tsp red thai curry paste (I like the Aayam brand)
1 tbsp coconut cream – use the thickest part off the top
8 Rice paper roll sheets
4-6 mint leaves, finely chopped
Either: Firm tofu or 12 cooked prawns
Either drain, press dry and chop your tofu OR peel and chop your prawns.
Place into a glass dish.
Chop the avocado and add it and the mint to the tofu/prawns.
In a blender/bullet/thermal cooker, place the mango, thai paste and coconut cream and process until smooth (Speed 5, 8 seconds, scrape down and repeat).
Add the creamy mango sauce to the other ingredients, cover and set aside in the fridge for at least half an hour.
Cook/soak your rice noodles according to packet instructions, then drain and rinse in cold water.
Soak your rice paper rolls according to packet instructions, then lay onto a damp towel.
Place noodles on the rice paper rolls, add a tbsp of mango mixture to the top and wrap up into rolls.
Serve immediately.
These are best fresh, but keep in an airtight container in the fridge they’ll last 24 hours.
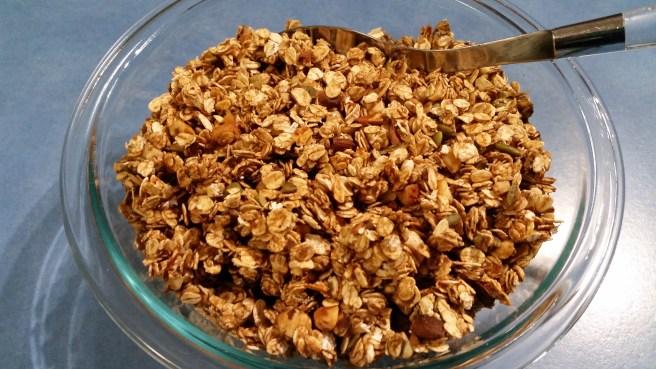
It always seems like such a cafe style, luxurious breakfast item to me. I am not really keen on the store bought variety though because as well as being expensive, they also tend to be loaded with oils and sweeteners (and coconut … why?!).
Well – here’s a way to enjoy your granola that’s kinder to your pocket and to your body!
2 1/2 cups rolled oats (use puffed rice or quinoa flakes for the GF option)
1 cup chopped nut or seeds of choice (today I did almond, hazelnut and pepita)
In a small saucepan mix together the date paste/syrup, oil, seed butter, salt, spices and vanilla.
Stir over low heat until just melted and well combined (Speed 2, 90C, approx 2 mins).
In a large bowl mix together the oats and nut/seeds until evenly combined (Speed 4, 8 seconds).
Add the wet mix into the dry and mix until evenly coated (Speed 3, 20 seconds).
Pour onto a lined baking tray and spread out into a thin, even layer.
Place into a preheated low oven (approx 140C) and bake for 30 mins.
Allow to cool. If you prefer not to have clumps in your granola, stir it around as it cools to avoid any sticking together.
Store in air tight container and use as you would any cereal … add milk to it, or as a topping for your yoghurt. Or, I use this as the filling in my baked pears/apples.
Why not add in some toasted coconut, if that’s your thing, or a handful of dried fruits if you’d like a sweeter version?
I feel like I’m giving away family secrets here …. Sorry Mum!
When my brother and I were little, if Mum and Dad were going out and we were having a babysitter come over (which wasn’t often I should add!) we’d always have an ‘easy meal’ … read; Fish fingers or Cheesey tomato pasta.
Cheesey Tomato pasta was my favourite …. a bowl of spaghetti with a tin of condensed tomato soup stirred through it and a handful of cheese sprinkled over the top so that it would melt as you stirred it …. kid heaven!
Well, these days, our family diet doesn’t look much like that but there are (many!) still times when an ‘easy meal’ is required …. “cheesey ‘mato pasta” as it has become known in our house, is a hands down winner. Inhaled every time. Full tummies and a happy, easy dinner time – there’s a lot to be said for that!!
Check out the end of the recipe for a modification to also use this as a great pizza sauce!
1 small butternut pumpkin (roughly 800g before peeling and seeding)
1 400g tin kidney beans or butter beans, drained
100ml coconut cream (we use the Aayam brand)
1 cup tomato passata
2 tbsp tomato paste
4 heaped tbsp nutritional yeast
1/2 tsp salt
Optional: 1 small zucchini
Pasta of choice
*You could swap out the coconut cream for creamed cheese or even regular dairy cream if your diet allows
Set a big pot of lightly salted water to boil for your pasta of choice (we use a GF variety). A legume based or a high protein pasta is a great addition here if you’re serving this as a meal on its own.
Peel and dice the pumpkin, then steam until soft – usually a few minutes in the microwave when this kind of dinner is required. If you have extra time (or some left over!), roasting the pumpkin adds a delicious depth of flavour too.
If you are adding a zucchini, dice and steam the it in the last couple of minutes with the pumpkin (you can peel it first if your little people are detectives for any green ‘bits’!)
Place the steamed veg and beans, with the tomato passata, into your blender/processor/bullet/thermal cooker together and blend until quite smooth (Start on speed 4 and work up to speed 6, for 10 seconds, then scrape down and repeat). Be very careful to follow safety instructions for blending hot ingredients. Add in the tomato paste, coconut cream, salt and nutritional yeast and blend again (speed 6, 10-15 seconds and repeat if necessary).
**If you are new to adding veg into your sauces, you could start out using less pumpkin and use more of your regular pasata or pasta sauce.
Cook and drain your pasta, then return to the saucepan and pour over the sauce.
Top with a little addition cheese of choice if you like.
Topped with Bio Cheese
Top with some crispy bacon if you wish – or fried mushrooms to keep it vegan.
This makes enough sauce for about 3 dinners, just freeze the leftovers.
You can use this for the sauce in pasta bakes or even double it for shared suppers (and Sunday School dinners in our case!). Add in extra veggies if you like, or throw in some left over bbq chook or sausages.
Enjoy 🙂
P.S. For a terrific and nutritious pizza sauce simply omit the coconut cream and passata (and don’t add the zucchini).
It marks the anniversary of the landing at Gallipoli of the Australian and New Zealand troops during WW1. It is a time when Australians give thanks for the sacrifices that our service men and women (including both of my beloved Granddads) have made for our country. We remember with the Dawn Service, the March and ANZAC biscuits.
The biscuits were originally sent in care packages to troops far off because they were cheap to make, didn’t contain any eggs and they kept well for a long time – after the end of the war they were sold as a fundraiser and today they are the only commercial good allowed to carry the name of ‘ANZAC’. They are delicious and thankfully, very easy to make into an allergy friendly version – plus, you can be very flexible with them based on what you have in your pantry.
See below the recipe for a *coeliac friendly version.
1 cups rolled oats
1 cup plain flour (GF flour, spelt, wheat – all work)
1/4 cup desiccated coconut
1/4 cup of almond meal (or seed meal)**
5 tbsp coconut sugar (or other sugar)
125g melted butter or oil (coconut oil, olive oil and melted vegan butter all work well, as does a nut oil if it suits you)
50g golden syrup/honey/maple syrup
1 tsp bicarb soda
2 tbsp boiling water.
*For a Coeliac friendly version: you can replace the oats with a mix of rolled quinoa and puffed rice.
**to omit the almond/seed meal, replace it with an extra 1/4 cup coconut.
Mix together the dry ingredients, except the bicarb soda, in a large bowl. (Speed 4, 10 seconds). Then set aside.
In a medium sized saucepan (or microwave), melt together the oi/butter and syrup. (Speed 2, 100C for approx 2 mins)
In a separate bowl, mix together the bicarb and boiling water and then add to the butter/syrup mix. It will froth up to about double the volume.
Add the wet mix to the dry mix and combine well (Speed 4, 8 seconds, scrape down and repeat).
On a greased baking tray place heaped teaspoon-fulls of the mixture and flatten down slightly. They need to have quite a bit of space in between.
Cook in a preheated oven at 170C for about 15-20 mins or until golden brown.
When you remove them from the oven they will be quite soft. They will harden as they cool. Leave them on the tray for 10 minutes before transferring to a wire rack to finish cooling.
These have extra oats replacing the coconut and almond meal – based on what was in my pantry!
These ones have puffed rice replacing the coconut.
Makes about 18 biscuits and they keep well in an air tight container for a couple of weeks … but they never last that long in my house!
A double batch of these bikkies is a great solution for Church suppers or bulking up for lunchboxes.
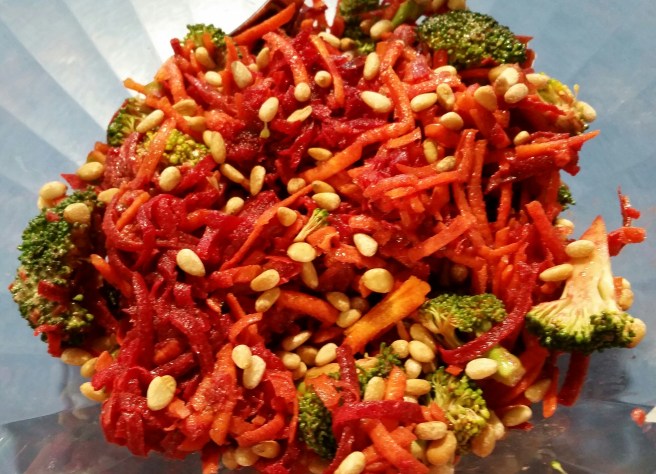
As well as the common allergies we have in our home, we also have a few more unusual ones. Raw cabbage is one of those.
Last time my biggest boy came across raw cabbage it took 4 days for the swelling in his lips and face to go down. So …. add in the usual dressings and that’s coleslaw out for us then!!
This is our delicious alternative – loaded with veggies, has all the lovely fresh crunch of standard coleslaw and an awesome creamy, yet healthy dressing!
OPTIONAL: a good handful of toasted pine nuts/walnuts
Peel the beetroot and then grate it and the carrots – food processor is easiest. Or you can do them julienne style with a mandolin.
Chop the broccoli into bite sized pieces.
Place all of the veg into a large bowl, add in the avocado dressing and toss through until well coated.
Top with a sprinkling of pine nuts or walnuts if you are able (toast them on a baking tray under the grill for just a few minutes – watch them carefully and toss part way through to get even browning).
Serve as a side salad at a bbq, with the protein at your main meal, or even top it with a tin of salmon as a delicious lunch.
My little miss loves her oat milk. We have found a great brand that is unsweetened and free from weird additives …. my only problem is the price. $3/L or more …. eek!!!!! Works out to over $430 a year!
Not helpful for this tight budget. So, for this month we are leaving those 12L on the shelf and making them ourselves.
So easy and so cheap!! You do need a good high powered processor and a nut milk bag or a cheese cloth for straining.
Place oats in a bowl and pour over the boiling water. Allow to sit for about 15 mins before draining and rinsing gently. ** You can skip this step if you are in a hurry, but you might find that your milk is a little slimy in texture.
Place soaked and drained oats and all remaining ingredients into your blender/processor and blend on high speed until very smooth. (Start on speed 5, working up to speed 7 for about 20 seconds).
Strain the mix through the milk bag into your milk bottle/container and use your hands to squeeze out any excess.
You can discard the remaining pulp, or to get the very most of your money and your food, spread it out on an oven tray and dry it out on a low heat in the oven then use it in baking (works like almond meal).
Just like the life of the store bought milk, this will store in the fridge for 3-4 days – shake well before use.
lIt is creamier and thicker than the store bought variety so you may want to thin it out by adding a little extra water if that suits your taste preference.